Today we're dismembering baby dolls, my friends, but it's all in the name of creepy/cute Halloween crafts. John tells me this time of year brings out my "weird and morbid" side, so let me apologize now for just HOW amusing I find these DIYs. I'll try to keep my shrill cackling to a minimum.
NOW. Let me show you how to take these Dollar Tree baby dolls:

... and turn them into THREE different Halloween crafts, using 3 different parts of the same dolls, in 3 varying degrees of "oh no you DID NOT" creepitude. Whether you like cutesy, creepy, or white-knuckled terror, I promise this post has something for everyone!
To ease you in, let's start with the cutest craft:
To ease you in, let's start with the cutest craft:
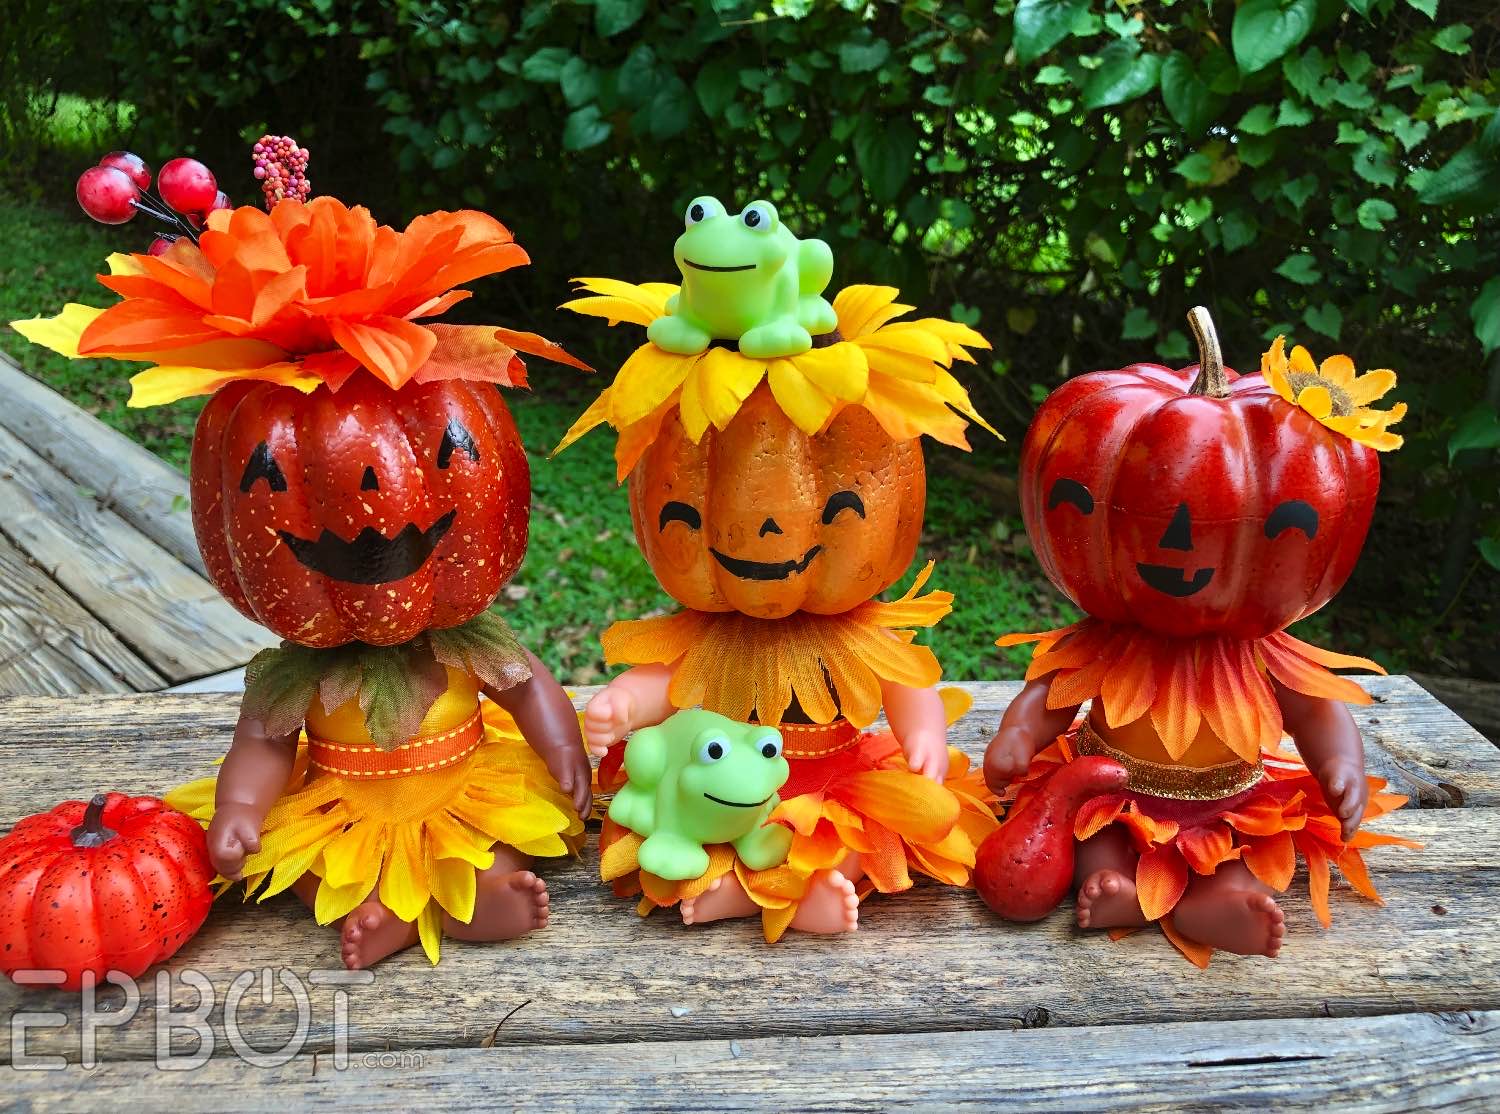
My pumpkin head babies!
When I was working on these I did a Very Scientific Poll and discovered *most* of you agree they're more cute than creepy - but I do like that they have that edge, to keep things interesting:

You can blame Over The Garden Wall for this inspiration, or more accurately, Rachel Maksy and her Over The Garden Wall-inspired pumpkin lady, which John just now walked in, saw on my screen, and demanded I remove, bahaha.
Here, I'll make the photo small, John, maybe that will help:
Here, I'll make the photo small, John, maybe that will help:

::squints:: Orrrrrr not.
Anyhoo, my Pumpkin Babies are easy-peasy and fun to make. Everything you need is at Dollar Tree: the doll itself, a foam pumpkin, 2 or 3 silk flowers, and a little decorative ribbon for the waistband:

Anyhoo, my Pumpkin Babies are easy-peasy and fun to make. Everything you need is at Dollar Tree: the doll itself, a foam pumpkin, 2 or 3 silk flowers, and a little decorative ribbon for the waistband:

That's about $3 per baby, a frighteningly good deal.
First, pop off the baby's head. This is best done in front of friend during casual conversation for maximum impact. (Sorry, Arielle.)
Be sure to set the baby head aside... for later. ::eyebrow waggle::
First, pop off the baby's head. This is best done in front of friend during casual conversation for maximum impact. (Sorry, Arielle.)
Be sure to set the baby head aside... for later. ::eyebrow waggle::

Now use a craft blade to cut off the neck stump.
Take apart a silk flower and fold the petals in half, like so:
Take apart a silk flower and fold the petals in half, like so:

Hot glue the folded petals around the waist to form a skirt. I started with one over each hip:

Then one in the front and back:

I trimmed the top section into a half circle to fit the waist better.
This doll has a fluorescent yellow torso, so I covered it with a sheer orange ribbon to tone the color down. For another doll I painted the torso, which you might find easier.
This doll has a fluorescent yellow torso, so I covered it with a sheer orange ribbon to tone the color down. For another doll I painted the torso, which you might find easier.

Next glue a scrap of ribbon around the waist to make a belt, and add one more flower piece over the neck stump to make a cute collar:

Isn't she sweet?
At this point you COULD add another flower like a hat to the original baby head, and you'd have a little flower fairy:

... but that's boring.
::chanting:: THIS IS HALLOWEEN THIS IS HALLOWEEN HALLOWEEN HALLOWEEEEEN!
::chanting:: THIS IS HALLOWEEN THIS IS HALLOWEEN HALLOWEEN HALLOWEEEEEN!
So instead, draw a cute face on your foam pumpkin with a Sharpie, and hot glue THAT on:

I experimented quite a bit with the face design, because this thing can get alarming pretty fast. I wasn't aiming for scary, though, so I made all my eyes smiley and Kawaii.
Some of Dollar Tree's foam pumpkins have flowers already glued on top, which look like hats:

(The frogs are also DT, they came in a pack of bath toys, I think?)
I tried a more traditional pumpkin face with my final baby, and you can see how quickly that starts to look a bit... stabby:

Then one of you made this suggestion in my Story, and, HOO BOY:

I like it.
Why does this make me laugh like Yzma kitty clutching a potion bottle? What is wrong with me? (And is that... MY voice?)
Why does this make me laugh like Yzma kitty clutching a potion bottle? What is wrong with me? (And is that... MY voice?)
Which brings me to Craft #2, where we'll be using the baby doll's eyes. Yes, just the eyes. So you're gonna need to pop those suckers out, which is no easy feat. At least, not if you want to salvage the eye sockets & head. Which we do.
The best eye-removing tool I've found is a seam ripper. Also sometimes you have to pause mid-sentence to really cherish a moment of blog-writing, so hang on a sec. Mmmmm.
Ok. Moment cherished.
As I was saying, the seam ripper is ideal because it's both pointy AND can flex around the eyeball to cut through the soft plastic housing inside the head. Full disclosure, though: after fishing out 4 sets of eyes my seam ripper snapped in two, perhaps as a form of protest.
(You're weak, seam ripper. WEAK!)
I'm not showing you a process picture of my gouging out any eyes, mostly because I forgot to take one, but also because that might be questionable without context.
("Questionable Without Context" is my new favorite band name.)
("Questionable Without Context" is my new favorite band name.)
Once you have a shiny new set of eyeballs at your disposal, glue those baby blues on a mini pumpkin!

Add a face with a Sharpie, and that's it, that's the craft. But OH SO CUTE, right?
Dollar Tree sells these bright freckly pumpkins as a three pack, so you get all three for a dollar. You can use a dry-erase marker to test out your face first (it wipes right off), then a Sharpie to make it permanent.
Here's what I did with my first pumpkin three-pack:

In fact there's a bonus craft for you: Turkey Pumpkin!

I used DT leaves for the tail and a cut up flower for the neck feathers.
So easy, yet so ridiculous. I want to make a bunch to use as place card
holders on the off chance we ever host a holiday meal again. Maybe with
a skewer in the back holding up the name card?
If you want to make your eyeballs go further, you could always make a few cyclops pumpkins:

Pro Tip: It's easiest to draw the black circle outline BEFORE you glue the eye on.
Here's a peek at my buffet with all three of these cuties:
Here's a peek at my buffet with all three of these cuties:

And the rest of the display:


I've saved the creepiest - and arguably the funniest/coolest - craft for last, so if creepy dolls keep you awake at night, CLICK AWAY WHILE YOU STILL CAN.
::looks around::
Y'all still here? You good?
Sweet.
BEHOLD!!

Baby Clown Night Light!
Keep scrolling to see this funny bunny in action.
This craft couldn't be easier: cut a few slits around the doll head opening & pop it over an LED nightlight, the kind that looks like this:

Sweet.
BEHOLD!!

Baby Clown Night Light!
Keep scrolling to see this funny bunny in action.
This craft couldn't be easier: cut a few slits around the doll head opening & pop it over an LED nightlight, the kind that looks like this:

(I can't remember if I got this at Dollar Tree or Walmart, but they're not expensive.)
Do NOT use a nightlight with an actual lightbulb. That could overheat, and burn down your house, and then the baby head will somehow mysteriously survive and BOOM, you just created a cursed object.
Nobody wants that.
Pop the head on the nightlight, and each night you'll be greeted by this warm and cheery visage:
Pop the head on the nightlight, and each night you'll be greeted by this warm and cheery visage:

I do like the classic simplicity of this, but naturally I had to add MORE.
So I grabbed this pack of Dollar Tree witch hats:

... removed all the felt and pipe cleaners, clipped the stick, and painted on some stripes.
Not gonna lie, painting this plastic hat was the hardest part of ANY of today's crafts, and nearly broke me. I finally used Mod Podge as a primer to get the craft paint to stick, then added many many coats of orange and white chalk paint. Finally I glued the pipe cleaner back on the edge for trim & at the tip of the hat for a pom pom.
Posting this in my Story - and then being buried in the avalanche of alternating "NOPE" gifs and laughing heart eyes - made my whole week. I haven't laughed so much in ages, y'all.

Then this happened:

... and many of you DEMANDED a neck ruff.
So I found some white flowers in my stash to take apart, and voila! A neck ruff that doesn't block the sensor:
So I found some white flowers in my stash to take apart, and voila! A neck ruff that doesn't block the sensor:


While photographing this I discovered my shadow was enough to trigger the light sensor, AND LOOK HOW COOL:

Eeeee! Love it love it love it.
Amazingly John *also* thinks this is cool, despite always being freaked out by creepy dolls in the past. Maybe because this one doesn't have legs to get to him? That or my gleefully "weird and morbid side" is finally rubbing off.
There you have it, gang, one baby doll, three crafts. I can only hope this sparks a whole host of new doll dismemberment out there. As always tag me in your pics if you try these, I wanna see!
And now, your moment of Zen:

******
Want MORE crafts? Then click over to my Tutorials Page, where I have over 150 projects like these for you to browse:
Want MORE crafts? Then click over to my Tutorials Page, where I have over 150 projects like these for you to browse:


I feel like that last photo should be a high res phone wallpaper
ReplyDeleteThis is a riot, since I just spent last week disassembling these exact baby dolls. I did the latest GISH hunt and had created a coat of arms from DT baby doll arms and fashion doll arms. The fashion dolls got their arms back and are being donated, but the baby dolls were destined for even more greatness. I used a very sharp xacto knife with a very pointed blade to take out those darling eyes from the heads. Same blade used to help get off the legs for a different craft project and the arms for yet another. I now have a little container full of baby eyes and am quite inspired by your ideas. The heads will have the guts from battery operated votives added to the bases to give a portable effect like the one you are getting with the night lights. You can get more mileage out of the batteries by using the programmable ones. Once you remove the plastic candle from the exterior the innards of those votives are quite handy! Taking apart those dolls reminded me so much of breaking down a chicken that I cackled gleefully during the entire process. Going to experiment with some crackle paint for an aged porcelain look.
ReplyDelete"Coat of arms" oh my sweet Stay Puft, I applaud your punnery!! You've made me want to go take apart some tea lights now, that's a fantastic idea! I wonder if one could install the on/off switch on the back of the head? Hmmmm....
DeleteI also thought about turning the heads into "stone" succulent planters, looks like I'm on the same page as your porcelain idea. We must swap photos at some point, I'd love to see!
I made the same one for GISH! I used doll arms for the collar and pool noodles for the back of the coat. of. ARMS!
Delete"Now...cut off the neck stump" is a phrase that probably shouldn't exist. I cackled through this entire post, thank you.
ReplyDeleteI was a little surprised we didn't get any sidebar editorials on "neck stump".
DeleteI'm fine with creepy dolls and severed heads but I could have used a heads up for the CLOWN aspect! 😅😅😅 (this are all great crafts, though; I love them a lot)
ReplyDeleteWhatever is "wrong with you" is also wrong with me, because I howled with laughter the whole way through the post :) Thank you, I so needed this!
ReplyDeleteI am SO GLAD to see these were inspired by Rachel Maksy because I was for sure thinking of her when I first saw the craft. Also, just love that you do know of her cause she's absolutely my favorite to watch on youtube right now. I'm excited every Friday just knowing it's new video time.
ReplyDeleteAlso looking forward to that Audrey II tutorial because I've gotten flowers from Target's Halloween section last year and this year and am planning to make a huge arrangement of creepy flowers.
I don't do Halloween and am not fond of creepy. But I was chuckling through the whole post and outright howling with laughter at the pumpkin head baby with the eyes attached! Gosh, that looks so ridiculously funny/creepy!
ReplyDeleteI love the potion bottle! What is the story on that?
ReplyDeleteThat's an old ThinkGeek product - gifted by our friend Sharyn - and one of my favorite things that stays out year-round! It's resin-filled glass with a color-changing light underneath. I switch it up each season by adding a different necklace or charm on top. I also added the vintage metal stand.
DeleteI'm pretty sure your turkey thing is actually a baby Fire Gang thing from Labyrinth.
ReplyDeleteAh, I see Jen is channeling her inner “Sid from Toy Story” today. XD
ReplyDeleteI collect and sometimes customize American Girl dolls..to remove *their* eyes, you take the head off and fill it with almost-boiling water so the vinyl gets soft enough that you can pop the eyes right out of their sockets. And yes, doing that makes me feel like Sid too.
I love you! I'm cry laughing over here and trying to figure out how to get these pumpkin heads on a wreath!
ReplyDeleteI'm sorry, that first pumpkin with baby doll eyes made me laugh all the way through the terrifying clown head. It don't get no respect....
ReplyDeleteI like what you did there, but all my mind saw was cheap doll eyes. Don't know why I need doll eyes, but now I know how to get them really cheap. (and I can guarantee you that I will have a need for doll eyes at some point)
ReplyDeleteGlorious. Absolutely. Glorious.
ReplyDeleteMy sister, many moons ago, was working at an opera house costume shop. When I called her, she was taking 12 baby dolls apart to sew each body part on a 20' cape for Mother Earth. Gotta love theater but not clowns!
ReplyDeleteI love it and am definitely going to make the pumpkins with the doll eyes. :)
ReplyDeleteI read an urban fantasy series recently where there's a house that has dolls that come to life and attack intruders as part of it's magical defense system. They are very creepy. I thought of you.
ReplyDeleteSo much to love about this and to discuss in therapy.
ReplyDeleteI need taht Audrey 2 tutorial, please and thank you!