Friday, October 29, 2021

Our Beetlejuice Halloween: The Big Build Update!

 Y'all.

It's almost time for Beetlejuice Halloween!!

EEEEEEEEEEEE

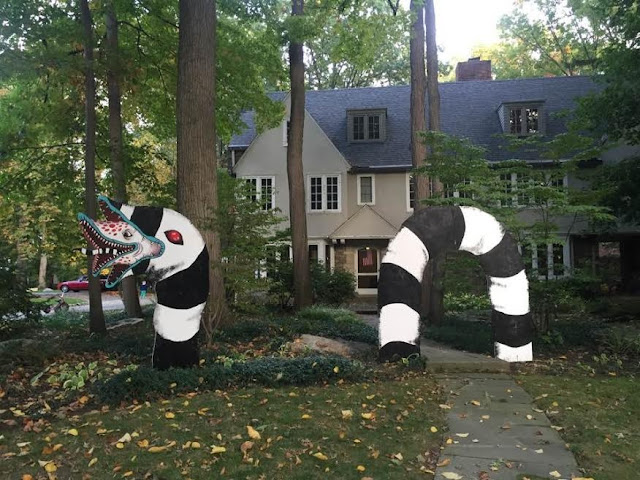
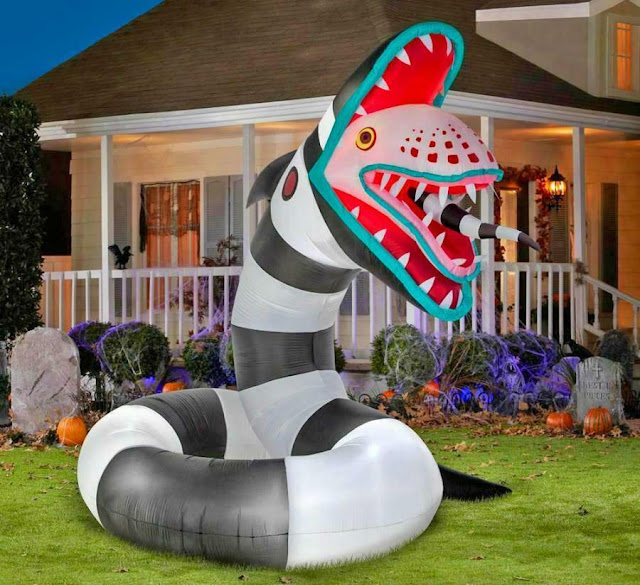
So last week I showed you the biggest part of our project this year: the inflatable Sandworm arches and candy slide. Since then John and I've been busy crafting more movie-related props and silliness, and WOW do I have a lot to show you. Just... so much.

I should mention if you've never seen Beetlejuice most of this won't make sense. In that case I recommend stopping here, and, y'know, going to watch Beetlejuice.

But for the rest of you, iiiit's.... TIME TO START THE SHOW!

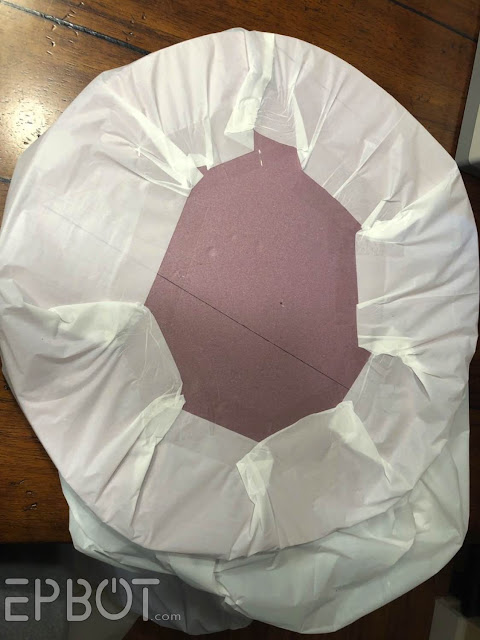
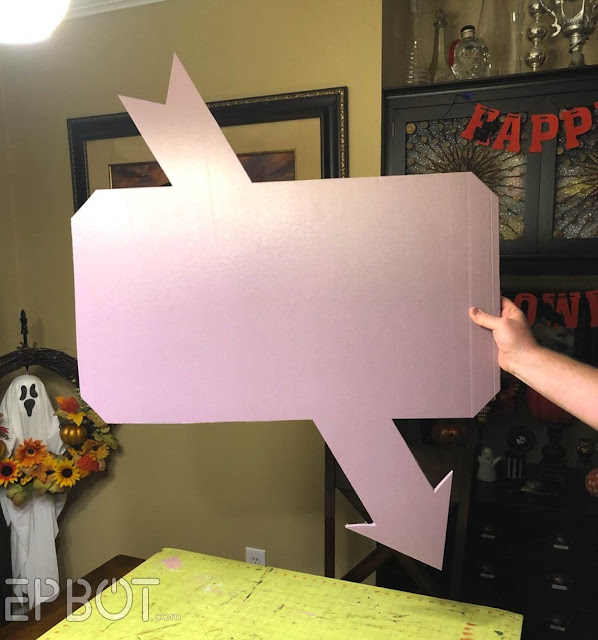
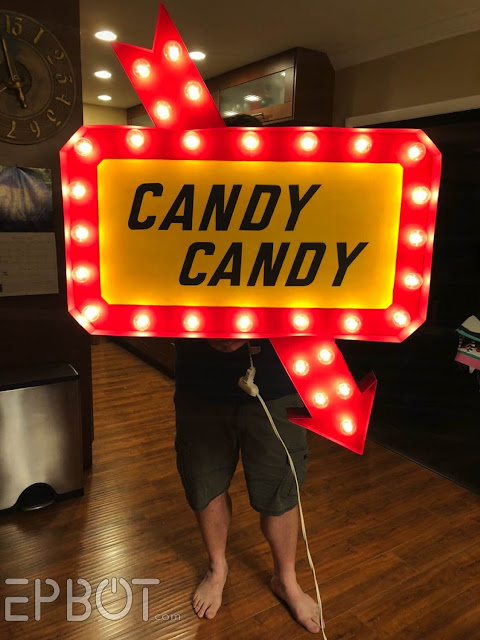
Starting with the iconic Beetlejuice marquee sign. John cut the shape from pink insulation foam:


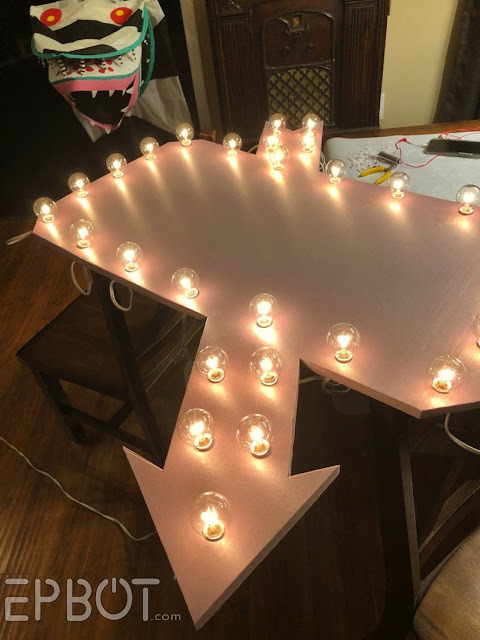
Then installed patio lights from Amazon around the edge:

(The lights he ordered were way too long, so he cut the strand in half - which actually worked, woot woot!)

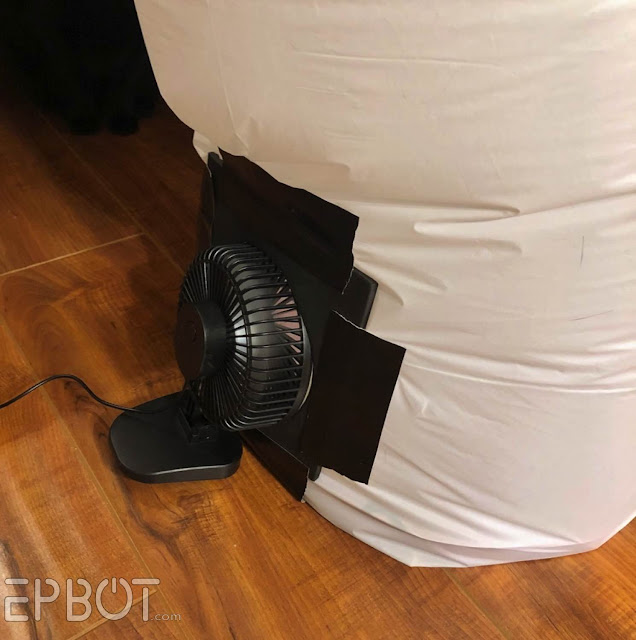
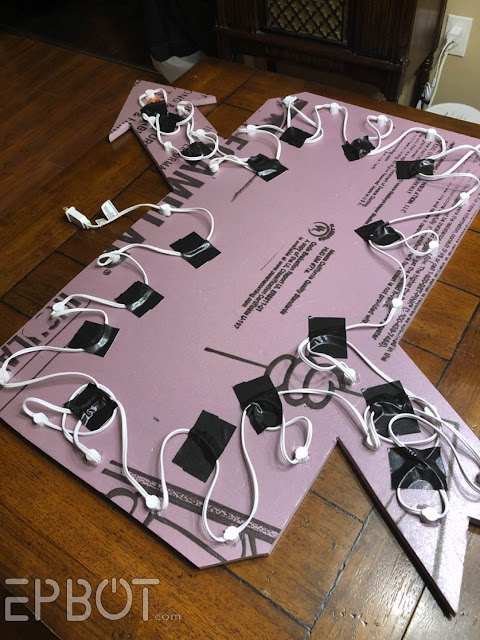
Here's what the back looks like, with all the wires duct-taped down:


We weren't going to have our sign pointing at Beetlejuice, though, so we changed the wording:


 (I may tell the kids to chant "candy" three times to get their treats.)

We cut the words with our Cricut, then used strips of red poster board for the raised edges.

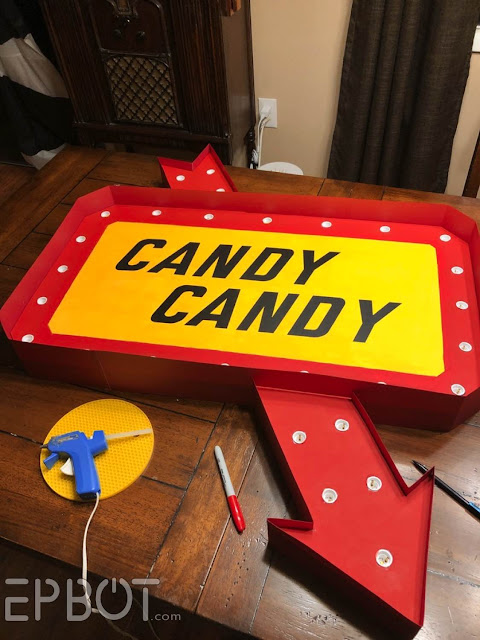
This turned out SO STINKIN' GOOD, which is annoying because I keep saying we're throwing all this away after Halloween. You know, to save on storage space. Grrr.

I'm not the only one thinking John should be wearing fishnet stockings here, right?


:D

Last step was adding a stand at just the right height so the arrow points to the sand worm's mouth:

Tuesday, October 26, 2021

A Haunted House Vending Machine, "Golden Ghouls", & Fish Heads, Fish Heads, Roly-Poly Fish Heads

I joined a Halloween Decorations group on Facebook last month, and the folks over there are giving me LIFE, laughs, and tons of inspiration:


Goals for next year, John? (Look at the projected Slimer in the window!)


This Hogwarts castle is so incredible I thought it was Photoshop 'til I saw the build photos:


See the house behind it? That's how big this thing is!

And it lights up?!


If you're as instantly obsessed as I am, good news: you can find all the details (there are so many more!) and geek out over the build photos on their Facebook page, Diagon Alley Austin Halloween House.

John's going to have to stage an intervention, because I am getting IDEAS.


They're not all enormous and epic builds, though; sometimes we get delightfully silly fandom nods, like The Golden Ghouls:


That's a cheesecake in the middle, covered with plastic spiders. :D

The outfits are spot-on, right?


::snerk::

Go see all the detail pics on Hill Wk's original post.

*****

In the same spooky spirit I must show you this Dr. Demento hilarity posted by Michaela over on Weird Secondhand Finds

Friday, October 22, 2021

IT'S SHOWTIME: Our Halloween 2021 Theme Reveal!

John and I are waiting another year to bring back Ghostbusters for Halloween, since the new movie won't be out 'til November, and we were really banking on it to help this year's kids recognize the theme. (Seriously, the amount of kids/teens who had no idea who Stay Puft was crushed my soul.)

So instead we decided on another 80s paranormal classic that absolutely none of the kids in our area will recognize: Beetlejuice.

I already had Beetlejuice on the brain thanks to Universal's new haunted house and all the new Beetlejuice merch at Spirit: Halloween, but what really sealed the deal was this photo:


HEART EYES. This gorgeous hand-painted Sandworm is/was in Cleveland, as featured in this 2016 news article. I fell in love with the arch especially, but the idea of storing something so large - even flat - was a deal breaker.

So naturally, I wondered if we could do what we did with Stay Puft, and make the worm arch inflatable.

"But, Jen," you're probably thinking, "they already make inflatable sandworms! Look! You can buy this one and be done with it!


You are, of course, technically correct. However.

1) That one costs hundreds of dollars,
2) you can't walk under it, and
3) where's the fun in buying something when you can spend dozens of hours and every ounce of frustration trying to make it yourself?

:D

We turned again to our trusty Dollar Tree tablecloths:


These things are tissue thin, but sew together like a champ. We used 4 to make our first arch: one per side tube, then two to form the arch itself.


For the bases we cut circles from pink foam insulation and taped the tablecloth tubes underneath them:


This gives the arch a flat base that we can later stake into the ground. (You could also use Dollar Tree foam board if you don't have pink foam.)

To inflate our arches I bought these USB fans from Amazon for $6 each. (The price keeps fluctuating between $6 and $10, I'm waiting for it to go back down to buy a few more as back-ups.) They're USB so you'll need a power adapter to plug them in, but happily Dollar Tree has those for $1. Score!


John cut circles into thick foam squares which we duct-taped to the side of each arch to form a little docking station. The foam is stretchy enough that we can pressure-fit the fan in place. We've popped the fans in and out of these little airlocks half a dozen times already, they hold and work great.

Arch #1 turned out.... a little big:

Tuesday, October 19, 2021

This Magical Photo Series Of Black Girls Made My Week 1000% Better


Remember Creative Soul Photography's Black Princess Series from last year? Dang, was that amazing. Go click over if you missed it.

Kahran & Regis Bethencourt are the visionaries behind Creative Soul, and this month the Atlanta-based duo is back with more from their new series, "Afro Art." Seeking to "empower children of color to embrace their natural curls and the skin that they’re in," Kahran & Regis transform young girls into warriors, fae creatures, royalty, and more, and I dare you to pick less than half a dozen favorites:


Seriously, hold on to your hearts. This is gonna be gooood.


::swoon::


I love that they don't have the girls smile. You get hints of a softness or amusement here and there, but mostly there are just steady, powerful gazes.

Or this!

Friday, October 15, 2021

Pumpkin Pooh, Batty Plants, & A Ghostly Wreath Re-Do

K, last spooky craft roundup! LET'S DO THIS.

You know the plastic push-in faces for pumpkins? Dollar Tree has 4 or 5 kits you can mix and match, they basically turn your pumpkin into a Mr. Potato Head:


WELL, I found another excellent use for them:


Giving our house plants more character.

Our topiary has never looked prettier:


Each piece has a little plastic spike on the back, but for the smaller plant I hot-glued them to bamboo skewers.

These kits come with a bunch of different accessories, so I also combined the wings from this pack:


...with that DT foam pumpkin, which I spray-painted black:

Wednesday, October 13, 2021

Dollar Tree DIY: Spooky Skull Bouquet

Continuing my skulls-and-flowers theme, here's a vintage gothic beauty straight out of Christine McConnell's house, or maybe the Tower of Terror. I bet it'd work year-round for some of you, or at least make a spooky chic centerpiece for a Halloween party.

My inspiration came from this photo floating all over Pinterest, made by floral designer Kim Taylor:


I decided to try a Dollar Tree version, so at our local store I grabbed this plastic skull and ceramic stand:


...plus some silk roses, moss, and - the secret ingredient - a foam football. That football makes all the difference, trust me. I'll show you how in a sec.

First the fun part: re-painting the skull. I started with a base coat of chalk paint, then aged it with Waverly antique wax. (Don't let the "wax" part scare you; it's water-based and goes on just like paint.)


The most important thing is to get rid of the shiny plastic sheen, so make sure you use matte paints. See how it looks more like bone or ceramic after painting?


Originally I thought I'd just cut a hole in the skull and fill it with flowers, but y'all, that doesn't work. There's nothing in the skull to hold the flowers in place, and the hole would have to be huge. I debated filling the skull with Great Stuff expanding foam, but since I needed the flowers to sit really high, I worried the DT flower stems wouldn't be long enough.

Long story short, learn from my trial and error, gang: hot glue one third of a foam football to the top of your skull, like this:

Monday, October 11, 2021

Easy & Elegant Skull Flowers, Plus A Bonus Candy Cauldron

HEY. You.

Is your style "spooky chic"? Do you aspire to a Morticia Addams level of elegance? Do you like easy crafts that look expensive? How about skulls and flowers?

Ahhhh.

Then do I have the DIY for you:


Skull flowers!

Sure, OK, yes, skulls in flowers have been done to death - pun intended. But mine are a little more subtle, a little more sweet. I even think they're kinda cute! Imagine one leaning over from a nearby boo-quet and whispering in your ear, "Allo, mate!" TOTES ADORBZ, right?

No?

What if it's purple?


See, now this one's singing "I Feel Pretty" in a lil' Muppet voice. Right? Can't you hear it?

(I told you, John, I feel fine. Why do you ask? And where did your nose go?)

The great thing about these lil' babies is you can make as few or as many as you like. A single skull flower in a bud vase is stunning, or mix a bunch into a larger bouquet to make your guests do a double-take.

All you need are fake flowers, hot glue, paint, and these plastic skulls from Dollar Tree:


I'm using the larger ones on the right, but the smaller Styrofoam ones work, too.

Now sure, you could just plop a skull as-is into a flower, but I'm telling you, it won't look as cool. So don't do that.


Meh.

See, the skulls look too plastic-y, and they're too oval-shaped to fit the round center of most flowers.

Solution? Knock their jaws off! With a craft blade. Then give them a quick coat of white paint:

Friday, October 8, 2021

This Is For Posterity, So, I'll Be Honest

You may have noticed I'm on a project kick lately: all I want to do is build stuff and browse the internet for more stuff to build, ha. If you have anxiety or depression, ADHD, or any other flavor of mental health struggle, then you probably know the power of a new obsession. It's new! It's distracting! And it's something better to focus on than all... ::gestures vaguely:: ... this!

Plus, in my case, it involves FUN HALLOWEEN STUFF:


Oooh, I want to make these. So cute! Plus fake candy apples are an appropriate segue to my next topic, Complaining About Food.

I've had a series of unfortunate food events the last few weeks, and spent too many nights - including last night - pacing the house because it hurt too much to sit down. I pace and pace, often 'til 8am or later, only to collapse and sleep through most of the next day, then wake up to migraines, anxiety, and allergy attacks. If you'd told me ten years ago that something as harmless as cherries could destroy my physical and mental health for 3-5 days, I'd've scoffed. SCOFFED, I say. ... Yet here we are.

I've been eating Low FODMAP for 3 years now, so you'd think I'd have it down, but I keep messing up, dangit. It's so frustrating! I forget I can't have peaches and try a new jelly, or I don't check the ketchup label for onion powder, or sometimes I'll eat something that SHOULD be safe, but still hits me like a semi. Those are the worst; why did this tofu fried rice John's made a dozen times suddenly puff me up like Violet Beauregarde? What did I miss? Is there something else I can't eat now? Whyyyyyy.

Anyhoo, when I finally come out of the pain & insomnia haze, I'm 3 days behind and utterly exhausted. All I want to do is sleep and make cute Halloween crafts.

Exhibit A:

I can stop going to Dollar Tree any time, y'all. My craft supply hoard is completely under control. Yep, yep, yep.

Worse, I keep accidentally starting the cycle over again, and each time I feel a little more stupid. When I get that first ache and realize in a panic that I've messed up again, and have at least 8 hours of pain and pacing ahead - but can't take pain meds, because they cause constipation which makes everything worse - I crumple. How do y'all with chronic pain do it? I want to be nonchalent and stoic and write witty jokes about how life is pain and anyone who says differently is selling something, but truth is when my gut is full of bowling balls and knives I shut down. I have a strict regiment of isolation, pacing, Will & Grace re-runs, and rocking in place in front of a jigsaw puzzle. John remarked the other day that I rock in place all the time now, so hey, at least I picked up a new habit that'll make people steer clear in public.

When the pain does finally stop, next I feel awful for losing all that time. Whole days, poof, gone. With nothing to show for it! And I need things to show for it, y'all. I base an unhealthy amount of my self-worth on productivity. So I swap a physical health crisis for a mental health one. 

Any of this sound familiar? Because this can't be just me, right? I know some of you deal with all this and more. So tell me, how do you cope? What do you tell yourself, what do you do, to make it better?

Better question: What's something you treat yourself to on your worst days? Bonus points if it's Low FODMAP. :D

And to share a little more sweet with all this sour, here are a few more Halloween goodies making me smile:

Tuesday, October 5, 2021

Let's Make Audrey II, Two Ways!

I have a growing list of spooky crafts for y'all this month, but I thought we'd start with the most requested after my sneak peek last week: Audrey II! Even if you're not a Little Shop of Horrors fan, everybody loves a monster plant with 'uge pointy teeth, right?

Run awaaaaay

John made this Autumn beauty first, then a week later I decided to try making my own, which ended up a lot more cartoony and silly-looking:


Like me!

:D

You know what they say, like mother, like monster-plant-daughter.

Both Audreys are made from Dollar Tree foam footballs, so let me walk you through the basics of how to make your own, plus I'll show you the different ways John and I made the lips, teeth, and greenery.


Step 1: The Body

 John cut his foam football in half, then cored out the centers. He cut each half at an angle and glued them back together, like so:


This method works great and looks fantastic, so the only real drawback is it takes time. I'm impatient, so for my version I took a shortcut and sliced out a wedge for the mouth, like this:


 I widened the wedge until it was big enough to fit in my teeth, but didn't bother coring out the middle. Since I used bigger teeth you can't see inside the mouth anyway, so that saves a step.


Step 2: The Lips

John used hot glue for his plant's lips. He doesn't believe in process photos (sigh), but here's a close-up of the finished product:

Friday, October 1, 2021

Inner Space: Watch Us Turn A Ceiling Nook Into A Mind-Bending Mini Galaxy

Hiya, happy Friday night! Our cat Suki was sick this week, so I lost a couple days staying up all night with her & being generally stressed and sad. Happily after extensive vet visits (and bills) she's on the mend, and only you fellow pet owners will understand my joy when I tell you, "she pooped today!!"


So with my cat poopin' and life looking up, let me show you an extremely cool project John and I finished a few weeks ago. It's also extremely hard to photograph, because it involves mirrors, lights, forced perspective, and an awkward space, but I have video coming that will help you see the full effect in all its glory.

First let's look at this awkward space:


Our friend Tim has an amazing new house that he and his folks have fully customized so he can best get around in his wheelchair. To that end, they knocked out a wall between his bedroom and study, leaving the space you see here with the ladder. This used to be a closet, and the ceiling inside is as high as the ceiling outside, leaving this narrow high niche between the two rooms:


(Remember that plug up there, it'll come up later.) 

The first time I saw this niche I told Tim it was PERFECT for hanging some of his Star Trek ship models. (Tim and I've been friends since the 7th grade, where we first bonded over our mutual love of Star Trek books.) Tim's learned some blind trust in my zany ideas over the years, so he was immediately onboard.

Our first step was essential but makes for boring photos: electrical work. John ran a wire from an existing wall outlet up to the top of the niche, where he installed a plug. Then he installed a wall switch where Tim could reach it, just below this picture:


We also painted the entire ceiling nook flat black.

While John did that, I was taping off 200 LEDs with little slivers of painters tape, which was super tedious and took a good hour and a half. Then I took the lights outside and spray painted the wires flat black:


These lights were tricky to find, but they're perfect for a galaxy display: cool white, 3 levels of dimmability, and a remote control that lets you set them to a twinkle for extra pizazz. (Yes, yes, I know stars don't twinkle in space. Let me have my fun.)  

After painting I took the lights home to begin the tedious process of removing the tape:


Once that was done, LOOK HOW COOL: