I originally shared this in my Instagram Story, the same night it occurred back during Dragon Con. I've had a few people request I share it here, though, plus I wanted to add an update, so here goes:
Let me add that all 3 of these cosplayers missed the big photoshoot they were there for, and without a second's thought or hesitation. The professor knew Dana a little from earlier shoots, and when she told him to go, to not miss out, he brushed off her protests with a smile and an assurance that her health was the only important thing.
When John and I left the group we assumed the crisis was over, when in fact it would take them all anothertwo hours (!!) to transport McGonagall to her room just one sky-bridge away. There were no wheelchairs available (something I'll definitely be mentioning to Dragon Con) so the three had to carefully walk the poor lady through the suffocating crowds - pausing often for her to sit and rest - to get just one hotel over and up to her room. (In the hotel's defense, we did have paramedics quickly on hand; you can see them in my video. Just no wheelchairs.)
On the bright side, I'm told that by the next morning the professor was right as rain.
Before they parted ways that night, the trio went back to the area of their missed photoshoot and took this for the professor:
I hope she keeps it as a happy reminder of friends and cosplay family. :)
These three make me proud to be a geek, you guys. They're the perfect examples of the kindness and kinship I feel every time I'm at a con, and I hope you'll go show them some love:
Joker is Dana Elliott, Superman is Jason Spencer, and Dr. Poison is Claudia Martinez. (Links to their Instagram accounts.) They have no idea I'm doing this, but I wanted to shine a little light on their kindness. Thanks for stepping up, you three!
MegaCon Tampa Bay is the perfect "first convention" con here in central Florida; it's roughly half
the size of MegaCon Orlando, not too big, not too small. A good range of celebrities, huge vendor room, family-friendly, lots of cosplay, AND
it's held in my favorite convention center. John and I only had a few hours
there each day last weekend, but it has a lovely relaxed vibe with just enough room for
filming.
Oh that's right, I hope you're not tired of cosplay videos yet, gang, because we tried a couple new things this time and turned out so fun. EEEEEE!
So turn up your volume and get ready to grin - and maybe chair dance a little. If you can't turn up your sound then come back later to watch this; the music is ESSENTIAL, trust me. (Plus I'm addicted to this song now. Give it a chance, it's seriously so good.)
The intro makes me laugh every time; I love how he starts stab-dancing after the lady in pink, then kind of gives up at the end, lol.
I hope it shows that we went to the con with this song already in mind, plus a whole list of costumes to find to match up to certain words. It was like cosplay bingo, and even though we didn't find everything we hoped for, it added another awesome dimension to our weekend. (How many words & costume match-ups did you find? Some are pretty subtle.)
[UPDATE: For those asking, the song is Mighty and High by Can't Stop Won't Stop.]
John and I are still new at this, but I gotta tell you, I had a blast running around playing director. Lining up shots, suggesting poses, asking people to do or say certain things - and then being delighted when they busted out with something unexpected - it all brought another degree of joy to a thing I already love. The only downside was I had no time to take regular photos, so I'm afraid this video and a few phone shots are all you get.
Also the 3 good fairies in the video at 2:33 are fellow FOE (and super sweet!) Check the video description on YouTube for more cosplayer credits: I've added all the ones I have for now, and will try to keep it updated.
I wish I could have gotten closer to these two for detail shots, because everything on them was stunning. They were obviously in high demand, though, so we could only take a few shots from behind other photographers, ha. They each had rhinestones all over their faces, and those flower skirts are amazeballs.
Getting back to the video: In addition to using a song with lyrics for the first time, John and I also tested out a new wide-angle lens. It required some trouble-shooting with our gimbal (we had to add a counter-weight to John's phone), but by Sunday we'd figured it out and managed to get some nice shots. Then last night we spent several hours together getting the edit right. The editing is still 85% John, but I help by making him change stuff at the 11th hour. :D
We ran into a handful of FOEs at the con - who are all in the video! - and even made a few new friends while out exploring the floor. (Exchanging business cards is totally the platonic version of getting someone's phone number, am I right? SCORE!) Cons are perfect for striking up a conversation with total strangers, and between me chasing down cosplayers and curious passers-by asking about our gimbal, John and I got to chat with dozens of awesome people.
I hope these made you smile! Our next convention isn't 'til December, but never fear: I still have lots more from Dragon Con pretties I'll be doling out between now and then.
******
Now, let's announce some art winners from my last post!
The winner of the Ariel print is Lindsay B.
The winner of the Baymax print is K-
And my wildcard winner is mel82178!
Congrats, you three, and please e-mail me your mailing addresses!
Some of you were worried that all those Dragon Con videos John and I took this year meant I wouldn't have photos, too, but NEVER FEAR. We worked in shifts, rotating between video, flash, and no-flash photography, so I still have lots more cosplay eye candy to share.
Now hold on to your hats, 'cuz there's a Storm a-coming!
Yep, that took nearly three months, but our big house renovation is finally finished, and John and I are ready for bigger and better things - you know, like planning our Harry Potter party. :D
First, though, let's get to the best part of any house project:the before and after pictures! John put them all together for you in a fun video:
Fun Fact: I originally did the video intro and a whole walk-through, but then our computer ate it. Grr. Rather than go put on makeup and do the whole thing again, I told John it was his turn in front of the camera. ::evil grin:: I will say he does less dancing than I did in mine, but otherwise, A++, Sweetie.
Now let's go over the Less Fun, But Still Interesting part:
The MONEY.
Originally we estimated it would cost $11,000 to do everything we needed to in this house. Then we decided to really challenge ourselves, and revised that estimate all the way down to 5K. In the end, the whole thing cost us around $7,000. So overall, we're still pretty pleased.
Most of our upgrades were cosmetic (doors, trim, closets, paint, lighting, fans, etc.), but there were also safety improvements as we replaced and corrected tons of faulty electrical wiring. (Just... so much.) Both bathrooms got new, safer plumbing & fixtures, and we added a dishwasher for the first time to the kitchen. Then the biggest improvement (in my opinion): We added roughly 30 square feet to the tiny master bedroom - also enlarging the master closet - by moving an entire interior wall over. Oh, and we eliminated a small closet & back-set the fridge in the kitchen, so it doesn't stick out in the walkway anymore.
Let me break down the major parts of that 7 grand, so you can see where (most of) it went. I'll also tell you how we saved the most money along the way. Most of our materials came from Home Depot and Lowe's, but I'll note our other sources as I go:
$1,000 - replacing the defective main breaker box. This was a major fire hazard, and we couldn't even get our insurance until it was done. One of the few jobs that we hired a professional for.
$850 - granite countertops for the kitchen, including install. This is a steal of a deal, which we got by shopping locally on Craig's List & agreeing to use a shop's remnant pieces.
$850 - all new interior doors and closet bi-fold doors (material only)
$400 - Dumpster rental (Found via Craig's List)
$350 - 4 ceiling fans (including light kits), 4 ceiling lights, & necessary electrical. (Fans were $50 each on Ebay - search for "52 inch Black Hugger Ceiling Fan", and you'll find a bunch of them. The blades are reversible, so they look more like bronze with wood blades when you flip them over:
$150 - A/C repair & maintenance (hired out)
$250 - new wood laminate flooring in master bedroom (material only)
John got this laminate from Home Depot, and raved about it being the easiest laminate he's ever installed - which is saying something, considering we've installed thousands of square feet of laminate over the years. Even better, it looks nice! I love all that crisp white trim with it.
$475 - Bathtub & tile refinishing (hired out). This was to turn the 70s yellow tile & tub a fresh clean white. Definitely worth the money to hire a pro for this, gang. John and I refinished a tub & tile ourselves years ago (they sell epoxy DIY kits), but it didn't last. This one looks way better (they apply it with a sprayer, so it's glossy smooth) and already seems more durable.
$250 - Exterior & interior door & cabinet hardware, including knobs, hinges, bumpers, etc.
$850 - New wall materials: drywall, studs, mud, texture gun, plus crown molding for the entire house. (We saved a TON of money on trim, molding, and a few odd-sized doors by going to U-Save, a local reclaimed building supply outlet.)
$150 - Closet bars and shelving:
$450 - Kitchen & bath faucets, plumbing, new toilet, & new vanity for master bath. (Faucets were from Amazon; those are always much cheaper online. Our big bronze kitchen faucet was only $80!)
$200 - interior paint & caulking (We again saved a ton of money by scooping up two 5-gallon buckets of discontinued wall paint from Lowe's. It was old, so we had to strain out some lumps, but we got a $35/gallon paint for more like $5/gallon. SCORE.)
$30 - Dining room light & spray paint: We picked up the chandelier at a Re-Store thrift outlet, then spray-painted it bronze.
$80 - Dishwasher: We found a barely used dishwasher from a Disney timeshare which replaces all its appliances every 2 years. It's pristine, and this model is still selling at Home Depot for $400! Again, found via Craig's List.
$50 - solid marble countertop for guest bath: This vanity is an odd, non-standard size, so we were facing spending a few hundred on a custom granite top to fit it. (The original yellow counter had to go.) As luck would have it, John spotted a vintage white marble top at U-Save that was the exact right size. He lugged it home (it weighs a ton), polished it up, and voila! A fresh marble vanity!
So purdy.
All of those amounts add up to almost exactly $7k, but keep in mind I rounded up on most of them to account for all the little expenses: things like new plugs & switches, rental fees for the Load & Go truck, miscellaneous hardware, etc.
And that's it! I hope this was helpful to those of you contemplating your own home projects. As always, feel free to ask questions in the comments, and John or I will do our best to answer.
You guys. I can't hold back any longer, and besides, I need your help.
Together, I believe we can come up with the BEST ideas, crafts, games, and outfits (oh yes, THE OUTFITS)...
FOR...
THIS:
But wait! There's more!
Not only is our Christmas shin-dig this year going to be a Hogwarts Slumber party, it's ALSO being hosted in the Hufflepuff Common Room.
Can I get a chair-dancing SQUEEEEEEEEE?
::squeeeeeeeeeeeeeeeeeeee!!::
Now, as a reminder, here's what our back room looked like last year when we turned it into the Drowsy Goblin speakeasy for our Fantastic Beasts party:
And here's what the Hufflepuff common room looks like:
As you can see we already have the gold-toned bricks and wood accents, so our back room is already close to capturing that warm & homey feel. I'm planning to add wall planters and as many artificial plants as we can find at local thrift stores, plus we hope to craft some magical plants to hide among the "real" ones. I'll also have fabric House banners on the walls.... somewhere.
The focal point of the room is going to be a massive faux fireplace, built where our little bar and moving goblin painting were last year. Here are two inspiration pics for that:
At most conventions you're lucky to see 2 or 3 punny mashup costumes, but Dragon Con? Dragon Con goes all out. Every year I keep an eye out for these groan-inducing beauties, so here's the best of what I've found (so far!) this year:
Dragon Con:
Give it a minute.
Belle-Atrix
She also had a wand; you can see her waving it about menacingly in our Sunday video.
I wasn't sure until the puppet came out, then I was all, "YAAAASSS!" And please note he has Thor's hammer, which he told us he was just holding on to until "that nice young man" could come and reclaim it.
These two were at our first FOE meetup at Dragon Con, btw - more proof that Epbot readers are THE coolest. (Plus Wonder Woman is the Elizabeth who sent me Gand-ALF's photo!)
Wonder Bread Woman:
I honestly love this design; most puns are just funny, but this one is pretty, too!
John keeps telling me I need to update you guys on the cats, which seems strange since the cats are pretty much ALL I post about over on my Instagram Stories, ha. I know most of you aren't over there, though, and yesterday we invented something sanity-saving that I think you cat Moms and Dads might appreciate:
These strappy one-piece numbers that really bring out their eyes. :D
Ok, really it's a recovery onesie, since both girls were spayed on Monday. We never intended to make these, though, because I thought I was prepared with these inflatable collars:
EEEEEEEH!
Both girls wriggled out of them in under 5 minutes. Turns out their safety collars inside the rings just popped open when they kicked at it. So we tried collars without the safety clasps... and Eva nearly strangled herself struggling with it. Terrifying. So, no.
We briefly tried our old DIY cat onesie, but it was way too big. Cute, but big:
Eva was still able to reach her stitches through the lower end.
At this point, desperation levels rising, John went out and bought the standard plastic cones. Suki did... ok?... in it, but Eva lost her furry little mind, instantly transforming into a 6-pound wrecking ball, flailing against every hard surface and giving me a succession of heart attacks as her little head bounced across the hard floors and walls. We tackled her, took the cone off, swaddled her tightly in the onesie again - plus a blanket for good measure - and sat down to regroup.
This is what a rough day looks like.
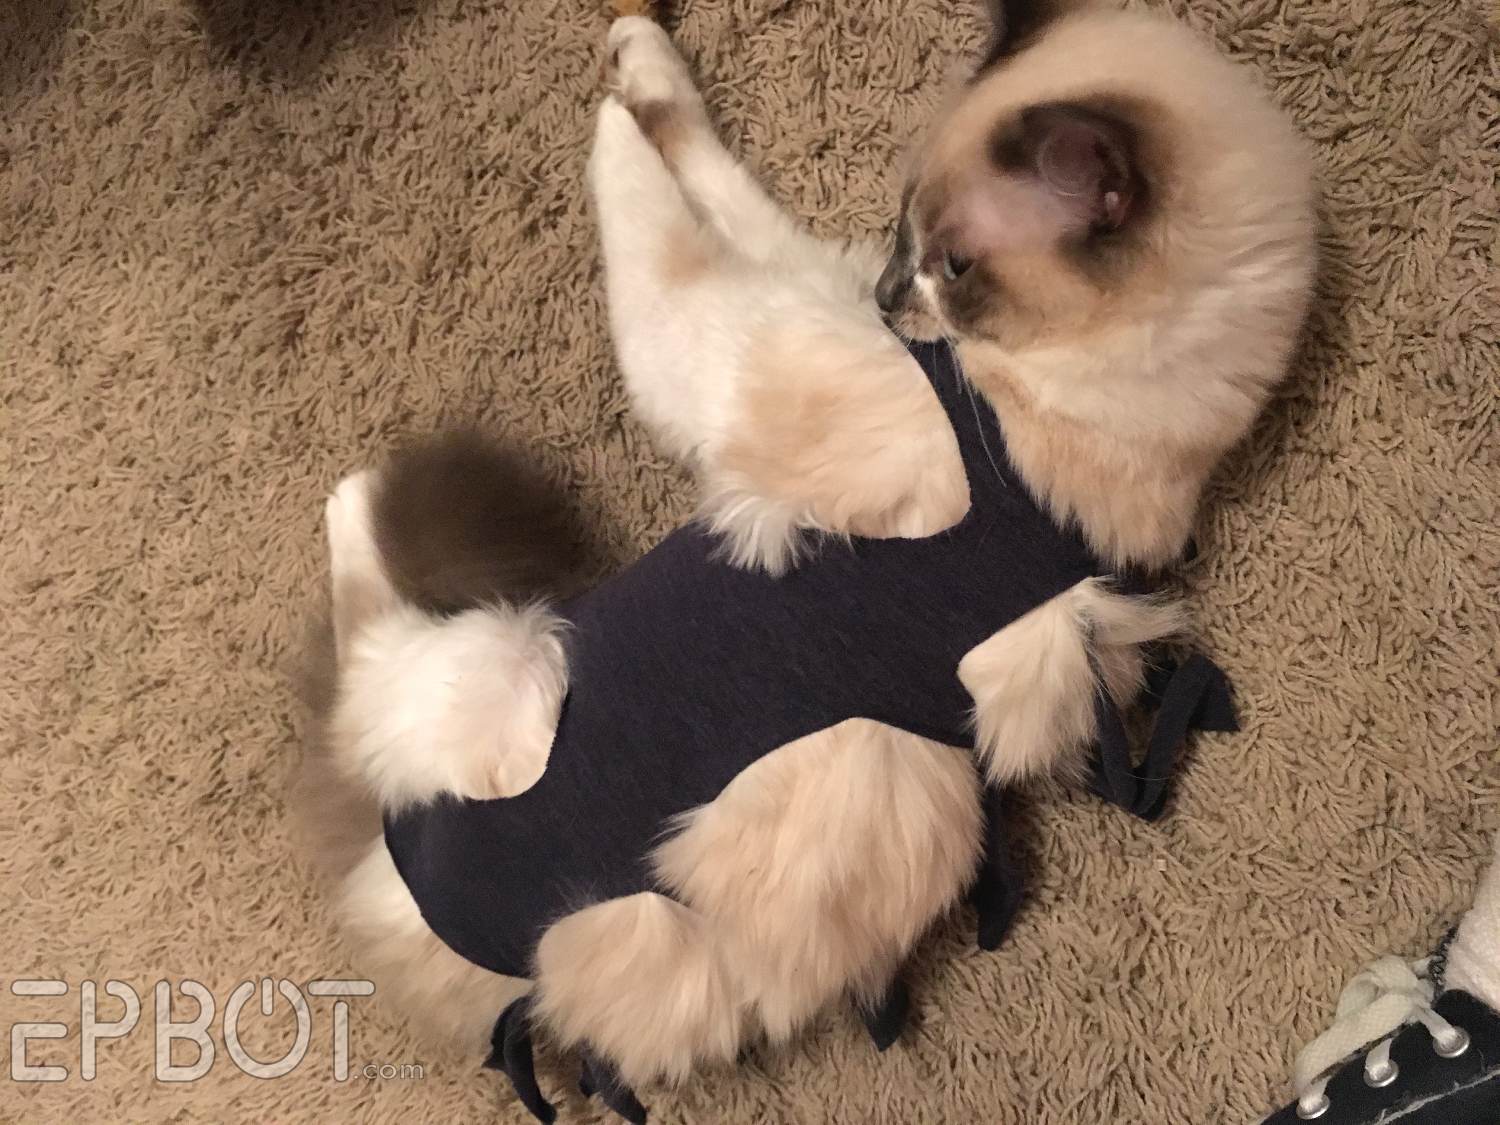
That's a long windup to tell you I found this "recovery suit" on Amazon while looking for a better collar:
It's only $9 and ships with Prime, but after squinting at it a moment I said to John, "We can make that out of an old t-shirt right now." John grumbled at first, like he always does, but then he got that thoughtful, calculating look that means MAGIC is about to happen.
Furry Stegosaurus!
John's first prototype just had leg holes and straps, and it worked pretty darn well. The neck part stretched out quickly with the girls chewing on them, though, causing the whole thing to slide down after an hour or two.
Prototype #2 had a head hole and extra front straps. This was the winner for Suki, and she's still snug and happy in it two days later: