Happy Friday, my festive Festers! Ready to
get your gingerbread house on?
This project has had a lot of ups and downs since we last spoke. Or downs and
ups, as things kept falling off, hehehe.
That's the slightly unhinged chuckle of a woman who is one more mishap away
from renting a flamethrower, btw. BUT WE MADE IT. And so far, knock on
gingerbread, the Gingerbread House still stands.
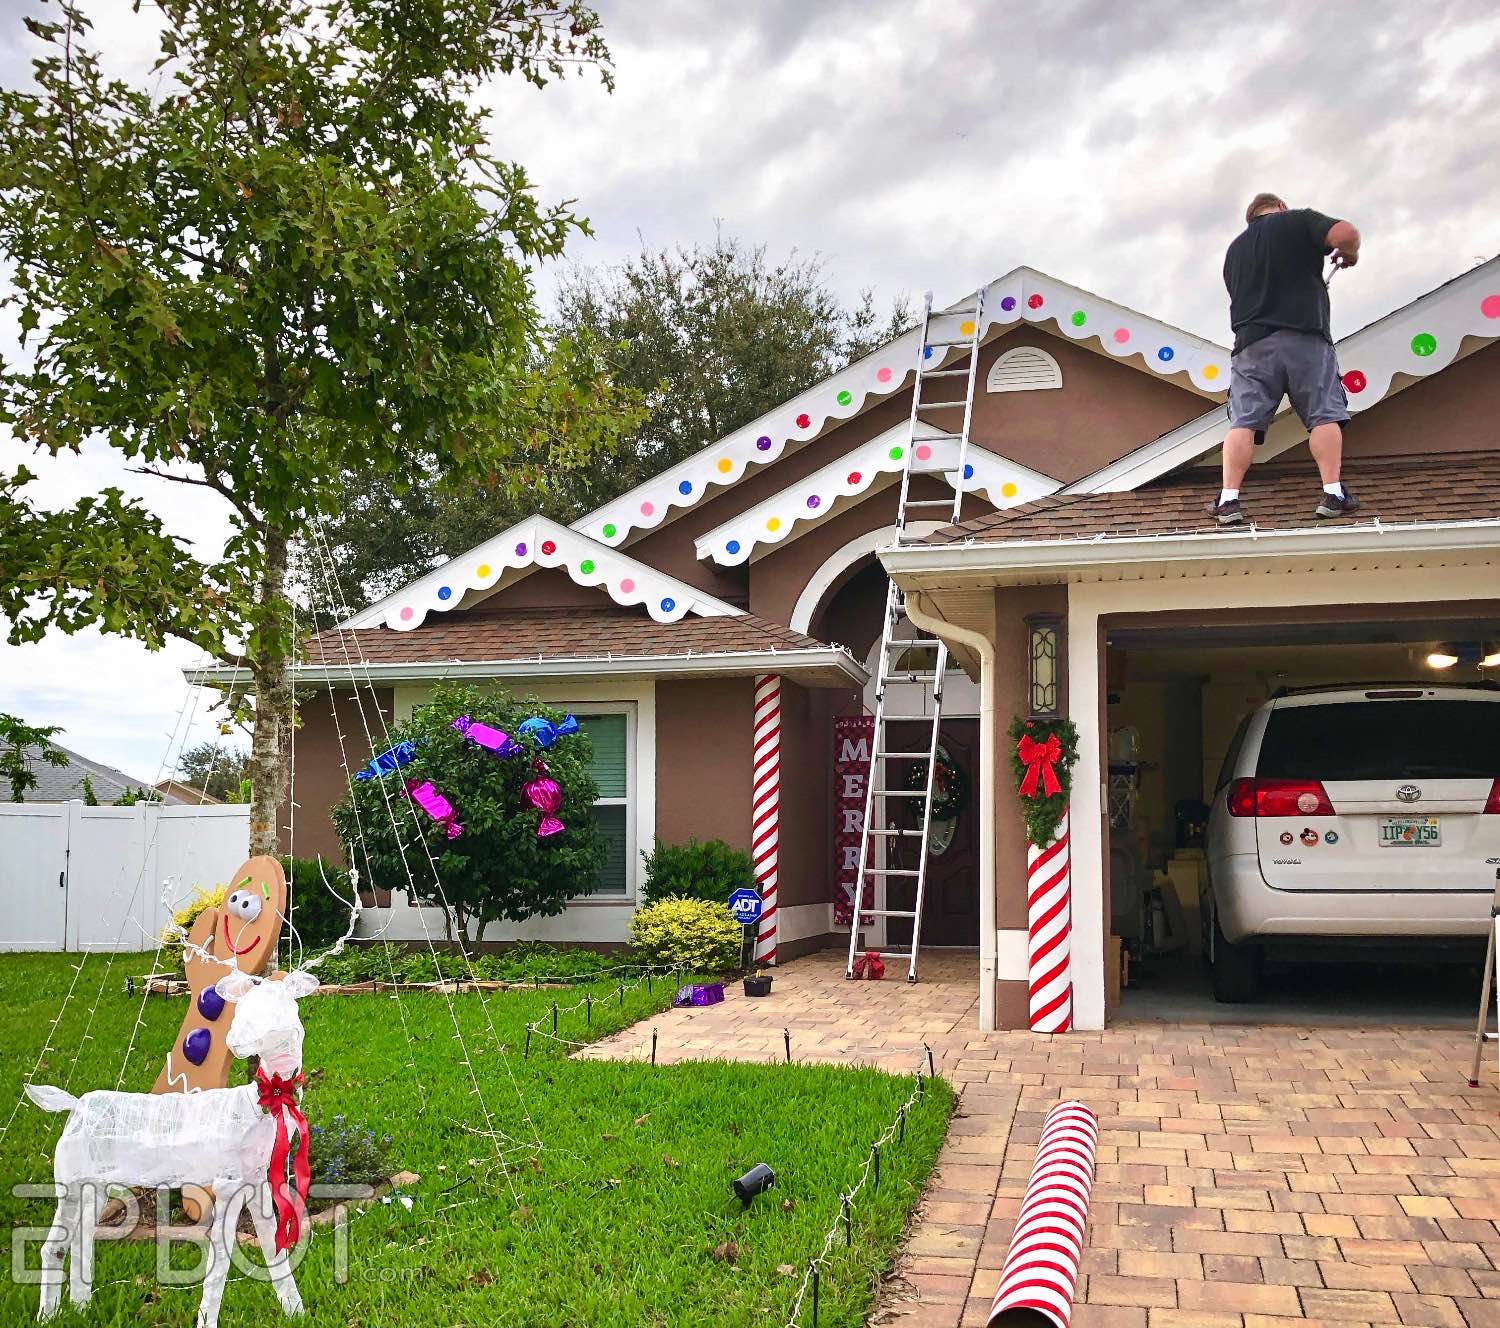
Our battlefield of candy carnage.
So now that we've learned absolutely everything the hard way, let me
show you all the things we did wrong last time, and our fixes that seem to be
working.
Btw, to the person who so sweetly commented last time that we "make it look so
easy!" - this is for you:

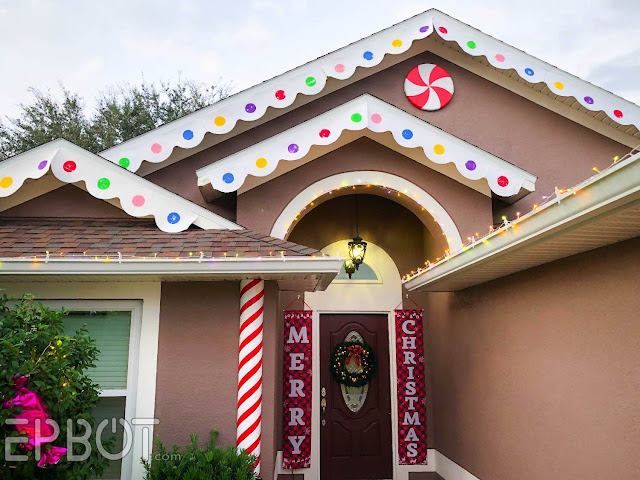
First let's jump in with some beauty shots, because I'm a desserts-first kinda
gal:


::trumpet fanfare::

Eagle-eyed readers will spot the difference in these shots, but shhhh.
We'll get to that.

The house doesn't look too different from my last sneak peeks, but the
icing trim on the roof line got a major upgrade.

Originally we made the icing from plastic tablecloths, which was thinner, more
translucent, and VERY wind-catchy:

BEFORE
It did stick well to the eaves, but the painted gumdrops softened in the sun
and became too sticky. Then as the wind blew it around the sticky
parts stuck to themselves, to the eaves, etc.
So that all had to go.

Me, yelling at the ground while neighbors walking their dogs gave us a wide
berth: "You were WEAK! WEAK, I SAY!!!"
So we re-made all the icing trim, exactly as before, except this time using
rolls of white craft foam instead of tablecloths. This was vastly sturdier,
much less flappy in the wind, and absorbed the paint beautifully, no sticky
spots. I heat-sealed the foam with an iron before painting it, so it's
slightly more resistant to water, and even submerged none of the paint runs.
So then our only challenge was getting the blasted stuff to stick to the house.


I'll spare you our winding road of trials and aggravation, and skip to the
part where we discovered the Golden Ticket:
Command Strips hot-glued to the craft foam. Y'all. Y'ALL. Learn from
our pain, and use this combo. The Command Strips alone won't stick to
the foam long-term, but the hot glue holds so well that the foam will rip
before that strip lets go.

How many times did John have to Spider-Man his way up to the eaves to repair
drooping icing before we figured this out?
TOO MANY TIMES. (I think 3-4.)
TOO MANY TIMES. (I think 3-4.)

Moving on to my next nemesis:

THE GINGERBREAD MAN
It turns out painted pink foam also resists anything sticking to it,
including hot glue. So every time we checked in with our friends something
else has fallen off: an eye, some of the trim,
the whole dang cookie from the stick, etc.
I will again spare you our various efforts and consternations, and skip to the solution:
STAB THE COOKIE.
::wild eyes::
That is, get yourself a craft blade, and score the foam in an X patterns
everywhere you want to glue things - under the eyes, buttons, and trim.
Then use your hot glue. The cuts let the glue seep into the foam and get a good grip.
The support stake itself needed something stronger, though, as the wind kept blowing
the cookie off. So for that we used screws through the front of the cookie.
If you can, put the screws under the gumdrop buttons to hide them. As it is,
I had to patch & paint over our screw holes.
NEXT!

And here the blue faded to bright silver:

At first I thought the sun had bleached them, but thanks to
ClashCreativeHome (who's also making gingerbread things!) I learned it was the
rain washing away the ink. So that's good to know: don't get foil
cellophane wet!

My solution was to replace the foil with plastic Dollar Tree tablecloths,
and while they're not as shiny or sparkly, they're still pretty stinkin'
cute.

Plus we discovered they glow at night, since they're translucent! Imagine
putting lights inside and making a string of giant candy lights. (Drat, now
I want to do that.)
Sorry I don't have a night shot of the candies; in the rush of repairs I forgot to take one. Here are some night shots of the house before replacing the candies, though:


Our final challenge - because oh yes, there's more - was getting the
two larger peppermint columns to stop falling over.

We'd been relying on large command strips and hot glue, but those were no
match for the wind. So we screwed a 2x4 into the house, then screwed the
sides of each column to the 2X4. Now it's completely stable, and the single
hole in the house stucco will be easy to patch later.


Happily these shorter columns stayed up just fine, since they're wedged
under the garage lights.
All the repairs cut into my extra candy-making time, but here's one small addition:

Giant Hershey's Kiss! I wanted to add mistletoe on top and a "Merry Kiss-Mas" on the sides, but ran out of time. Maybe later.
The big kiss is a super easy Dollar Tree craft, btw:
All the repairs cut into my extra candy-making time, but here's one small addition:

Giant Hershey's Kiss! I wanted to add mistletoe on top and a "Merry Kiss-Mas" on the sides, but ran out of time. Maybe later.
The big kiss is a super easy Dollar Tree craft, btw:

Pad out a DT kitchen funnel with tin foil, wrap it up, then print out a blue
HERSHEY label to tape to the top. Cover the paper label with packing tape if
it's going outside. Done!
And THAT, my friends, is our School Of Hard Knocks crash course in
building a giant gingerbread house to withstand the Florida weather. I'm
sure we'll have more repairs in the weeks ahead, but I *think* everything
is finally pretty stable and secure. Many thanks to our friends Ken &
Sue for letting us decorate, slowly trash, repair, trash again, and repair
again your home. Love y'all!

 You know that giant lollipop is the only thing we DIDN'T have to repair. Who's the sucker now?
You are, lollipop. Gold stars.

Last few photos, pre-candy fading:


You are, lollipop. Gold stars.

I'll leave you with a fun video surprise from Ken, who put together
some awesome drone footage, check this out:
Those end shots make me feel like I'm on Soarin'. LOVE IT. Also that's our friend Sue, Ken's wife, doing happy "Snow Angels" on the driveway, bahaha.
If you missed them before, here's
Part 1
and
Part 2
of this gingerbread house build. Thanks for following along, and please let
me know if you try any of these DIYs yourself - I'd love to see!
*****
My
Squeegineer
winners for November are
Tracy M,, Lisa S., & Carly P. Congrats, you three, and please
check your inboxes for a message from John so you can choose your
prizes.
Everyone else, you can get a jump start on December by
entering now!
*****
Presenting my all-time favorite Christmas tee, which heck yes I've already been wearing for the last 3 weeks:

The graphic is bright and cheery, it's super soft, and only costs
$14! More colors and cuts for Men and Kids at the link.
(Also check out the Epbot Amazon shop for lists of all my favorite things!)
Presenting my all-time favorite Christmas tee, which heck yes I've already been wearing for the last 3 weeks:

(Also check out the Epbot Amazon shop for lists of all my favorite things!)


So now you can take the plastic-cloth wrapped candies and add transparent plastic film on top of them to give them color *and* the shiny sparkle! And it would look more like some of those actual candies with the dual wrapping
ReplyDeleteSuch a magical transformation! It doesn't look like Christmas decorations added to a house, it looks like the house was built this way!
ReplyDeleteAlso, you posting end results first is high on the list of reasons I love Epbot. :)
We could not be happier with the transformation of our home to an almost edible, whimsical creation! Epbot and gingerbread...can't get more Christmas-y than that! Thank you sooooo much! We love it and so do many who stop by and enjoy! Just don't eat the icing please 🙂
ReplyDeleteIt looks absolutely wonderful! From those drone shots it looks like an actual Gingerbread house! You both did great -and thanks for the updated hacks and helps! I feel like I have the right shaped house, but mine is blue -there house is the perfect gingerbread brown!
ReplyDeleteMaybe you're house could be more of a chilly snow candy sparkly house? Like gingerbread inspired but with those kind of colors/atmosphere.
DeleteMaybe an ice castle would be better for you, or an ice cream theme.
DeleteWow, absolutely amazing! I'm sorry it was such a trial but so glad you perservered and showed us the end product (and steps along the way). It might be starting to make me feel festive!
ReplyDeleteAwesome job! What a wonderful thing to do for friends. That drone footage during the video was great! Really made a difference to the whole thing.
ReplyDeleteLove the gingerbread house. I want to do this to our house so bad, so I appreciate all the tips. On another note, seeing your rainbow shoes in one of the pics reminded me to tell you about these amazing kindergarten-y shoes I found and order. They are SUPER comfy and cute. I get compliments on them all the time. :) https://www.rocketdog.com/collections/sneakers/products/jazzin-red-rollo-stripe-sneaker
ReplyDeleteThank you for being so good about sharing all your challenges, so I don't feel bad when my crafts don't work out the first time! It looks amazing in the end. <3
ReplyDeleteAm I Lisa S. ? Do I have an Inbox somewhere? I can't tell haha. I'll activate notifications on this comment in case.
ReplyDeleteOops, that's the tricky part about my only posting initials, ha. I just checked with John & he says he's heard from the correct Lisa S., so this one wasn't you. Sorry about that!
DeleteNo worries! I was surprised that I thought of entering the draw this time :P
DeleteAs someone from Hershey who's used to seeing kisses everywhere, that wreath is the SWEETEST edition. This is fantastic!
ReplyDelete