Happy Friday, po-tay-toes & hobbitses! Remember when we made these?

What do you say we make a life-sized one? With a functioning door? For
a Hobbit party?
I'm getting strong "yes" vibes over here, so I'll assume those are from you.
LET US PROCEED.
I'm getting strong "yes" vibes over here, so I'll assume those are from you.
LET US PROCEED.
John and I turned once again to our trusty not-sponsor -
but we're open, Pink Panther, just sayin' - pink insulation foam.

Blocking out the basic shapes - and quickly discovering that threshold
was a face-plant waiting to happen, ha. That'll get lowered later.
This will not be Bilbo's iconic door, because we wanted something less
character-specific. And red, to be more festive. Our
inspiration was this other Hobbit hole in New Zealand:

via Rachael Christian
So pretty, right? Just imagine it all decked out with lights and snow for Christmas!
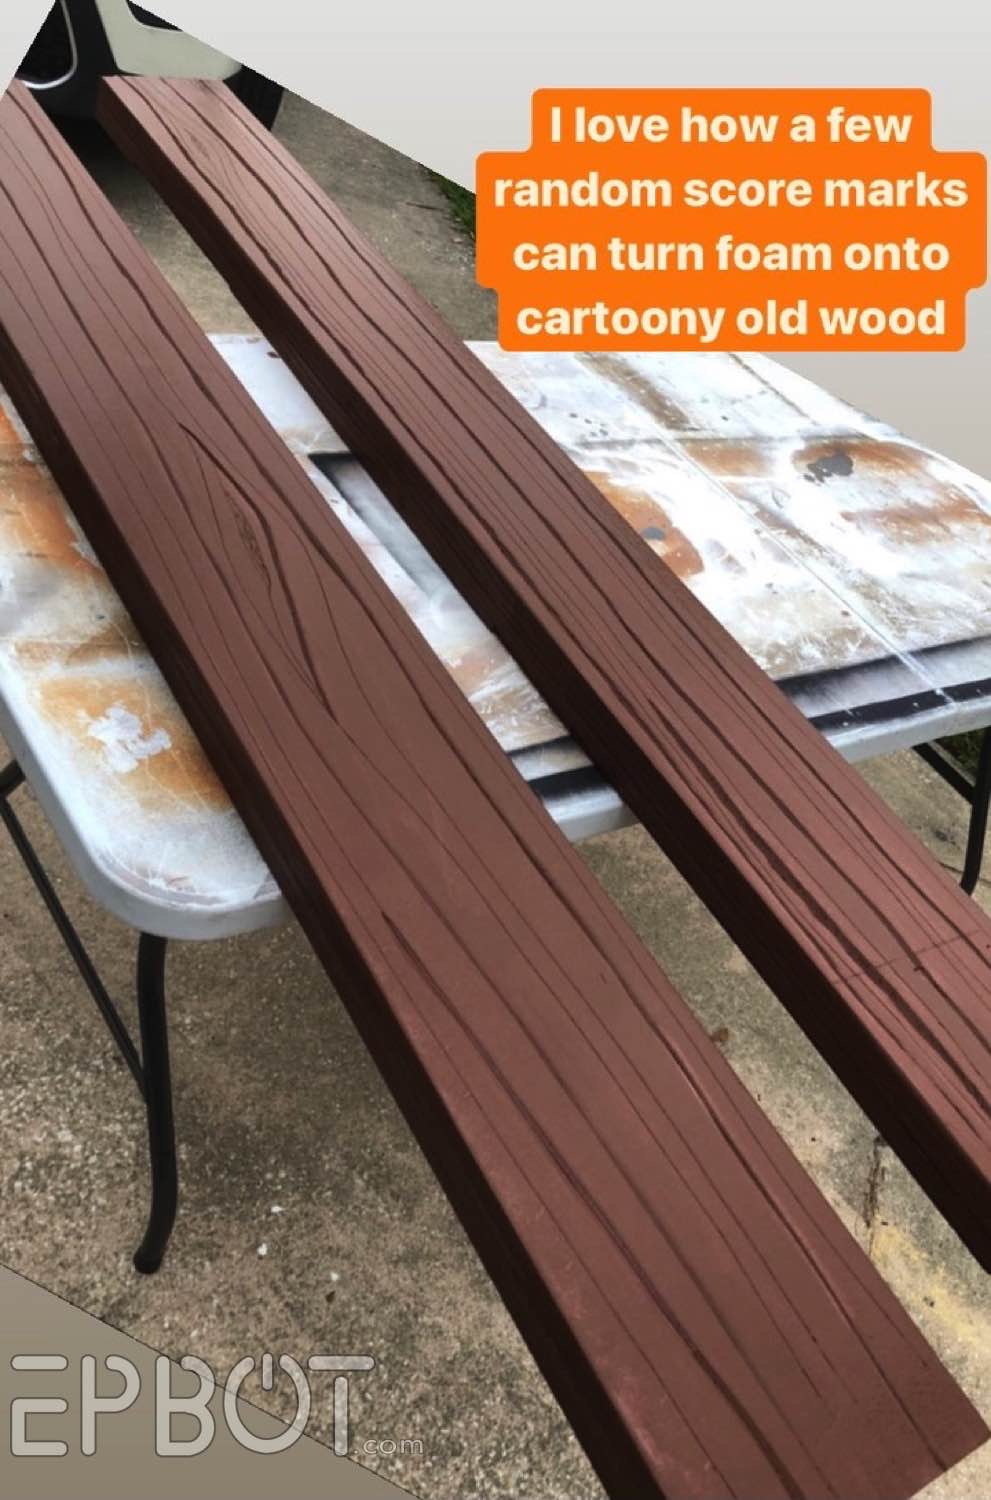
Once we had all the pieces we starting adding wood grain texture:
 I used an awl for the lighter grain and knots, then John sliced V grooves with a craft blade for the deeper cracks.
Four pieces of foam stacked & glued to make these honkin' corbels:
 My wood grain's not great on this side, shhhh.

via Rachael Christian
So pretty, right? Just imagine it all decked out with lights and snow for Christmas!
Once we had all the pieces we starting adding wood grain texture:

Four pieces of foam stacked & glued to make these honkin' corbels:


Once we painted everything brown it really started coming together:
From here I added wet-blend highlights for a little
variation. I did this at night, though, so this is the best photo I
have:
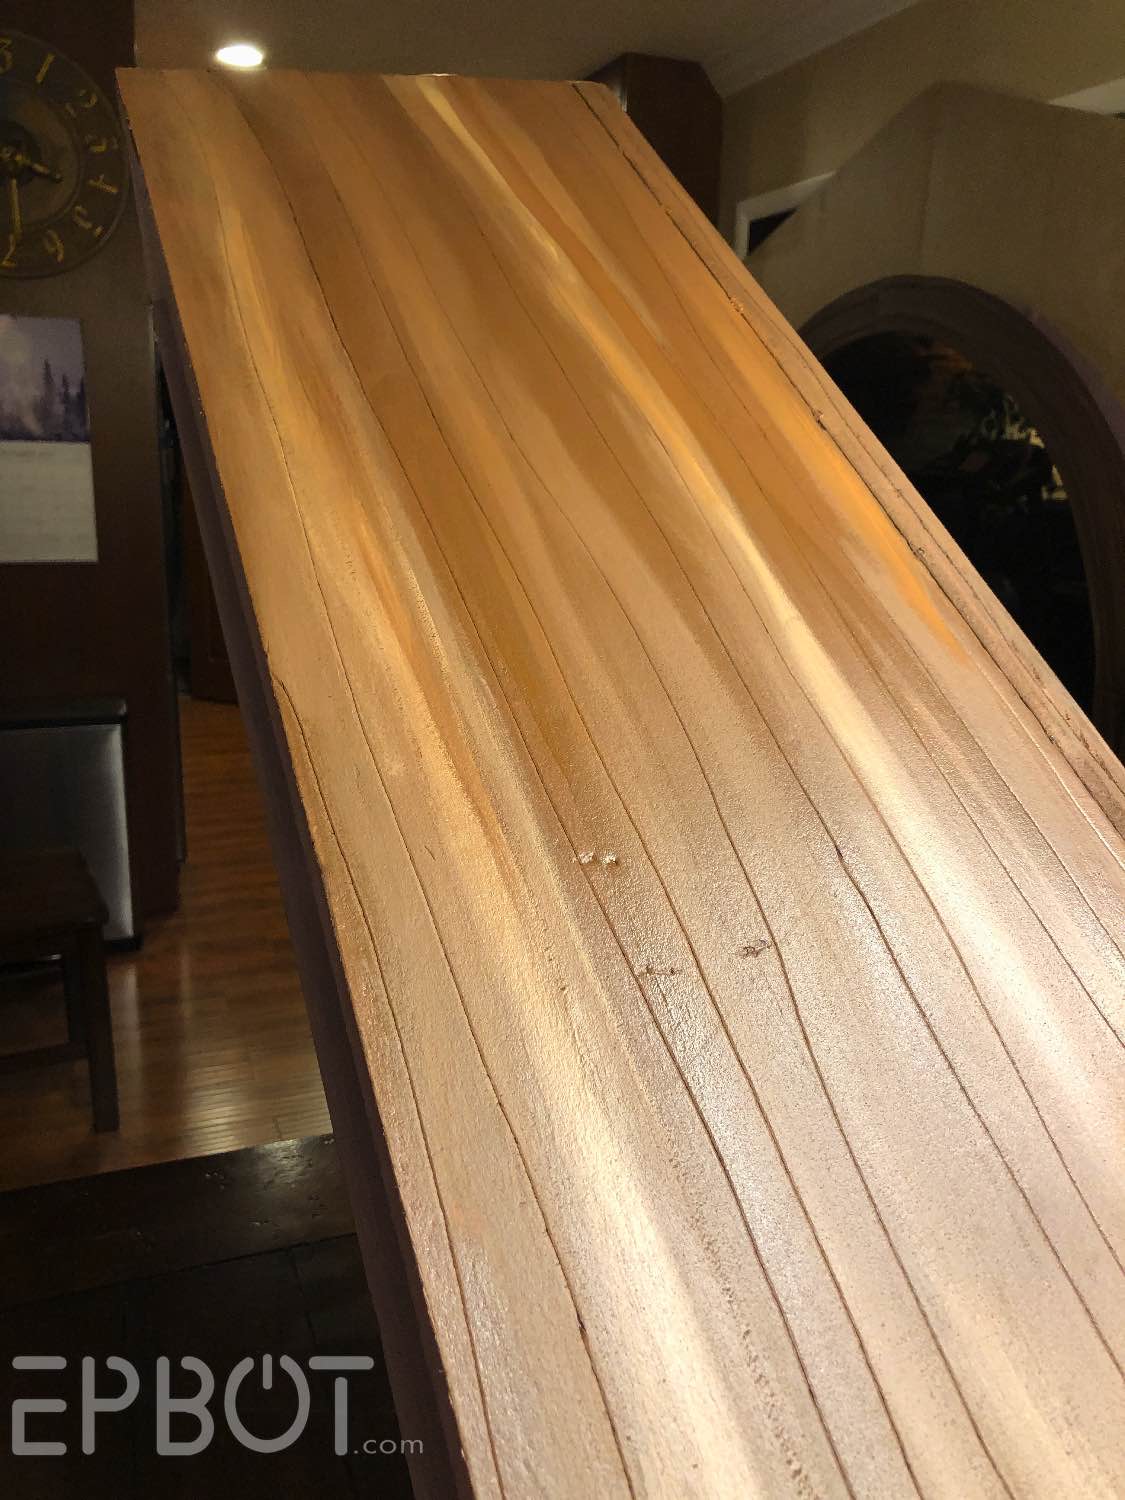
The glare struggle is real.
Testing the fit:


Nothing is attached yet here; it's all leaning against the wall while John holds
up the roof.
I decided the wall paint was too beige, so asked John to repaint those sections to a lighter cream:

I decided the wall paint was too beige, so asked John to repaint those sections to a lighter cream:

He later fauxed this section to give it an aged plaster look - something we
actually used to do for a living, back in our pre-blog lives.
You can see the new faux finish here:

You can see the new faux finish here:

John hot-glued all the foam pieces together, than added drywall screws
from behind for strength.

Meanwhile, I was working on the door.
My first finish had great texture, but was too dull and dark:

Take 2!


I scrubbed the paint on with a stiff brush to leave as many dark streaks and texture as possible.

Meanwhile, I was working on the door.
My first finish had great texture, but was too dull and dark:

Take 2!
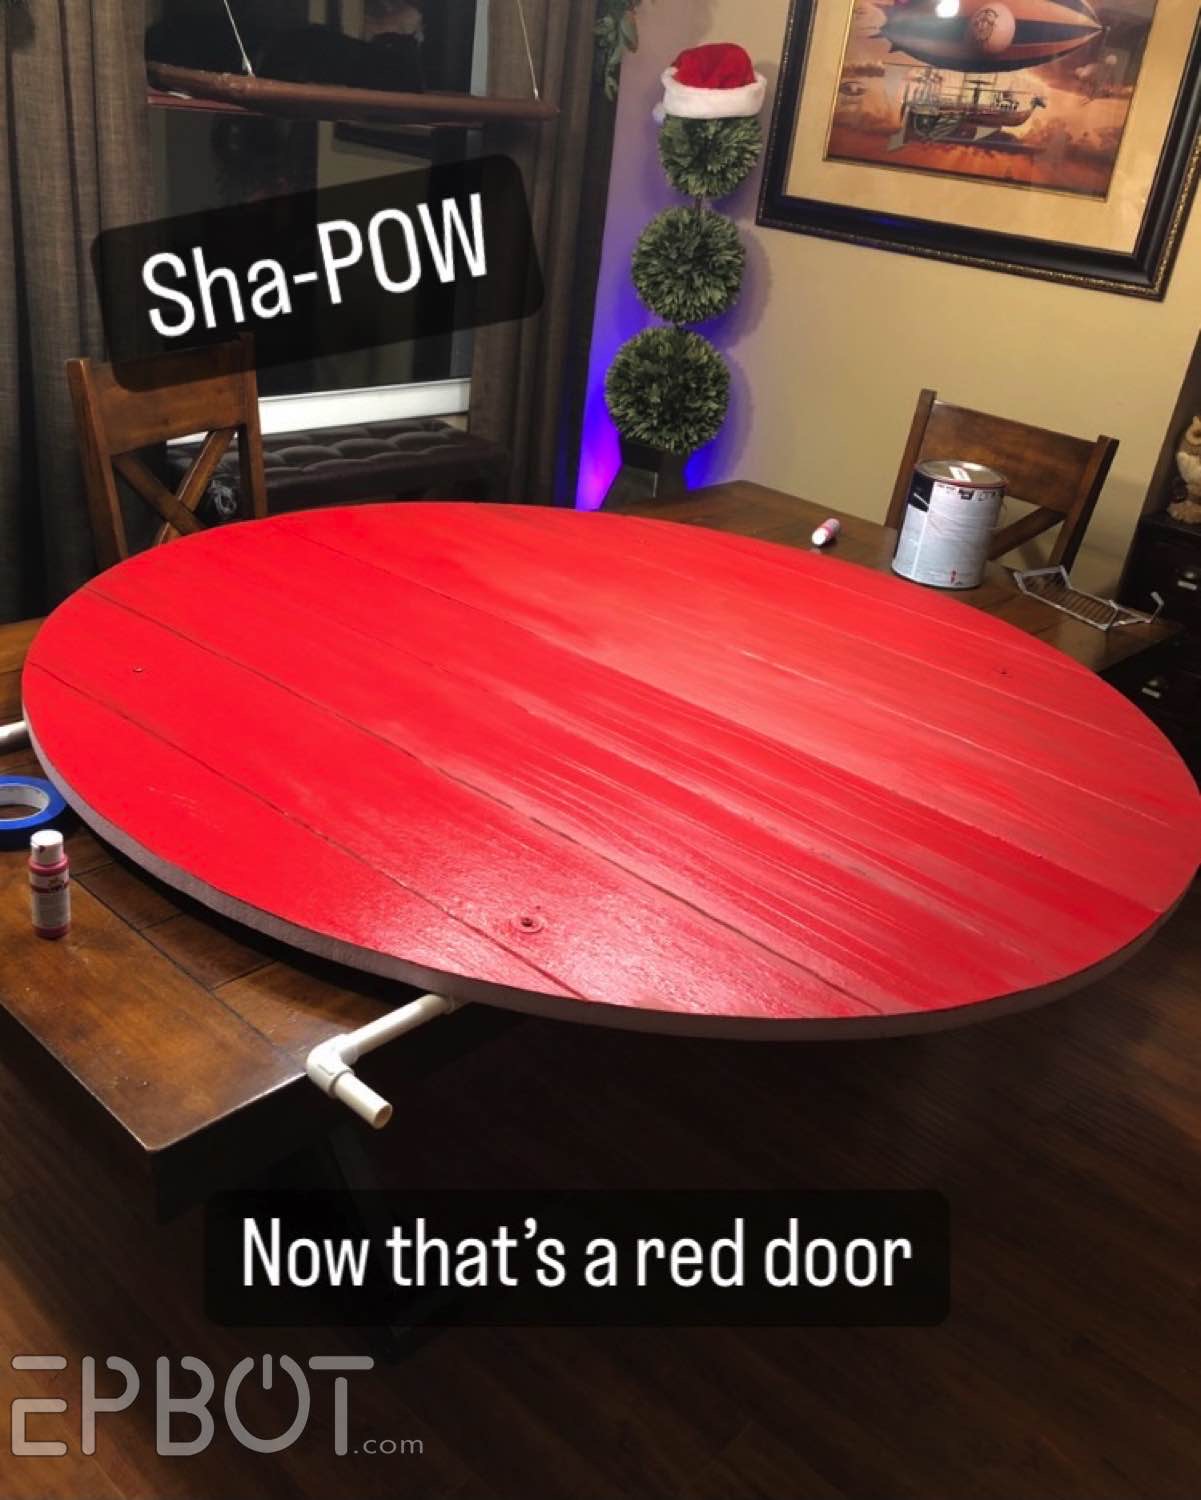

I scrubbed the paint on with a stiff brush to leave as many dark streaks and texture as possible.
Setting up our mini trees - you might remember these from our Labyrinth Illusion Wall:

And finally, before I show you the finished door - we need a door knob.
We decided to re-purpose this giant ornament - which you last saw in 2018 as a giant Golden Snitch over our kitty Quidditch Tower:

I painted it a bronzey brown, then added gold Rub N' Buff to bring out the texture:

I used a lot of gold at the front, to make it look well-worn.
We still have to add all the hobbit-y Christmas decor, but here comes the mostly finished beauty shots:

Ta-daaa!

Eva demonstrating how a door works.
(Every time I open this door one of the cats has to walk through it. It's their new favorite thing.)
And a peek behind the magic:
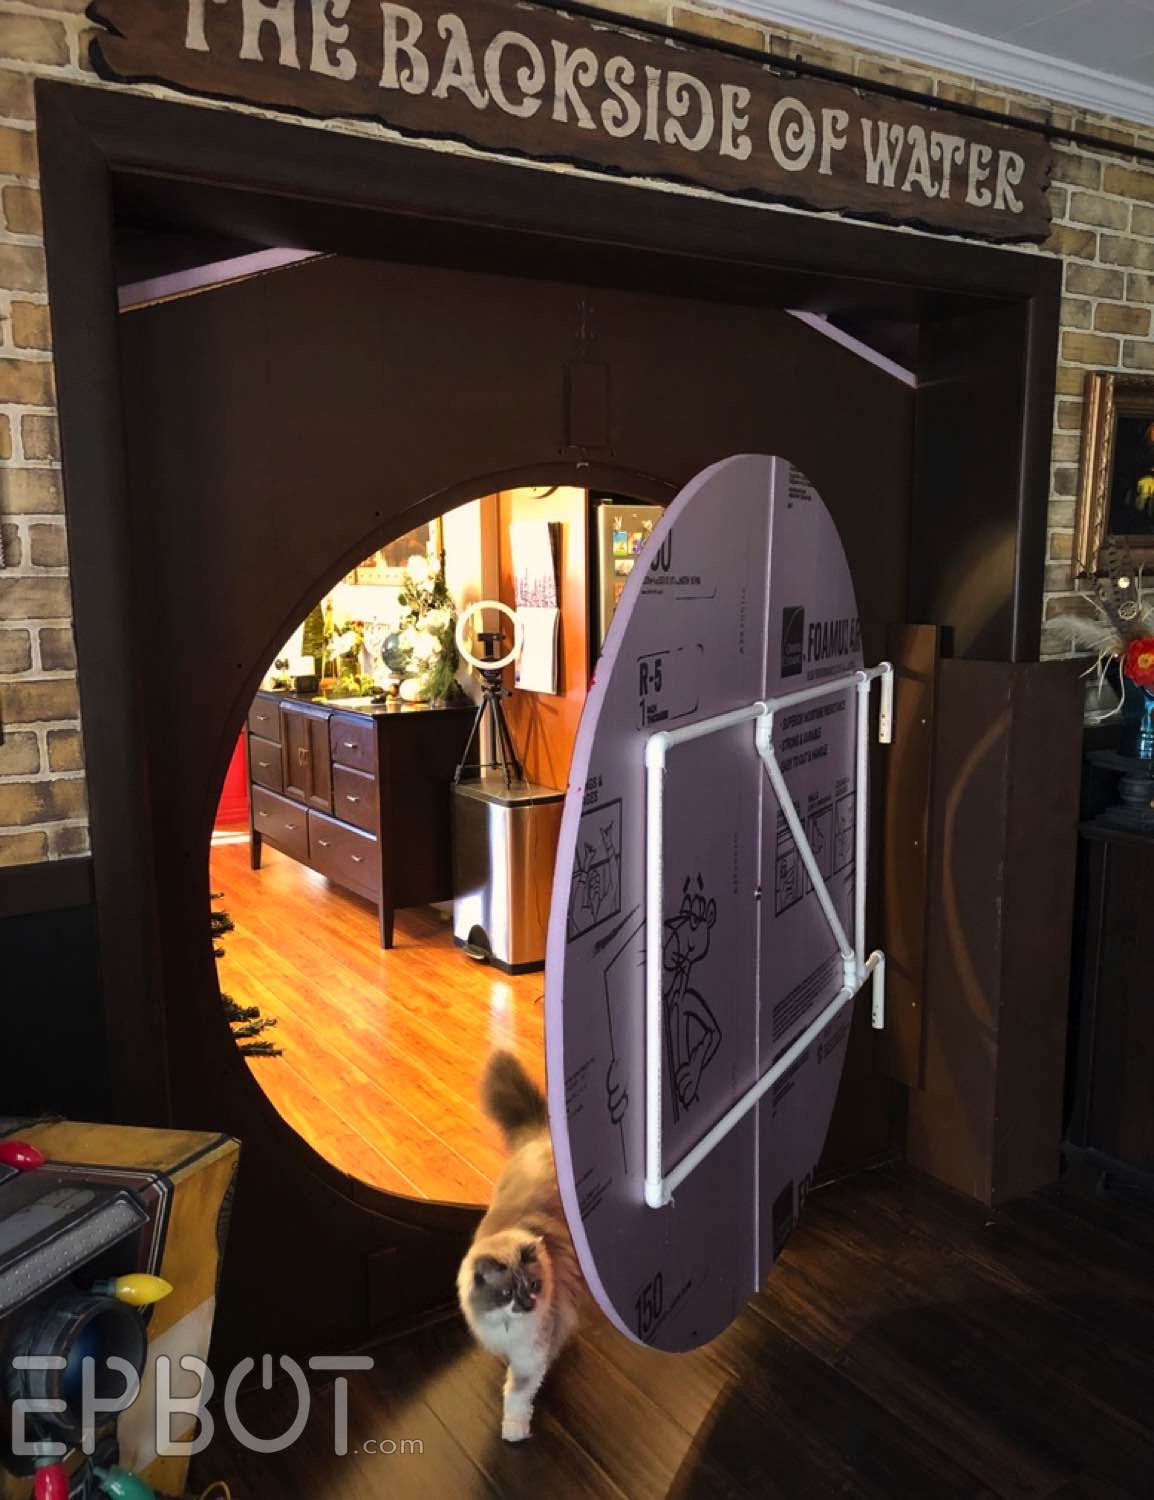
THE BACK SIDE OF HOBBIT HOLE. Plus a Suki.
We'll paint the back of the door later, but for now you can see
how the hinge works: the door is attached to a PVC pipe frame, with
two downward pipes slotting into slight larger pipes attached to the wall. The
hinge pipes are screwed to a wooden brace to avoid putting more holes in our walls.
Now comes the REALLY nifty part. Did any of you notice the door's threshold
missing in some of these photos? John and I have a couple friends with mobility
issues - canes & wheelchairs - so we had to make sure this doorway works for
everyone.
John's design is as easy to use as it is brilliant. Check this out:
We can also leave the door and threshold off for daily use, which
is handy. We have to duck slightly, but so far John's only walked into the
top of the doorway once, ha. (Good thing foam flexes a tiny bit.)

Next I'm planning to paint the tree pots lighter, add a door wreath, garland,
and fake snow on the roof and ground. This will be the main photo area for our
"Hobbit Holiday: Second Christmas" party, so I intend to go FULL FESTIVE.
A closer look at our faux plaster and wood grain:

I'm so happy with these wood corbels and trim; they give me Snow White's Scary Adventures vibes in the best way.
Side view from the kitchen:

It's just so CUTE eeeeeeee.

And that's our Hobbit door so far! Someone in my Story sneak peeks said I was making this look "dangerously do-able" - and it IS, my preciouses, IT IS. Heck, you could make something similar out of cardboard and/or Dollar Tree foam board, if you don't want to spring for pink insulation. So please, go hobbit up your holiday! Or your every day.
John and I are hoping to be at Dapper Day this weekend - our first in 3 years! - so if you see us at WDW chasing well-dressed people with a camera, please say hi. Or maybe it'll be you we're chasing, in which case, I promise we're mostly harmless. ;)
I hope you have a dapper-licious weekend, my friend, and I'll see you back here Tuesday for my full report.
::mwah::
::mwah::
*****
If you like the silly stuff we do and make here on Epbot, and want
to help fund the fun, you can support us through Paypal! Whether it's a one time tip or a monthly donation, every little bit helps me and John keep pouring our time and hearts into this little corner of the internet, so THANK YOU.
Or, if you feel like shopping, I have an Epbot Amazon shop with lists of fun things I like, wear, and use. Maybe bookmark it for future gift-shopping?


Amazing! And totally looks doable
ReplyDeleteYou guys are amazing! I'm blown away by every project you do!
ReplyDeleteCould you attach the threshold to the bottom of the door so it swings with the door when it’s opened?
ReplyDeletejinx! that was my thought, too. That the threshold is a faux threshold and just moves with the door.
DeleteYou could, yes! We just didn't want to spoil the effect since this will be a photo op. This way people can peek out the door or film themselves coming through it without giving away the illusion.
DeleteI love this so much!
ReplyDeleteThis is SO COOL. I've been watching the progress in your IG stories, but the finished product is absolutely amazing. :D
ReplyDeleteI just henh henh henh henh right out loud at Eva demonstrating how a door works. :)
ReplyDeleteGranny Roberta
You guys work so well together! We are lucky we get to benefit from that!
ReplyDeleteNext time, base paint the door a deep black to make the red really look red. Old scenic painting trick. Same goes for navy blue, base is black.
ReplyDeleteThis is so wonderfully adorable!! Can’t wait to see the finished festive look!!
ReplyDeleteThat is AMAZING!
ReplyDeleteOhhhhh, that looks so good! I have no idea where you come up with these ideas, but I'm tempted to move to Florida just to come to some of your parties. <3
ReplyDeleteThis is gorgeous! I'm trying to convince my other half we need a Hobbit door between the dining room and living room
ReplyDelete