John and I had such an amazing Dapper Day Saturday that we went back for
more on Sunday. Which means I'm a day behind and have twice the
content, oops. So I'll bring you those photos and fun stories on Friday,
k?
In the meantime, here comes another Hobbit Holiday build: our Dragon
Hoard Christmas tree!
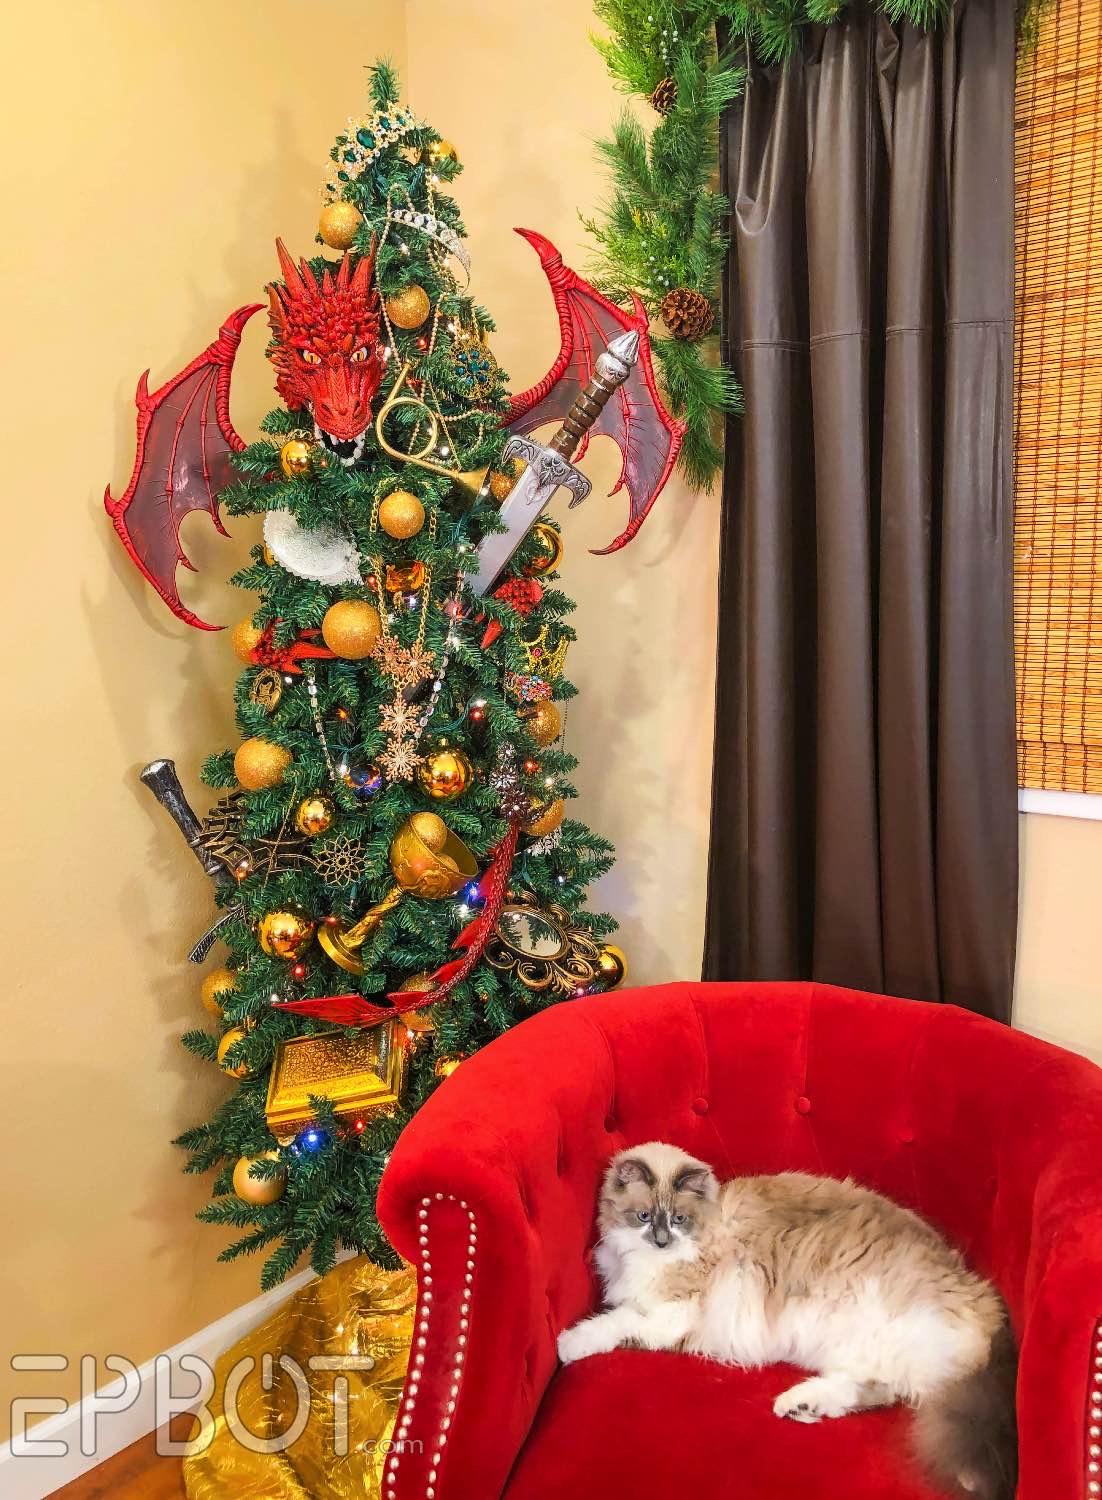
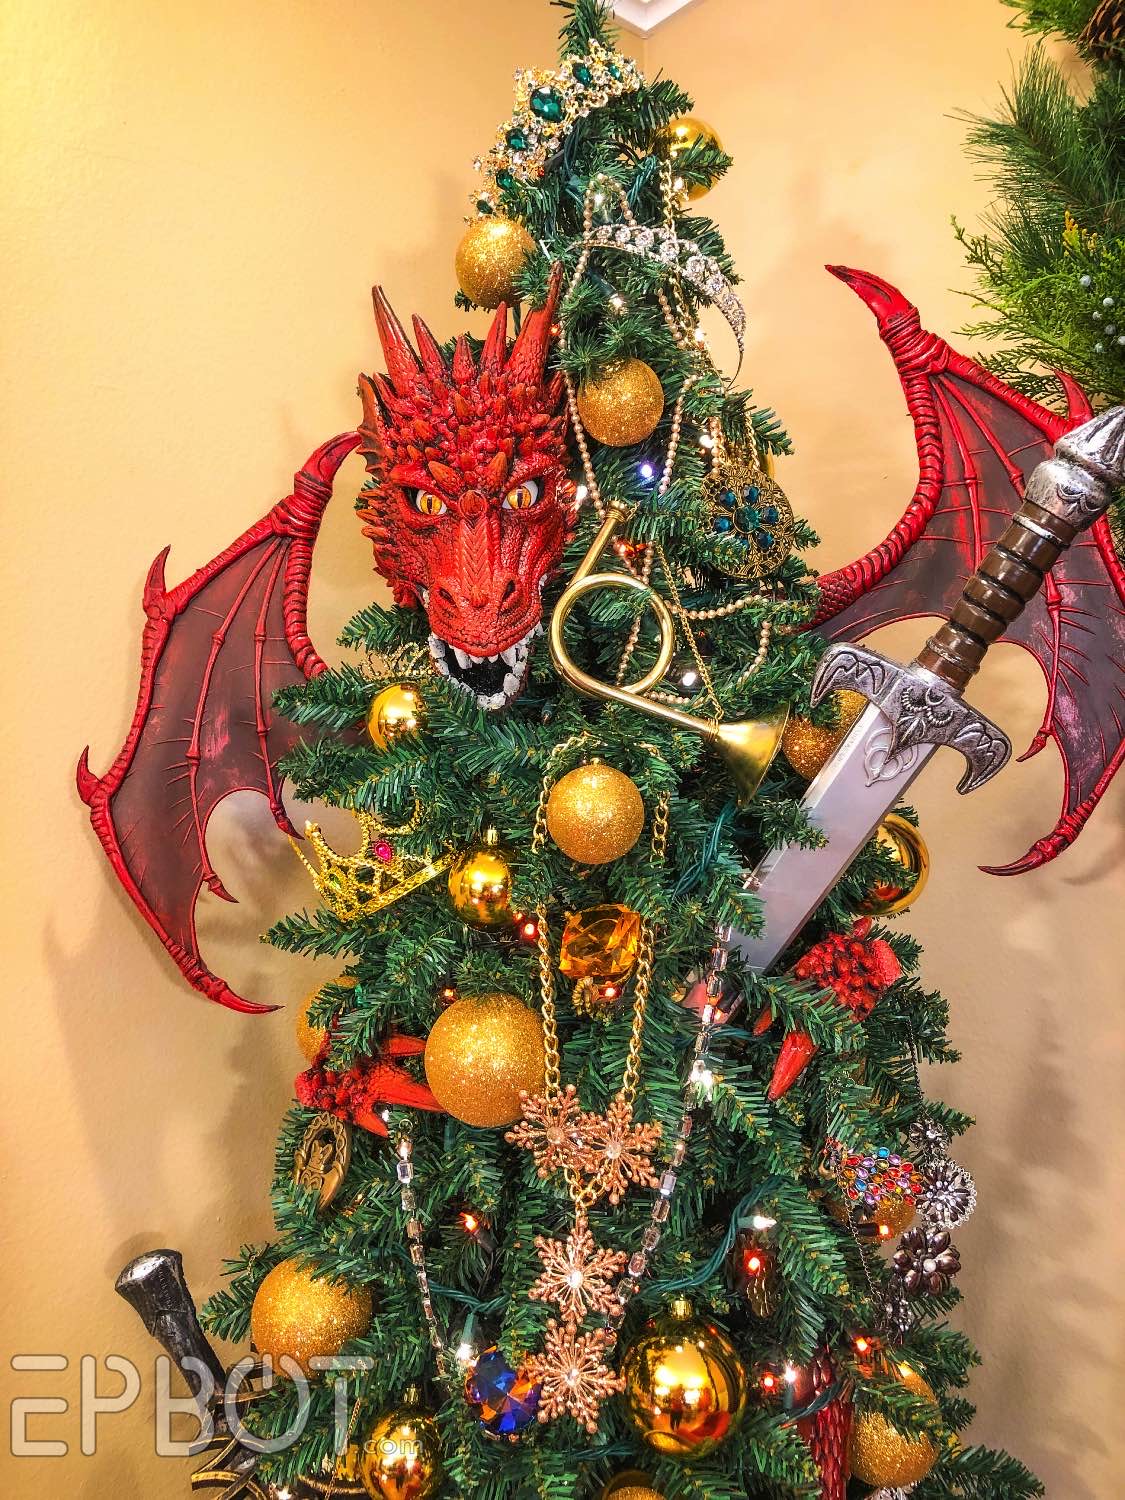
Yes, our mini Smaug has amassed his own treasure pile in our this corner
tree, and is fiercely protecting it from the cats.

"MINE."
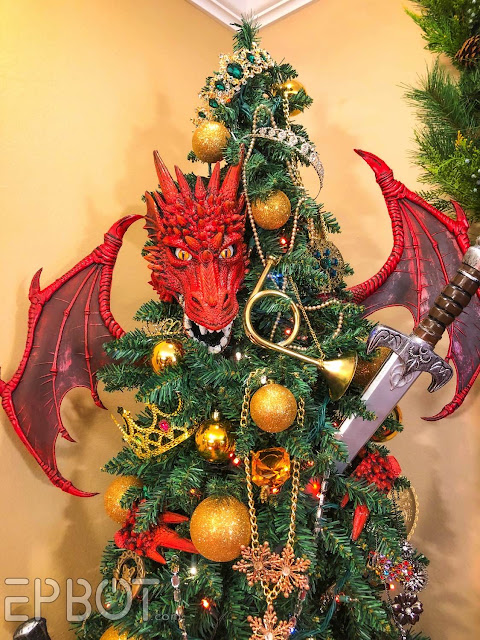
The tree is full of giant gems, strands of pearls, medallions, mirrors -
basically every gold and/or sparkly thing our house had to offer, plus
gold Christmas balls for fill.


I re-painted a plastic Tangled goblet to make that fancy chalice, and I
think the gold box held candy?
I also hit up my friend Traci's cosplay closet for some foam swords and a bunch of sparkly tiaras, which make a fantastic tree topper:
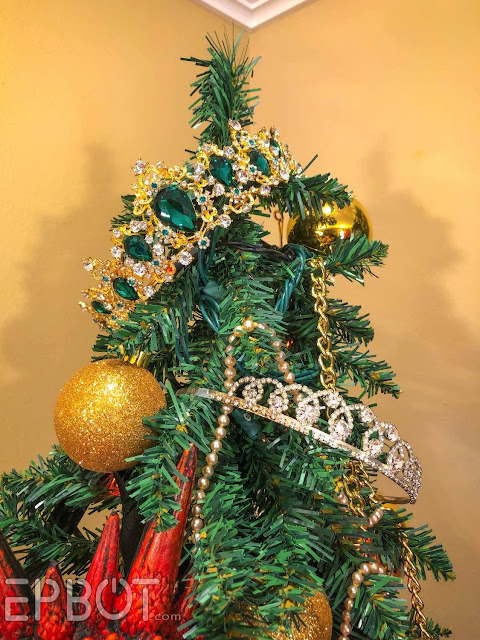
I also hit up my friend Traci's cosplay closet for some foam swords and a bunch of sparkly tiaras, which make a fantastic tree topper:

I plan to keep adding "treasures" as I either find or make them, so the
hoard should grow by party time.

In fact this would be a great thrift store project! Paint lightweight
tchochkes gold, maybe bedazzle them with plastic rhinestones, and
boom: instant treasure.

These are parts of a Christmas sprig I glued to a broken chain belt.
:D

A Dollar Tree mirror from my stash. I had to get creative since we
haven't had time for a thrift run.

"Ok, Jen," I can hear you saying, "That's great. BUT WHAT ABOUT THE
DRAGON?"
Ahhh, that's the best part!

Our dragon is a modified costume set from Amazon. Meaning you
can easily make this yourself! I'll link what we used and show you
how, after I show you the rest of the room. 'Cuz I like it.
:)

You'll see a lot of pumpkins and Fall colors mixed in with our
Christmas this year. I'm... trying something.


Daytime view! The sunlight is a challenge, so the rest of these will be night shots. (Also after this I realized my pillows were really off theme, and took them away.)

Since there wasn't much room for a tree, I searched for something thin but still fuller than a pencil tree. I found this 7 foot "slim fir" on Amazon for $65, and it's perfect - cheaper than even Walmart's cheapest pencil tree and fuller and better-looking. I'm quite chuffed with it.
The corner helps with our dragon illusion, but even the side views
aren't bad:

Lemme show you the rest of my displays, since I worked so hard on them:

SO CHRISTMASSY
(Remember when I made a gingerbread house
from a Dollar Tree doll house, and used real candy? Would you believe it survived all year
in storage bug-free?? o.0)
Spot the dragon:
Spot the dragon:

That's a garden gazing ball I found on clearance several months back.
Around it are vintage wooden toys.
Then we have two more mini dragons over here:

Then we have two more mini dragons over here:

See them? They do blend in well!
These cuties are 3D resin printed, full articulated, translucent, and
absolutely gorgeous. I bought them a few weeks ago at a local festival
from
Crispin's Creations.
One has crystal shards for scales and an extra long tail, the other
has roses down its back:


She's hard to see from above, but I like that she'll be a surprise for anyone who sits here:

What should I name the green one? Holly? Leaf? Samwise? Merry?
Right, let's get back to the real dragon in the room:
Here's what you need to make your own:

This Dragon Costume Set from Amazon, plus one extra dragon mask, which are also sold separately.
Cut the snout off the extra mask, flip it over, and staple or sew it to the first mask like this:

Now you have a mouth!
The eyes are an easier version of my realistic eyeball DIY, since you don't need to add any veins. Don't use human irises, though; google "Dragon eyes" for something with a slitted pupil.
Once you have your eyes, stick them to a wadded up ball of shopping bags or paper, then lay the mask on top and bend it around, using the elastic strap to hold it in place. (We tried gluing the eyes directly to the mask, but it's silicone rubber, and nothing sticks!)
It helps to add a scrap of black fabric over the back, too, to hide your ball of paper/bags.
And that's it! Tuck your dragon head in your tree, then add the tail and wings. We cut our wings off the harness and added a wire to zip-tie each one to the trunk.
Finally I cut up the rest of the second mask to make claws and the suggestion of a neck:
It's a quick-and-dirty job, but works from a distance. And again, SO EASY.
Oh! Almost forgot to show you the tree lights:

After Halloween we found some orange strand lights that twinkle bright blue
for 80% off. On their own the orange/blue combo is jarring/ugly, but after I
mixed in my favorite white twinkle lights it really came together. Now it
looks like magical sparkles glinting off the treasure!
Since I have to make Reels now, here's one of those, too:
We tossed a broken strand of twinkle lights (only 2/3rds work) on the ground and covered it with gold fabric for the tree skirt. I'd love to cover the skirt with plastic gold coins and more flotsam to extend the treasure pile, but this works for now.
I hope this inspires more dragon trees out there! I'd love to see what your treasure tree would look like, and all the ways you'd style your dragon.
Now I'm off to sort through a different treasure hoard: my Dapper Day photos. :p

I hope you'll come back Friday to see some of my favorites, plus our last-minute Kevin & Russel 'bounds and all the fun we had meeting the REAL Kevin. (There was much squealing, honking, and dancing. GOOD TIMES.)
Love y'all! I have some less fun real-life things to tell you about next week, but I hope to have all good news to share by then. Just remember that life is never as easy, perfect, or beautiful as we online people can make it seem. Life is messy and hard, we all have bad days, and it's OK if you're struggling this month to keep it together. It's OK. You're doing a better job than you think, I promise - and it's also OK to fall apart sometimes.
BIG SQUEEZY HUGS.
*****
If you use Amazon, please consider bookmarking my
Epbot Amazon shop! I keep it stocked with lists of things I use and love, gift ideas,
clothing, decor, & more. Anything you purchase through my Amazon links or shop gives a little back to
help support me and John, so it's a free way you can help support us and
Epbot while you shop. Thanks, friends!


Beautiful! Brainstorming how to create an Arkenstone for the tree.......
ReplyDeleteGorgeous! I love the repurposed chatchkes as dragon hoard. And the twinkle lights make it even more magical!
ReplyDeleteHere's a vote for the green one to be Merry! Merry and Rosie sound like a cute dragon cafe/tea shop couple.
ReplyDeleteOh my gosh, that is amazing!! So cute. And obviously if you have Rosie, the other dragon must be Samwise. He's earned a nice Christmas party with his girl.
ReplyDeleteI love it!! And just a thought - have you tried clear bathtub caulking to glue things to silicon? Silicon sticks to silicon really well, and it should work. Plus, it won't smell bad like some other glues.
ReplyDeleteWhat a great idea! Thank you, I'll remember that.
DeleteThat's brilliant! We had to make Aladdin's cave in college and learned you can spray paint anything gold and make it look like a treasure pile. Have fun building your hoard!
ReplyDeleteThis is so fun! I just started reading The Hobbit to my son so it will be fun to show him all your builds. And thanks for the tree recommendation - that looks like the exact size I've been searching for. I do wish I could find one this height/thinness that doesn't require fluffing, but I've not found any.
ReplyDeleteYour dragon tree is SO COOL. The illusion works really well! I feel like it could also be fun other times of year, if one wanted to leave one's tree up year round and just change out the decorations . . .
ReplyDeleteJen - How much of the extra snout did you cut off? Like, are there nostrils on the underside that we just can't see?
ReplyDeleteWe cut off the ENTIRE snout, leaving only an inch or two below the eyes. So err on the side of more! It helps fill out that lower jaw.
DeleteWell... Obvs... Rosie is with Sam!! That's just the way of things. I LOVE this Tree so much!! I'm playing with the LOTR - 7Geese to rule them all, 6 Swans to find them, 5 Rings to bring them all and In the Pear tree Bind them... as a graphic image... so far I'm not liking what I have but I hope to figure it out before the holiday. This may be how I decorate next year!! It's AWESOME!!
ReplyDelete