Time
for another update to John's "Boba Vet" cosplay! We may not have a convention planned anytime soon, but I figure some of you will still get a kick out of our ridiculous progress.
Now I know I lured you in here with the trash monster - and it's here! - but first I want to show you John's helmet.
Obviously we needed the iconic Boba Fett helmet, and you can buy a pretty fantastic one from Rubies for about $50. Well, fantastic if you ignore the factory paint job, that is:
 What in the silverly sunburst flower is happening here.
I've purchased a lot of poorly aged props in my time, gang, but this helmet takes the hilarious cake. I couldn't stop laughing:
 Getting White Hand of Saruman vibes off that section to the left. There were lots more random fingerpaints all over this thing, plus brushy bits like what you see here on the red.
(We glued that doctor's head mirror to the antenna, btw, the helmet doesn't come with it.)
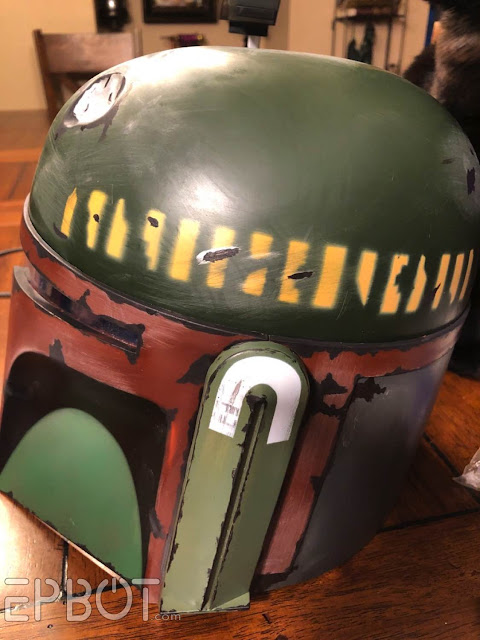
The terrible paint job wasn't a dealbreaker, since I wanted to try my hand at aging it anyway. I found a bunch of reference photos online, then did my best to get all the shiny silver blotches off. They didn't want to budge, even with pure acetone, so finally I resorted to sanding them off with a sanding sponge. Bonus: the sanding sponge took off the plastic sheen and gave some great dusty aging.

Next I went in with flat black paint (or extremely dark gray) and added "paint chips" using a flat-sided artist brush. I was amazed how realistic this looks; even I couldn't believe that's not chipped paint!
The hardest part was getting the black paint in jagged paint-chip shapes:


You could almost stop there, but I couldn't resist adding some silver Rub 'n Buff in most of the chipped areas. I used a Q-tip and tried to highlight just the edges and raised areas.
And here it is all finished!
Now I know I lured you in here with the trash monster - and it's here! - but first I want to show you John's helmet.
Obviously we needed the iconic Boba Fett helmet, and you can buy a pretty fantastic one from Rubies for about $50. Well, fantastic if you ignore the factory paint job, that is:
I've purchased a lot of poorly aged props in my time, gang, but this helmet takes the hilarious cake. I couldn't stop laughing:
(We glued that doctor's head mirror to the antenna, btw, the helmet doesn't come with it.)
The terrible paint job wasn't a dealbreaker, since I wanted to try my hand at aging it anyway. I found a bunch of reference photos online, then did my best to get all the shiny silver blotches off. They didn't want to budge, even with pure acetone, so finally I resorted to sanding them off with a sanding sponge. Bonus: the sanding sponge took off the plastic sheen and gave some great dusty aging.
Next I went in with flat black paint (or extremely dark gray) and added "paint chips" using a flat-sided artist brush. I was amazed how realistic this looks; even I couldn't believe that's not chipped paint!
The hardest part was getting the black paint in jagged paint-chip shapes:
You could almost stop there, but I couldn't resist adding some silver Rub 'n Buff in most of the chipped areas. I used a Q-tip and tried to highlight just the edges and raised areas.
And here it is all finished!

Quite a change from where we started, right?


The back:

The only other complaint I have with the Rubies' helmet is it comes with a clear face shield, when of course you don't want your face visible. Arg. I bought a roll of one-way mirrored window tint to add to the visor, but the film is thick like vinyl, and the visor curves in odd ways. After many tries and much frustration, John finally cut out the original visor and glued in a piece of the mirrored vinyl instead:

It's still not perfectly smooth, but overall it looks great. I love that you can see out but no one can see in, plus the vinyl film is thick enough that it feels surprisingly sturdy.

The last "feature" we added may get us some side-eye, but it's... ::sunglasses::... pretty cool:

See it?
Yep, we cut a hole in the back of the helmet to vent some of the heat, since this thing is basically a portable noggin sauna:

We covered the hole with hardware cloth/metal mesh, so hopefully John's hair won't stick out too much. You can't see it from the front and just barely from the sides, well worth it for the added comfort.
K, that's the helmet, so now let's make another hilarious Star Wars creature, shall we? 'Cuz they're my favorite part.
Remember this?

And this?

Quite a few of you correctly ID'd this as the trash compactor monster from Star Wars, aka a "dianoga," and I'm so proud. ::sniff:: The body is PVC pipe wrapped in a garbage bag, duct-taped, and plastered with flexible drywall spackle.
I have less pics of this creature build because it's entirely John's doing, and John doesn't believe in taking process photos. ::sigh:: ::eye roll::

I have less pics of this creature build because it's entirely John's doing, and John doesn't believe in taking process photos. ::sigh:: ::eye roll::

We spent 2 nights trying to hand-paint the eyeball, but wow
is that harder than it looks on Youtube. After we both tried and failed
I convinced John to buy printable adhesive vinyl and just print the eye instead.
The eyeball is double walled: there's a Styrofoam ball underneath - the part with the printed vinyl applied - and half of a clear ornament over that. This gives it the depth and shine of a more realistic eye.
With the eyeball done John hot-glued it in place and sculpted the eyelid using the same epoxy dough I used on the porg-in-carbonite:

Next John inserted several screws into the bottom of the eyestalk, and sculpted little tentacle danglies around the screws:

The screws help support the weight of the clay; otherwise the clay fell off. (Oops.)

If
you look closely you can see our printed eyeball has some wrinkles, but
you have to be VERY close to notice, and this lil' looker is gonna live 7 feet
in the air over John's head, so I think we're good.
Now a base coat of brown craft paint:
Now a base coat of brown craft paint:

And an absolutely disgusting top coat of red and swamp green:

::shudder::
::slow grin::
And finally a black wash to grunge it up:

With our Dianoga eye stalk done, it was time to turn our attention to how John would carry it. John put the eye in our bedroom to protect it from the cats, where it matched surprisingly well with the wall art:

If
you're an uber Star Wars geek then you know there's more to the dianoga
than an eye stalk. Specifically more tentacles and a horrifying Saarlac
pit of a mouth.
We're... not making all that.
What we ARE making is a portable water tank for the dianoga to sit in, with maybe a tentacle or two flopped over the side. John will wear the tank on his back like a backpack.
To keep it ultra light, John made the pack out of pink insulation foam:
We're... not making all that.
What we ARE making is a portable water tank for the dianoga to sit in, with maybe a tentacle or two flopped over the side. John will wear the tank on his back like a backpack.
To keep it ultra light, John made the pack out of pink insulation foam:

It's held together with hot glue.
He added some trim around the edges with more foam, banged it up a bit to distress it, then handed it off to me for painting:

That hole in the back is for a speaker. More on that later.
I painted the pack Boba Fett green:

Then I used my phone to messily sketch on some design ideas:

We
cut the aurebesh letters on our Cricut, taped and painted the red pin
stripes, and then John helped me make the side vents and control panel
out of craft foam:

The rivets are stick-on pearls from Dollar Tree.
The
aurebesh is a little easter egg for any fans who can read it.
(I fully admit we can't, and googled how to write this.) Since our
dianoga needs some kind of ailment to fit the veterinarian theme, we decided it has dry eye. So the aurebesh reads,
"Visine."
We do keep ourselves entertained over here.
We do keep ourselves entertained over here.
My
final step was to weather the pack to give it some dirt, rust, and
metallic scrapes. I ended up absolutely hating this finish and starting over again, but here's how it looked after attempt #1:

My swampy Florida backyard is the perfect backdrop.
A closer look at the pack. The aging had so much going, which is why I decided to start over:

Here's attempt #2 at the aging:

.... and I still don't like it.
::pained laughter::
Well, at least I have time for an attempt #3? I think it needs more dirt/rust and less silver.

Harrumph. Well, we're moving on and ignoring my paint job for now.
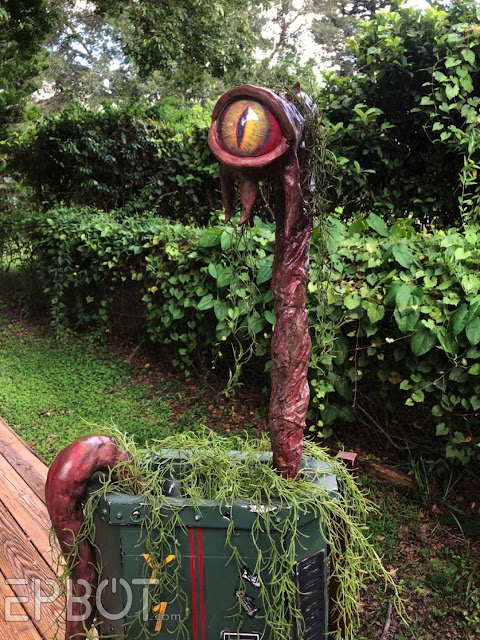
John added backpack straps, a side tentacle, swamp
greenery, and a plastic hose that lets him turn the eye stalk
to freak people out. The hose curves around and fits into John's labcoat near his hip, so he can reach it without looking at it.
I know it looks cramped, but I figure a baby dianoga is squishy like an octopus.

Look how gross this tentacle is:
 Glorious.
John tucked a wireless speaker inside the pack that plays random bubbling sounds and some absolutely terrifying roars - so much that I asked him to turn off the sound when he wore it the first time.
Look how gross this tentacle is:
John tucked a wireless speaker inside the pack that plays random bubbling sounds and some absolutely terrifying roars - so much that I asked him to turn off the sound when he wore it the first time.

My favorite part is the dangling vegetation: it gives some fantastic secondary movement when the eye swivels, plus the hanging strands on the pack sway as John walks.

Something about this last photo feels very behind-the-scenes on the set of Labyrinth to me:
Heheheh.
I hope this gave you an EYEFUL of happy, gang, and that you have the best weekend ever, or at least in a while. I'm planning to get some confetti cake cookies from Crumble - my favorite flavor of theirs, and they have it this week, woohoo! - then we have movie night tonight on the Epbot Discord, so my night's looking pretty sweet.
I hope this gave you an EYEFUL of happy, gang, and that you have the best weekend ever, or at least in a while. I'm planning to get some confetti cake cookies from Crumble - my favorite flavor of theirs, and they have it this week, woohoo! - then we have movie night tonight on the Epbot Discord, so my night's looking pretty sweet.
*****
P.S. Forgot to mention I also bought a neck fan for John to wear with this cosplay. They range in price from about $20 to $50, so I went with what seems to be a better quality one for about $35:

This one has a higher power and longer battery life than the $20 models, plus excellent ratings. It definitely pushes a good amount of air, but 2 caveats: 1) If you're wearing a big helmet with it you can't hear all that well, surprise, surprise, and 2) in the scorching Florida sun John found that having hot air blown around his face wasn't all that helpful, so he took it off within 20 minutes while outside mowing the lawns. My guess is this is better for things like Disney or more leisurely activities, not full-on exercising in the full sun when it's 100 degrees and a thousand percent humidity, ha. Several of you mentioned you had these, though, so where/how do you use them?


That looks so good!!
ReplyDeleteOh my gods, this is every kind of amazing
ReplyDeleteThis is my favorite build of yours yet! So clever, so well done, and I love Star Wars. Thank you so much for sharing your amazing creativity with all of us!
ReplyDeleteThat was an EYE popping Craft!! <3 Fantastic Job!!!
ReplyDeleteI think all the aging attempts were great! The only thing that stood out in each of them was the super white, non-aged buttons! They should be worn down from use, no? lol
ReplyDeleteOr if they're lights/indicators, have them slightly yellowed?
DeleteHave you seen the NBC show "Making It" hosted by Amy Poehler and Nick Offerman? I think the two of you would be great on that show. All your different builds are fantastic:^ ). Looking forward to seeing Boba Vet in action!
ReplyDelete~LST
I love that show! It's so kind, happy, and positive!
DeleteI grinned at the thought of the eyeball staring at you in your bedroom! That would be most unsettling to wake up to in the middle of the night! For my birthday in March I was still working at home and my coworkers did a "drive-by" party for me. One co-worker couldn't make it so they put her picture on a picket stick and waved it around while they sang. They left it for me, and I put it on one of my side chairs in the living room. I kept forgetting it was there and it scared me half to death every time I went in the living room because I live alone and suddenly someone was there in my chair!
DeleteWow!
ReplyDeleteOnly ever use fans when the air temperature is below body temperature - otherwise the fan becomes counterproductive (like John experienced) I only recently learned this, but it makes perfect sense - fans work not by cooling air, but by moving air that is cool (relative to your body temperature) across your skin, taking some of your heat with it. Tl:Dr: Fans don't work when it's hot.
ReplyDeleteWhen I went to Home Depot in search of that one-way film, and explained that I needed it for my son's box costume, they were so amused that they gave it to me for free. And yes, a box. Just a box. A gold box. Not with his head and arms sticking out, oh no. Just a little flap in the front for him to stick his arms out (except his candy bucket didn't fit so his brother had to carry it). There was some creative engineering, believe me.
ReplyDeleteYou need rusty drips coming out of the top from water sloshing. Maybe some moss or slime around the top and trailing down. It needs more water damage.
ReplyDeleteYes!! This!
DeleteI love all the updates about Boba Vet!
ReplyDeleteWhat was that weird silver star supposed to be? The radial marks from whatever dented it? Those were very, very confusing. I love the helmet, and I think the creature and its box are perfect!
ReplyDeleteAhh- yours & John's makes are always so great! I loves watching your processes
ReplyDeleteEeeeeeeee! That's awesome! This might be my favourite build by you guys. Bravo!
ReplyDeleteSo much talent! So much swampy effects that REALLY work!
ReplyDeleteI'm Boba, The Vet
ReplyDeleteMy backpack is wet
I fly through space most every place
To heal all yo pets!
Your Pal,
Storm the Klingon
I think everything you do is great but I can see what you mean about there being a sweet spot between finish #1 and #2. Maybe #2 with a little more of the black scuff marks from #1?
ReplyDeleteAlso, you can look into some cool neck bands that a lot of people use for hiking. You put them in water and they have little beads/absorbent fabric to soak up the water for a long time. Kind of like using a wet bandana but the coolness will last longer.
Did you cut the christmas ornament in half? I need to make eyes for a project. If you cut them, what did you use? Thanks in advance.
ReplyDeleteWe used one of the clear craft ornaments that opens up into two pieces, much easier than cutting!
DeleteI love the dangling vegetation on the eye. When it turns, does the eye feel fabulous? https://giphy.com/gifs/littlemix-holiday-little-mix-0i3J29eIbBrbZT4ldS
ReplyDeleteThe first shor of the trash monster I thought it was an umbrella. Now I want an umbrella with an eyeball on the handle.
ReplyDelete