On Monday John and I found out we're going to Mickey's Not-So-Scary Halloween party this weekend (EEEE!) so we need some last-minute costumes.
And I would apologize for posting Halloween content this early, but I feel like this is the crowd that's already shopping for new skulls and huffing pumpkin spice for breakfast, so... hopefully we're good. ;)
Now, John and I want something cool (it's still 85 degrees at night here), comfortable, and funny, so naturally: Hei Hei and Tamatoa from Moana.
NATURALLY.
These will be sort of extreme Disneybounds: still using mostly regular clothes, but then over-the-top, costume-y accessories. This is totally different from, say, Dapper Day 'bounds, because we're leaning WAY into the ridiculous as well as going for theme park comfort over style.

My inspiration: both in life AND for this costume.
I quickly found some comfy options in my closet for a decent Hei Hei 'bound:

(That's a tank top under the cardigan, which I would wear with the sleeves pushed up.)
Now to ACCESSORIZE - and get to the crafty part of this post.
I looked all over Google for Hei Hei hat inspiration, but everything I found was heavy fleece or crochet or built into a hood of some sort, which is all WAY too hot for Florida.
So I set out to make something on a cotton ball cap, instead.
I won't keep you in suspense: here's a peek at the finished product:

Are you intrigued - or laughing hard enough - to keep going?
EXCELLENT.
Let's begin.
Materials:

John found everything we needed at Michael's for about $8: a red ball cap, one large Styrofoam ball (which I've already cut in half there), and sheets of craft felt in red, yellow, and purple.
The only other things we used - and already had - was a little batting, hot glue, and some stretchy white fabric. The white fabric is technically optional, but it looks better and also holds better, so I highly recommend it.
For the eyes, cut the large Styrofoam ball in half, then use a craft blade to slightly hollow out the back sides, aiming to fit the curve of the hat. They don't have to be perfectly flush with the hat, but keep carving 'til you're happy with how they sit.

You can hold the eyes in place with pins through the underside of the hat.
(Also if you ever need to make a Fly costume, HERE YOU GO.)
At this point I've also covered each eyeball with a stretchy white fabric. (I flipped over a stretch velvet to use the shiny backside of the fabric, but spandex or stretchy nylon would also work.)
NOTE: Make sure you hollow out the back side of each eye BEFORE covering them in fabric.
Covering the eyes with fabric is time-consuming but easy: just stretch the fabric around to the back and pin it, angling your pins towards the center of the eye so you don't stab yourself. Start with the four "corners", then work your way around:
Covering the eyes with fabric is time-consuming but easy: just stretch the fabric around to the back and pin it, angling your pins towards the center of the eye so you don't stab yourself. Start with the four "corners", then work your way around:

You will use a LOT of pins.
When the top of your eye is smooth and wrinkle-free, trim off the excess fabric in the back:

Finish by hot gluing the fabric edges down. Technically you could probably remove the pins after hot-gluing the fabric, but I just left my pins in for extra stability.
Here's the finished, fabric-covered eye:

Now the beak!
Draw a straight line from the center of your hat brim to each edge, then cut:


Find
a bowl that fits snugly inside your hat, then trace the rim of the bowl
onto the edge of your yellow felt. Cut, then fit in place:

When
you're happy with how the curve lines up, hot glue just that curved line, NOWHERE ELSE. Hot glue tends to
darken/discolor the felt, so if you use it all over the beak it could end
up looking spotty. (I made one bad spot before realizing this.)
Next cut and fold the felt so it folds under the beak, and hot glue in place:

The
underside of your beaky brim IS visible, so make sure it's fully
covered. It helps to fold the felt up and under the hat band, as I did.
Next let's make the cock's comb, AKA, the red floppy bit on Hei Hei's head:

Fold your sheet of felt in half and draw something like this on it. The bottom curve is the trickiest part; you want that to match the top curve of your ball cap. It helps to start with a paper template, and to have someone actually wear the hat while you go back and forth adjusting the template. Then transfer the template to the felt, and cut.
You can make this part as small or as ridiculous as you like. We, of course, opted for "ridiculous."
I have zero process pics of John sewing the comb because he's just that fast, but here it is half an hour later sewn, flipped inside out, stuffed, and tacked on to the hat:

You only have to tack the comb down in 3 or 4 places; no need to sew the entire length. Tacking it down lets the comb have a little flex to fit your head better, too, which is good. John hand-stitched the comb on to the hat, but you could also try hot glue; it really doesn't weigh much.
To make Hei Hei's dangly wattle bits (look at all these chicken terms we're learning!), drape a long piece of red felt over the beak and hot glue it in place along the curve of the hat. Make sure it extends back and fully covers the yellow edges of the beak. Don't worry about the wattle ends just yet: we'll trim those into shape later.
Since Hei Hei has a comically small beak, I used an especially wide piece of felt for the wattle, to make the beak look smaller.
Once the wattle felt is glued on, trim the edges to have a rounded tear drop shape.
Now try it on for an obligatory chicken hat selfie:

This step is very important, even if you're not wearing any makeup and your hair is a Stage 3 disaster from trying on the aforementioned chicken hat all night. :p
We're on the home stretch now! At this point it was roughly1:30AM and I forgot to take a process photo, but it's another easy step: Cut 3/4 inch strips from the purple felt, and hot glue them around the eyeballs like this:

Push the felt down to cover any gaps between the eyeballs and the hat, then put the seam(s) in the back. I have two seams on each eye because my felt was short, but neither are visible from the front, so it's all good.
Adding that purple strip is when the hat finally started looking like Hei Hei to me, so I was pretty EGGS-cited. (Oh, you thought you'd get through this tutorial without a single chicken pun? THINK AGAIN, my fine, feathered friends!)
The last step is adding the pupils. You could just paint or draw them on, but we used our Cricut to cut a variety of sizes out of card stock, just to test them out. Ultimately we found that a 3/4 inch circle was just right:

This 2AM selfie is my victory lap.
You might say its... [sunglasses]... POULTRY IN MOTION.
Now some beauty shots I took the next day out in the scalding humidity of our backyard:

::triumphant clucking noises::

::coyly flirtatious clucking noises::

::dramatic, action-hero clucking noises with things exploding in the background::
This hat is super lightweight and comfortable, so I'm incredibly happy with it. There's barely any added weight from the felt and Styrofoam, and it doesn't feel any warmer, either, which is the most important part.

It looks best from a slight angle, so I'll probably turn my head for photos.

Though probably not this much.
(This just makes me laugh.)
THE ULTIMATE SIDE-EYE.

Well, gang, that's my Hei Hei hat!
I hope this made you smile, and I REALLY hope an entire army of you make Hei Hei costumes for Halloween this year, because the world needs more ridiculous chicken costumes in it.
I'm not done with mine, either: I hope to make a feathered collar out of craft foam, a themed bag, and maybe even some kind of glowing green rock to wear around my neck. I'd also like to wear a picture of Alan Tudyk as a brooch, because that ALSO makes me laugh, and I'd love to see how many people get the reference.
I'm still brainstorming, so if you have any other fowl ideas, let me know in the comments!
For John's Tamatoa 'bound he's planning to wear bright blue shorts and Chucks, a purple t-shirt with "Shiny" written on it in gold foil, a metallic gold backpack, and one of these light-up headbands:

Aren't those perfect Tamatoa eyes?? They have mixed reviews on Amazon, though, so we're just hoping they work when they get here. I'll keep you guys posted, as we see how much more we can throw together in the next 2 days.
P.S. Is there anything in particular you'd like me to photograph/film at Mickey's Not-So-Scary Halloween Party? I have no plans other than to wander and see all the shows, so put your requests in the comments!
*****
*****
Wait! One more thing! While I was looking up those glowing eyes on Amazon I also found THIS:
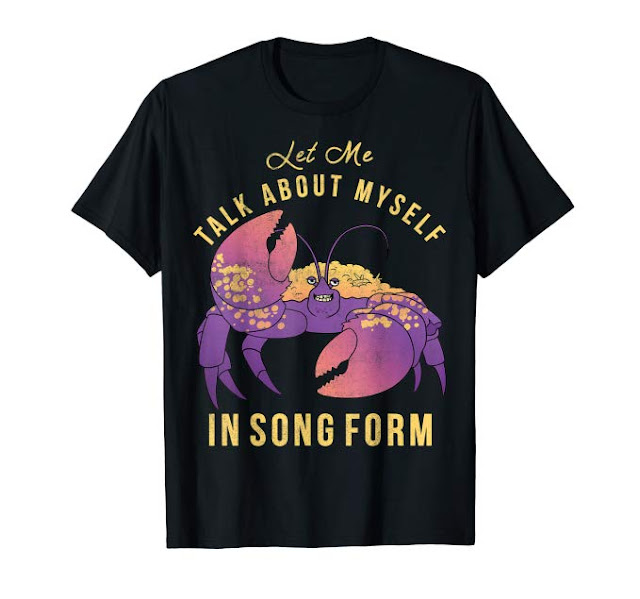
Bahaha!
It also comes in women's cuts, but I'm so tempted to get this for John instead of the purple shirt for his costume. That wouldn't really be Disneybounding or costume-y, though, so I'M TORN. Which is better? This shirt (still with blue shorts & shoes & the headband) or a purple shirt with a gold "Shiny" on it? HALP.
(Honestly I might get the shirt anyway; it's too perfect for John, since he's forever singing in the background while I'm trying to take videos of the cats. :D)


Get the shirt and make him sing. Record it for us. Years ago I was in Maryland at a crabshack with a trio playing show tunes. Silly men thought they could stump me - nope! Proud Wardrobe Mistress/Master Electrican/Costume Designer of musicals for decades. Sing people, sing!
ReplyDeleteI adore that Tamatoa shirt, but I do think the Shiny one is better for the costume. Get the other one for Christmas. ;)
ReplyDeleteI'm seriously in love with the HeiHei hat and now want to do that for Halloween. Stay tuned!
Color me inspired! Totally going to make this hat. Thanks for sharing!
ReplyDeleteI was today years old when I realized I needed a rooster hat in my life.
ReplyDeleteFor John's Tamatoa, you should also look for a shiny gold backpack/drawstring bag, and hot glue some gold coins/trinkets to it. Functional AND decorative!
ReplyDeleteDon't forget Maui's hook!
DeleteThis comment has been removed by the author.
DeleteWhat Amanda said, backpack covered in shinies! Maui's hook would be great too!
DeleteYes! The "shiny" shirt with the backpack for sure.
ReplyDeleteGold flip sequin backpack? Those are super shiny!
ReplyDeleteThe purple totally makes the hat. I love Hei Hei and love that they used a Juilliard trained actor to portray him. Tamatoa, is a great costume idea too, need the song playing in the background some how. Can't wait to see you both (photos). Have fun!
ReplyDeleteDavid Bowie version of Shiny https://www.youtube.com/watch?v=xH2buGosNwA
How about a belt that you've attached feathers to for a mock tailfeathers?
ReplyDeleteBahahaha! I lurve it so much! Can't wait to see pictures from the party.
ReplyDeleteI love the shirt
ReplyDeleteI think John needs a gold sequin backpack.
ReplyDeleteYour Hei Hei hat looks amazing! And the clothes you picked are going to look so perfect with it.
ReplyDeleteThe Shiny shirt will definitely be better for John's costume, but it sounds like he needs to have the other one as well.
When I was watching your IG, I thought this was the giant chicken at the KFC in Marietta, GA. You could repurpose the hat for an amazing cosplay at DragonCon next year!
ReplyDeleteSpirit Halloween opened in August and I was there within the first week so of course I'm already in Halloween mode.
ReplyDeleteI've never been to Disney so pictures of anything are great. But also need Emma Rubuni's Peter Pan from you guys, heehee.
I love this! I think I might do it!Thanks, Jen!
ReplyDeleteI love the idea of the Alan Tudyk broach. He is my absolute favorite and it always makes me smile to know that he is the voice of Hei Hei.
ReplyDeleteDon't forget these!! https://smile.amazon.com/Knee-Socks-chicken-Animal-Print/dp/B071G14Z4F/ref=sr_1_1?keywords=chicken+leg+tights&qid=1568319071&s=gateway&sr=8-1
ReplyDeleteEvery year the teachers at my school do a book character pumpkin. The kids vote for their favorites with coins as a fundraiser, then they cart all the books and pumpkins down to Texas Children's Hospital to give out to the kids. If I can find a Moana book, I absolutely HAVE to adapt your hat to a pumpkin. Thanks for the inspiration!
ReplyDeleteIf it helps, my 2 year old is obsessed with the Golden Book. https://www.amazon.com/Moana-Little-Golden-Book-Disney/dp/0736436030/
DeleteThat is a truly fabulous hat! Thanks for sharing it with us.
ReplyDeleteI love this! And your collar you shared on IG. Can't wait to see it all together!!
ReplyDeleteIf you've never watched chicken run, please do. Other than using the poultry in motion line and many others, it's just great. And mostly about chickens!
ReplyDeleteMy not-so-scary halloween outfit for this year is a bat kigurumi that I bought for my friend's party. We always spend halloween playing horror (board & video) games and having a faff anyway, so wearing what is essentially a pajama works just fine. Also, being from Finland, it's fine that it's a warmer outfit. Can't wait. ��
ReplyDeleteI have to laugh at my sleep deprived self-- when you mentioned a "cotton ball hat" I read that as a "cottonball hat" and wondered how gluing cotton balls to a hat would look like a chicken, but I had total faith that you and John could do it!
ReplyDeleteWhy do I feel like I need a chicken hat now? SO much YES to the Alan Tudyk brooch!! Are you going to make a tail(or maybe pin back the bottom edge of the cardigan to be tail-ish)? If you wanted to be a slightly more understated classy ridiculous chicken(ha!), you could replace the craft foam feathered collar with a graduated fan necklace.
ReplyDeleteEggsellent! A chicken dance and chicken hat is part of Oktoberfest madness, so this is dual purpose. Or maybe you could make a chicken hat for your chicken hat?
ReplyDeleteI am making this for my DD for her Halloween costume. Curious how you attached the eyes to the hat. Did you just hot glue them on?
ReplyDeleteYep! Everything is attached with hot glue.
DeleteThank you so much for this guide! The hat turned out so good that my coworkers didn't believe that I'd made it! Cluck cluck cluck!
ReplyDelete