Ready to see part of what John and I've been working on the past few weeks?
Not the whole thing, of course, but at least a little of it?
SWEET.
Not the whole thing, of course, but at least a little of it?
SWEET.
First pretend you didn't read that post title for a sec. You know, so you'll be surprised.
Ahem hem hem.


BB-8!!
As
you can see, this BB's been through a scrap or two. Never fear though, he's a tough little droid and will have a lively conversation with you
if prompted.


There's much more to our Project, but I thought BB-8 would be a fun partial reveal for now. Especially since he can be made separately!
I'll
warn you, our BB-8 doesn't roll; he's a static model. He's also not 3D
printed - a rarity in the BB-8 building community - nor is his
body made from a large acrylic lampshade globe, since those cost around
$130 each. o.0
In fact, our droid is made entirely from common materials, and only cost around $50 to make, since we already had some things on hand. That's right, fifty bucks!
Here, let me walk you through it.
Here, let me walk you through it.
First
you'll need one large exercise ball, inflated to about 20 inches, and one smaller ball at around 10 inches. (You can find both sizes at Walmart.) Stick them in large bowls so they won't roll away:

Make sure the air hole for each ball is on the BOTTOM, so it's still accessible later.
Carefully cover both balls (the urge to make jokes here is strong, y'all) with a single layer of cling wrap:
Carefully cover both balls (the urge to make jokes here is strong, y'all) with a single layer of cling wrap:

Make the wrap as smooth as possible, without too many bunches. The wrap will allow you to remove the balls later.
Next apply 4 - 5 coats of paper maché on both balls. For the head you only need to cover a little more than halfway down. It's up to you how much of the body to cover, though, since you can always leave a hole to be covered by the head later. Err on the side of covering more, though; you can always trim it later.

That's no moon.
Once all your paper maché is applied and dry (this took 2-3 days), it's time to move outside for a much smellier application:

BONDO.
Bondo is great for this because it's spreadable, fast-curing, and surprisingly flexible, so you don't have to worry about chipping later. It's also readily available at Walmart for about $15/gallon. SCORE. (One gallon is plenty.)
Apply a healthy coat of Bondo, spreading it as evenly as possible with a plastic smoothing spatula. It won't be super smooth (see above), but no worries; next, we sand!

A palm sander is great for this, but elbow grease works, too. Repeat with more Bondo as needed if there are any patches of paper mache showing through, or until you reach your desired thickness. (John did two coats.)
Once that's cured and sanded you can deflate & remove both balls. Trim the edges of both the head and body so they're even & perfect circles.
BB-8 has a metal band on his head, which John fashioned from flexible aluminum stacked on a wooden ring:

You can find the aluminum at any hardware store, and the wood can be substituted with EVA foam if you don't have power tools to cut it.
It's not a perfect fit, but close enough:

Later John added a thick ring of EVA foam under the wooden ring to make BB's "neck" - that angled section under his head.
Note: You can stack 6mm craft foam to make thicker pieces; no need to buy a whole roll of EVA.
Note: You can stack 6mm craft foam to make thicker pieces; no need to buy a whole roll of EVA.
Once both the head and body are as smooth as they're going to get, it's time to break out the compass and start drawing in the many, MANY details:

Print out as many reference photos as you can, and use a compass for all the circles and curves - it's a life saver.


BB-8 is one of those things that seems simple until you stop to really look at it, at which point you sit down and cry a little, because HOLY COMPLICATED, BATMAN.
I joined the BB-8 Builder's Club online for a little guidance, and happily they have a file of BB's body design you can download. We printed off all six sections and used them for templates:


Now comes the really tedious part - or at least the NEXT tedious part in a long line of tedium, ha.
Get out your Dremel with the small pumpkin-carving bit, and go over every. single. line.

I'll warn you now: your lines are going to look terrible. They'll be wobbly and jagged and though practice helps a little, the fact is they're never going to be perfect. But it's OK, I promise. It's not just you; everyone's lines look bad.
The good news is it won't matter in the end, so just keep going. Take breaks to shake out your hand, though, because you WILL have a frozen crampy claw after a while. I spread this step out over two nights.
Once all your lines are Dremeled, it's time to prime. You can use buildable/sandable primer and sand some more if you'd like to get that texture a little smoother:

Or just use any white primer to lay down a nice base for the rest of the paint. This will be the final coat for the white color, so make it a nice one - nothing too gray.
Here you can see BB-8's neck ring, which I covered with random foam squares to simulate all the doo-dads under his head:

Pay no attention to BB-8's body cut in half over there.
I said pay no attention!!
I said pay no attention!!
And now... WE PAINT.
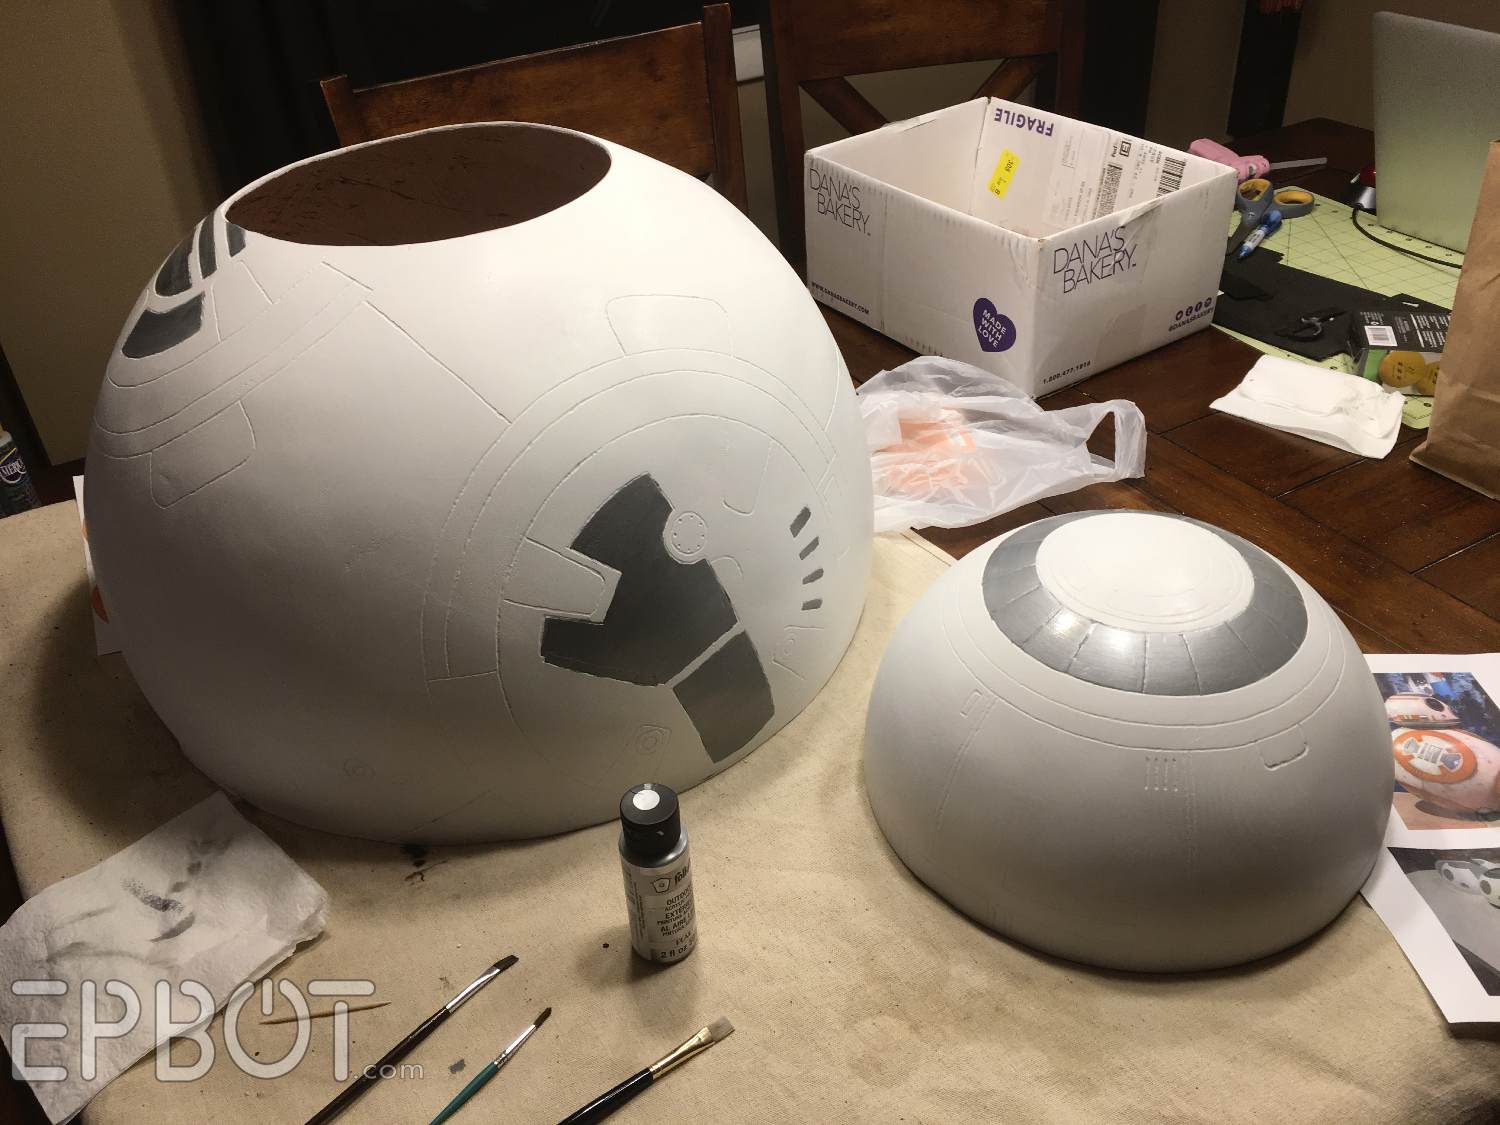
I used a metallic silver craft paint for the gray sections, and more cheap craft paint for the orange - though we custom-mixed our own shade. I watered down both colors slightly and applied them with the softest brush I could find to minimize brush strokes.

I'll warn you now, your BB-8 is NOT going to look good at this point. The wonky lines will be all in your face, taunting and yelling about how you're a no-talented, 2-bit hack. Ignore them. This is gonna work out, I promise. Look at me, waving these virtual pom-poms. You got this.
For BB-8's eye you'll need one of those plastic Christmas balls that come in 2 pieces from the craft store, plus some thin black craft foam. Some builders dye the eye cover black, others don't - it's up to you. We chose to dye ours using Polyster fabric dye. It didn't work very well (ours came out splotchy), but it DID work.

I'm sorry I don't have a template to share for his eye surround, because John just "winged it." He's talented like that. Yes, it's annoying.
If you want the eye to light up (which it should), poke a single red LED through the back side of the foam, then tape on a button cell battery. BAM. BB-8 is alive!
There's another piece on BB-8's face that's much harder to build - I think it's his holo-projector? After some experimenting John went with a small routed piece of wood topped with a blue glass gem and more craft foam:

John made tiny slashes in the foam to make that beaded texture around the marble. So smart.
Note: Instead of wood you could form that rounded base from paper clay, or even more craft foam, which rounds nicely when heated.
Note: Instead of wood you could form that rounded base from paper clay, or even more craft foam, which rounds nicely when heated.
I did the paint job to simulate the raised panels, and I'm not all that pleased with it. Still, when it's lit up and back a ways it gets the job done.
Here are both on the head:

For the antennas John headed over to SkyCraft, our favorite local electronics junk shop, and found two options he then covered in heat shrink tubing:

You can always use painted wooden dowels though, and sand the tips to they're rounded. Drill holes in BB's head, poke 'em through, and glue down from the inside.
In that photo you can see I've started outlining the panels with a thin brownish-gray paint. This is where the magic starts to happen, peeps. Get that paint inside all your Dremeled lines, then spray the whole droid with a layer of satin lacquer to lock it in. (Without sealing you could re-wet the paint in the next step. That would be bad.)
Make sure it's a satin spray, so BB-8 will have a nice metallic sheen.
Make sure it's a satin spray, so BB-8 will have a nice metallic sheen.
Now the fun part: AGING.

Get a larger stipple brush and a rag, and concentrate your aging on the seam lines. This helps camouflage the wonky lines, and also looks more believable, since dirt would accumulate there anyway.
I find the best dirt color is a mix of gray and rusty brown, but have some areas of both colors for variation.

EXTREME ZOOM.
You can make BB-8 as clean or as dirty as you like, but given this is NOT a 3D printed version, I recommend some hefty aging to disguise any texture issues.


Now I'm going to tell you a sad tale with an OK ending. Ready? At this point disaster struck.
John was moving something late one night while in a hurry, and BB-8's completed head (as seen above) fell six feet onto the hardwood floor, breaking badly. (HE WAS THE ONE WHO KNOCKED... his head.) BB's projector nozzle thingy hit hardest, resulting in several large raised cracks across the front of his face.
It was somber time in the Yates' household, y'all. WEEKS of work, shattered in half a second.
But after a moment of stunned silence we got out the superglue, fixed what we could, and set about turning lemons into lemonade.


Now our BB-8 has some pretty badass scars, if I do say so myself. Instead of trying to hide what couldn't be hidden, I sealed and then emphasized some of the damage - even adding a few more cracks, in fact, so it would look intentional. The rest I hid as best I could under more layers of grime.
I'm most proud of the brownish "dirt" smear in the extreme upper right here:

That's actually another crack - can you tell?
And hey, since we wanted a battle-worn BB-8 anyway, I think it all worked out. At least now we'll always know which one is ours! :D
It's intentionally subtle, but we do have 3 lit elements in BB-8's head:
 His projector has a dim blue LED, and the little circle under his eye is lit with a frosted piece of acrylic. (Pro tip: sanding clear plastic "frosts" it.) If electronics scare you, though, just go with the single red eye; it's by far the most important.

Our BB-8 also "talks" and can swivel to look at you, but those elements will have to wait for next time. Again, our Project is still a work-in-progress, but we're hoping to debut it at Star Wars Celebration, so you don't have much longer to wait! (And we don't have much longer to finish! Eek!)

And hey, since we wanted a battle-worn BB-8 anyway, I think it all worked out. At least now we'll always know which one is ours! :D
It's intentionally subtle, but we do have 3 lit elements in BB-8's head:


Our BB-8 also "talks" and can swivel to look at you, but those elements will have to wait for next time. Again, our Project is still a work-in-progress, but we're hoping to debut it at Star Wars Celebration, so you don't have much longer to wait! (And we don't have much longer to finish! Eek!)

And since I was curious myself, here's an approximate cost breakdown. Again, we had some of this already, but assuming you need to buy EVERYTHING here's an estimate:
Exercise balls: $15
Paper maché materials (newspaper, flour): $5
Misc: (Aluminum trim, scrap wood, craft foam, antennas) $15
Bondo, 1 gallon: $15
Craft paint: $5
Christmas Ball: $1
Spray lacquer: $7
Spray primer: $5
LEDs, wire, button cell batteries: $10
Total Cost: $78
Hope you guys enjoyed the virtual walk-through! I know this wasn't a complete tutorial, so feel free to ask questions in the comments. And as always, if you make your own PLEASE share over on Facebook; I wanna see!
***
Want to see ALL of my tutorials and project build in one place? Then head over to the Craft Page!


Huh... when I read that BB8 has a metal band in his head, I pictured something more like this: Metal Band
ReplyDeleteLove your posts. Love the stuff you make. I just don't have the energy (emotional or mental or otherwise) to put into crafts, or home improvement, or anything of that nature, and I really wish I did. So for now, I'll just live vicariously through your stuff. :) My heart was hurting for you about the break, though. Been there, baking-wise. Ugh. Glad you were able to creatively salvage it!
ReplyDeleteLove it. He looks fantastic, as do all of your builds!
ReplyDeleteWonderful! He looks amazing! I think you should do a tutorial on distressing...mine always looks like smears not aging.
ReplyDeleteYou guys never cease to amaze me with your creativity!!! He looks fantastic!! Please tell me you'll be at Celebration on Thursday?! Our 3yo daughter is coming dressed as Rey and would be beside herself excited to get a picture with your BB8!! She's been listening to the movie soundtrack everyday and is getting really excited for Celebration (we've showed her pictures from our trip to the 2012 Orlando one, but missed finding you that year).
ReplyDeleteHi Cara! We haven't decided which day(s) BB will be out, but Thursday is a strong possibility, since the crowds will be less crazy then. (Offhand I'd guess we'll have him out Thurs & Sunday.) I'll try to announce here on the blog when we know the days for sure!
DeleteThat is awesome! The aging is perfection! Thanks as always for sharing the how to. Now I have a sudden urge to go buy Bondo and exercise balls!
ReplyDeleteHe's so adorable! Can't wait til you show off all he can do when you're done!
ReplyDeleteWow - another project well done! Love how you turned an accident into battle scars for BB8. Thanks for the breakdown of how you two put him together.
ReplyDeleteyou are both wildly talented! your bb is magnificent! and i actually love his scars. the are unique and give him character!
ReplyDelete#mostexcellentwork
Awesome job guys! I swear, you two are miracle workers with paper mache, between this and figment, is there anything you can't make? And your solution for the crack was great, I think it looks more brilliant cracked like that. Perfect.
ReplyDeleteHoly WOW!! He looks amazing! All the details, and the way you fixed him after his misadventure? You guys just never cease to amaze. Are you going to be bringing him to Dragon Con? Pretty please? *bambi eyes*
ReplyDeleteI'm preeeetty sure he'll be coming with us to DCon, yes!
DeleteYAY!! I'll have to make sure I wear my Jyn costume that day and find you guys!!
DeleteThe "scars" are giving me some serious Mad Eye Moody vibes and I love it!
ReplyDeleteWOW! BB-8 looks amazing. I think he looks even better with the scars. He's not some pristine droid; he's seen some action.
ReplyDeleteThanks for the heads up on his potential show days! We figured the same, Thursday would be kid friendly so she'd be less likely to be overwhelmed by the crowds. Here's to hoping we finally get to meet you!
ReplyDeleteSeriously impressed. I love how you two imagine these things up - that's a special gift to have that kind of vision.
ReplyDeleteI love it! I have a weird BB-8 obsession (my favorite color is orange so start there) and I think I'm going to have to make my own. Not going to lie though, I got very confused when I saw the reference to Skycraft (we call it skycrap.) I forget y'all are in Orlando and couldn't figure out why (or how!) there would be two of them. That is the best.... place.... EVAR! I go in there all the time buying bits and bobbles for my various projects.
ReplyDeleteI also love the cracks. After all what they know and what you know are always two different things. Battle damage is epic.
He looks AMAZING! :D
ReplyDeleteHe looks so awesome! I'm a longtime reader of this and cakewrecks, first time commenter, but I'm all excited about my first time going to Celebration and I'm hoping I'll get to see BB-8 in person there.
ReplyDeleteThis is amaze-balls! hee hee - GET IT??
ReplyDeleteSeriously good!
Question (and forgive me if you already answered it): If BB doesn't roll, what is your plan to maneuver him throughout the con?
--Piper P from Washington State
Part of me is going: Wow, I could make that! Another part of me is going: Are you crazy, you hardly have time to cook decent meals for you kids, how are you going to find time to make that?!
ReplyDeleteGuess I'll just continue to live my life through Epbot for a few more years.
OMG!!!! I am so making one for display in a dead space in our home theater. I am singing your praises right now because yours is by far the best and easiest plan I've seen. I only wanted a simple static one for ambiance and I'm a a crafty artist so this right up my alley.
ReplyDeleteI am attempting to make one now and I got to wondering....how is head attached to the body? Just glued on?
ReplyDelete