I've got a super fun DIY for your next craft night, gang; this was a huge hit with my group, and I think my favorite thing we've made all year:
Hobbit Door Wreaths!
Or alternatively, Fairy Door Wreaths.
In fact that's what I love about these: they're infinitely customizeable. And - AND! - you can buy everything you need from Dollar Tree, so they only cost a few dollars each to make.
Here's my Friday Night group hard at work on theirs:

I'll show you all their finished wreaths as we go along.
First, let's talk materials:

I found the wreaths, flowers, rope hangers, moss, and I think even the wood beads all at Dollar Tree. The only thing not from DT on mine are the tiny mushrooms and the insulation foam we used for the doors - but here's a handy foam substitution you CAN find at Dollar Tree:

Did you know you can peel off the paper backing from DT foam board? I just learned this trick from Studson Studio, my new favorite Youtuber. You can stack the foam together to make thicker pieces, and just like pink or blue insulation foam, this stuff carves & textures like a dream. Perfect for woodgraining.
Again, we used pink foam because we have so much in the garage, but everything I'm about to show will also work on DT foam.
Last thing: be on the lookout for things you can turn into tiny door handles. Wooden beads, jewelry pieces, or these finger puzzles from Dollar Tree all work great:

A little gold paint, and you can turn that into this:

Calvin went with a homey swamp aesthetic for his door, and had an elaborate backstory of the crotchety hermit who lives there, ha. (Yes, basically Shrek.) I LOVE the moss growing out of the knots in the wood.
Oh, you'll also need hot glue and basic craft paints, btw. Make sure everyone has their own work station, including the cats:

Check.
First things first, trace your wreaths onto the foam and cut out your door circles. Make them a little big, because we'll be pressure-fitting them into the wreath later.
Now, we woodgrain!
This is the fun part.
You don't need special tools for this, but if you HAVE carving tools, give them a go. Practice on the back of your door or a separate scrap first. I tried out a bunch of tools, so let me show you my 3 favorite, and what they do:

This fat wooden knife made thick jaggedly lines, perfect for the seams between the wood planks. (You can also use a butter knife.) Make these seams first.
Next, this metal loop makes fantastic wood knots:
Next, this metal loop makes fantastic wood knots:

Just drag down, and you'll get a roughed-up patch. If you don't have a loopy tool, try dragging a craft blade horizontally for a similar effect. Do these knots second.
Finally, I used this sharp needle tool for all my grain lines:
Finally, I used this sharp needle tool for all my grain lines:

You can use anything sharp and pointy for this, like a toothpick or pencil. Don't be afraid to carve deep; too light and the grain won't show up after painting.
The hardest part with woodgraining is knowing when to stop, but by the end you should have something like this:

The hardest part with woodgraining is knowing when to stop, but by the end you should have something like this:

Next paint the entire thing with flat black craft paint. (Spray paint dissolves this foam, so that's a big no-no.) Really scrub the paint into all the grain lines; you don't want ANY foam showing.
The paint will take a while to dry, especially if your grain lines are deep, so this is a fantastic time to break for dinner.
Behold our build-your-own baked potato bar, with both sweet and regular potatoes, all the regular fixings, plus barbecue pork and spicy chicken with ranch dressing. Aw yeah. SO GOOD.

P.S. BBQ on a sweet potato will rock your world.
Right, back to crafting or whatever.
;)
Next is the fun part. OK, another fun part. DRY-BRUSHING.

Grab at least 2 shades of the color you want: one darker, one lighter. Start with the darker shade, pounce most of it off your brush onto a paper towel, and then lightly brush it over your door. It helps to brush against the grain like I'm doing here, so you only hit the top peaks.
For my blue door I used both a cobalt blue and turquoise craft paint for my base coat. You can see that was still pretty dark after my first coat:

For my blue door I used both a cobalt blue and turquoise craft paint for my base coat. You can see that was still pretty dark after my first coat:

I kept layering up the blue and the turquoise, then added a bright blue highlight, which eventually gave me this:

Once your door is done, it's time to squish it into your wreath. Ours took some trimming because John cut our foam into perfect circles, and the DT wreaths are anything BUT perfect circles, ha:

Don't worry if there are gaps or crunchy edges; you can cover a lot of that with moss and flowers later.
Now another fun part: DECORATING.

Now another fun part: DECORATING.

Gratuitous pretty picture I took while picking my flower colors. Shades of a blue hydrangea, right?
At those point you may hot-glue on all the moss and flowers and whatnot your hobbity heart desires.
There's no right or wrong way to do this, so let me show you the rest of my group's for more inspiration:
There's no right or wrong way to do this, so let me show you the rest of my group's for more inspiration:

Kelsey used hot glue and beads to make this incredible doorknob, then decorated with big chunks of moss.
She and Calvin made theirs a co-ordinating set:
She and Calvin made theirs a co-ordinating set:

Calvin was so proud of his test scrap of foam that he made sure I got that in the photo. :D
Kari - who's actually BEEN to Hobbiton in New Zealand, so we're all insanely jealous - made two almost identical wreaths so she could give one to a friend.


The doorknobs are wood beads with little filigree pieces on top.
Kari is a professional faux finisher, and it shows, because peep that incredible woodgrain and highlight! I shamelessly tried to copy her for my first door, but I'm terrible at "random" and made my highlight way too even:

Kari is a professional faux finisher, and it shows, because peep that incredible woodgrain and highlight! I shamelessly tried to copy her for my first door, but I'm terrible at "random" and made my highlight way too even:

::Stitch voice:: "It's small, and not highlighted well, but still good. Yeah. Still good."
I added a little piece of craft foam at the bottom to look like a flagstone - did it work?
I also added teeny plastic mushrooms I already had from Amazon:
I added a little piece of craft foam at the bottom to look like a flagstone - did it work?
I also added teeny plastic mushrooms I already had from Amazon:

I originally bought them for a Wonderland teacup garden, which I still want to make someday. That's on the list for a future Craft Night.
More wreaths! Here's Karen's blue door:
More wreaths! Here's Karen's blue door:

And Traci's red one:

Traci carved in an extra door trim around the edge on hers, which I really like, then the doorknob is more little pieces from my jewelry stash.
Forgot to mention it, but our hangers are just a piece of DT rope hot-glued to the backs:

One pack of rope was enough for at least 8 or 9 wreaths.
For something completely different, here's John's non-wreath Hobbit door:
Forgot to mention it, but our hangers are just a piece of DT rope hot-glued to the backs:

One pack of rope was enough for at least 8 or 9 wreaths.
For something completely different, here's John's non-wreath Hobbit door:

I told him he made a haunted Hufflepuff Hobbit hole, ha. This is made entirely out of pink insulation foam and a little moss.
We're watching Lord of the Rings this week for the first time in ages, and after Bilbo's "Concerning Hobbits" John and I've decided all Hobbits are Hufflepuffs. Any seconds? Are we all in agreement here?
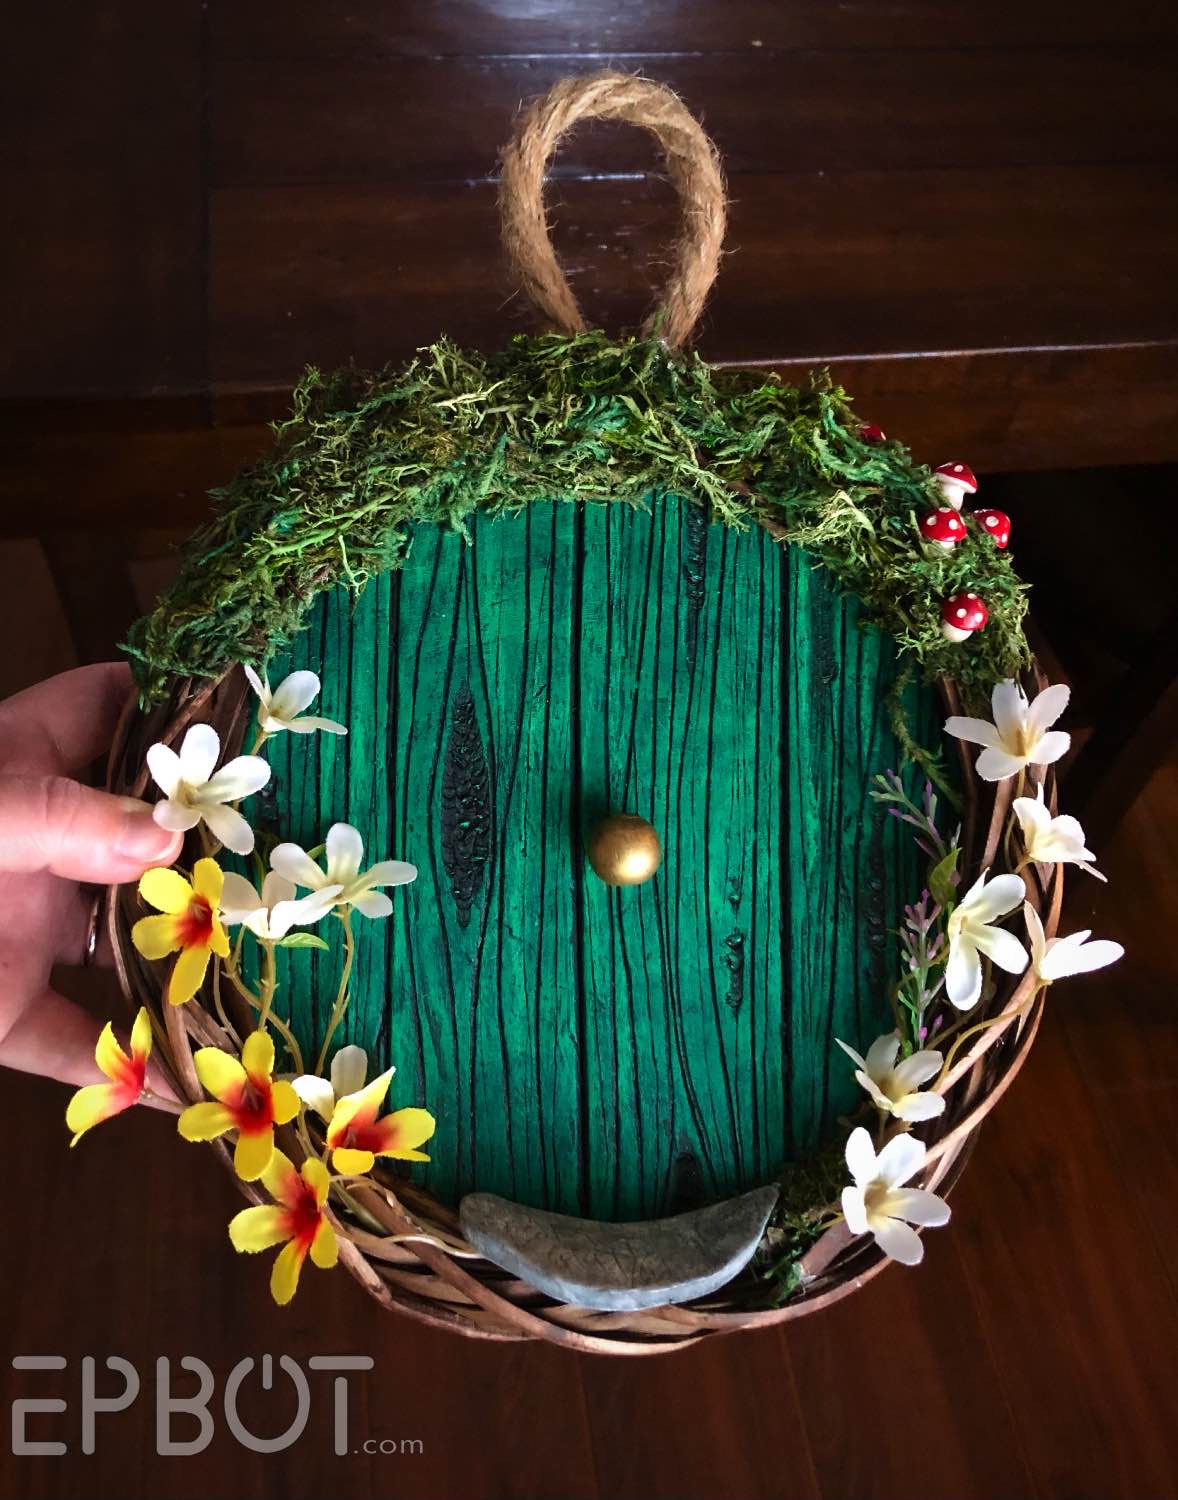
And finally, here's my finished blue door wreath, which I'm super proud of:

I really love these colors together, and I think I did better with the highlight this time. I spent too long making that fancy doorknob, but I think it was worth it.
Here's an extreme zoom of the top handle piece: I rounded a filigree in my doming block, then glued on a gem I cut and filed from a scrapbooking brad:
Here's an extreme zoom of the top handle piece: I rounded a filigree in my doming block, then glued on a gem I cut and filed from a scrapbooking brad:

I finished with a light coat of gold Rub N' Buff, then fitted it over a wooden bead.
I hope this inspires some happy craft nights of your own, 'bots! After spending most of my life crafting alone, I can tell you it's SO much more fun with friends and laughter around. Sometimes the distraction of other people helps me break out of my perfectionism, plus you get to bounce ideas off each other and ask for advice, which I love.
Then when you're done, you get one final art project left behind:
Then when you're done, you get one final art project left behind:

There's something about the enormous mess after a group project that makes me so happy. Though vacuuming up moss dust for the next week makes me... less so. (How. HOW does it get everywhere??)
Love y'all, go do something that would make Bilbo proud this weekend! You know, like bake a pie, plant some flowers, or have a nice cup of tea snuggled up with a good book. Mmm. That's the stuff.
*****
P.S. My Squeegineer winners for the month of June are Mely J. & Mara P. Congrats, you two, and please check your inboxes for a message from John, so you can pick your prizes!


You know what else is amazing in a sweet potato? Buffalo chicken! With ranch or blue cheese.
ReplyDeleteFWIW, those aren't finger traps. They're launching dart toys. You sort of scrunch the mesh bit against your hand or finger, then let them go to launch them. I seem to recall the name-brand, non-DT version are called 'Doinks'.
ReplyDeleteWonderful, as always, but I'm actually motivated by this to try making them! Living in the UK, I'm sure I can find most things at hobby/craft stores, but how thick are the DTfoam boards so I can make sure to try to get something not too thin? Also I would love to get some of that pink insulation board for sculpting other things, but Google isn't being helpful at all. Leaving out the colour, what is this insulation for? Walls, floor, etc.? And how thick is it..any additional info you can give me to try to find something similar would be appreciated, thank you!
ReplyDeleteI've seem pink and blue foam for sale in the range here in the uk. In suitable size chunks and sheets for crafting. Shame our pound shops don't seem to carry all the same things as dollar tree.
DeleteThe pink & blue insulation is for walls, and comes in varying thickness from 1/2 inch up to an inch, I believe. Our larger hardware stores all carry it, so hopefully some of yours do, too? Comes in big 8 foot sheets, so one will last you forever!
DeleteThanks, both! Sounds like a trip into the real world is called for :-)
DeleteThose are great! I do agree that most hobbits are 'Puffs, but I think an argument can be made for Merry and Pippin in Gryffindor.
ReplyDeleteI LOVE Studson Studio! I've watched his videos way too many times.
ReplyDeleteI’m teaching a LotR literature class at our homeschool co-op this fall for middle and high schoolers and this will be a perfect craft for us to do-I can’t wait!
ReplyDeleteOh. My. Goodness!!! I must make one! More than one! They are so perfect!! I have been sitting on the idea of a "Speak Friend and Enter" wreath, so this is too perfect. Do they belong on the same craft, or do I just do coordinating decorations 🤔 . . .
ReplyDeleteThis post was so timely! I’m in the process of making my daughter’s LOTR/Hobbit nursery and this is perfect for her room!
ReplyDeleteI, too, have been to Hobbiton. I was really proud that I only cried three times.
ReplyDeleteJohn and I've decided all Hobbits are Hufflepuffs. Any seconds? Are we all in agreement here?
ReplyDeleteYes. Yes, we are. I just had one too many draughts of Entwash.
(Andvthe Sackvikle-Bagginses got into Slytherin, but they regretted it)
I adore the fact that John is unselfconsciously wearing a wreath in the first photo. That’s just so John. Thank you for documenting craft night, I think this may be something I’d like to duplicate!
ReplyDeleteOH! How about lion drawer pulls! DOOR KNOCKERS! Now I want to do this too.
ReplyDeleteDespite the fact that there is a huge thunderstorm and deluge happening, I'm grabbing my purse and running to DT right now! This is the cutest thing yet! I think I need to make every variation, they are all so sweet!
ReplyDeleteObsessed with this!!!!! Want to make one!!!!! Also your cat looks just like mine! :)
ReplyDeleteI'm having a ton of trouble peeling the paper coating from the foam core. Fwiw, my DT didn't have foam board in stock, so I'm using a name brand that starts with an E. I'm not sure if that means it's more difficult to remove? Can you link directly to the video from that YouTuber where they address the foam core trick? Thank you!
ReplyDeleteI just had this exact problem last night, and realized I was using Walmart foamboard instead of DT. So yes, I think the paper only peels off of the Dollar Tree brand; everything else is too quality, ha.
DeleteThat little rounded filigree thing was a bead cap, right?
ReplyDeleteVery close! It was a flat filigree stamping I rounded over a bead - effectively making my own bead cap. :)
DeleteI had tons of fun making this! Thank you so much for the idea. I love it!
ReplyDeleteThis is so fun! I was wondering, if I wanted to use this activity for kids, is there an alternative you'd suggest to using hot glue guns to add the decorations? Thanks!
ReplyDeleteI just did this craft with friends last night. I would suggest tacky glue for attaching decorations, and possibly wire or string to loop things around. We used tacky glue and wire for most our decorations, I didn't break out the glue gun till I was putting a wood cutout on mine that I knew the tacky glue would take forever to dry on and I didn't have patience for that =) Happy crafting with kids!
DeleteI agree with Lizzy; tacky glue is a great alternative! And for sticking the foam into the wreath you could use duct tape or packing tape on the back.
DeleteHow did you cut the foam?
ReplyDeleteJohn cut the rounds with a scroll saw, but it also cuts easily with a craft knife. In fact we had to adjust most of them to fit the wreaths, which aren't perfectly round, and used craft knives to do it.
DeleteThis comment has been removed by the author.
ReplyDelete