Everyone knows how great foam armor can look, but most of us find EVA foam a bit intimidating. It's kinda pricey, extremely labor-intensive, and all around a big commitment for someone just looking to dabble in foam for cosplay.
Ahhh, but what if I told you you can make these carved leather arm bracers:
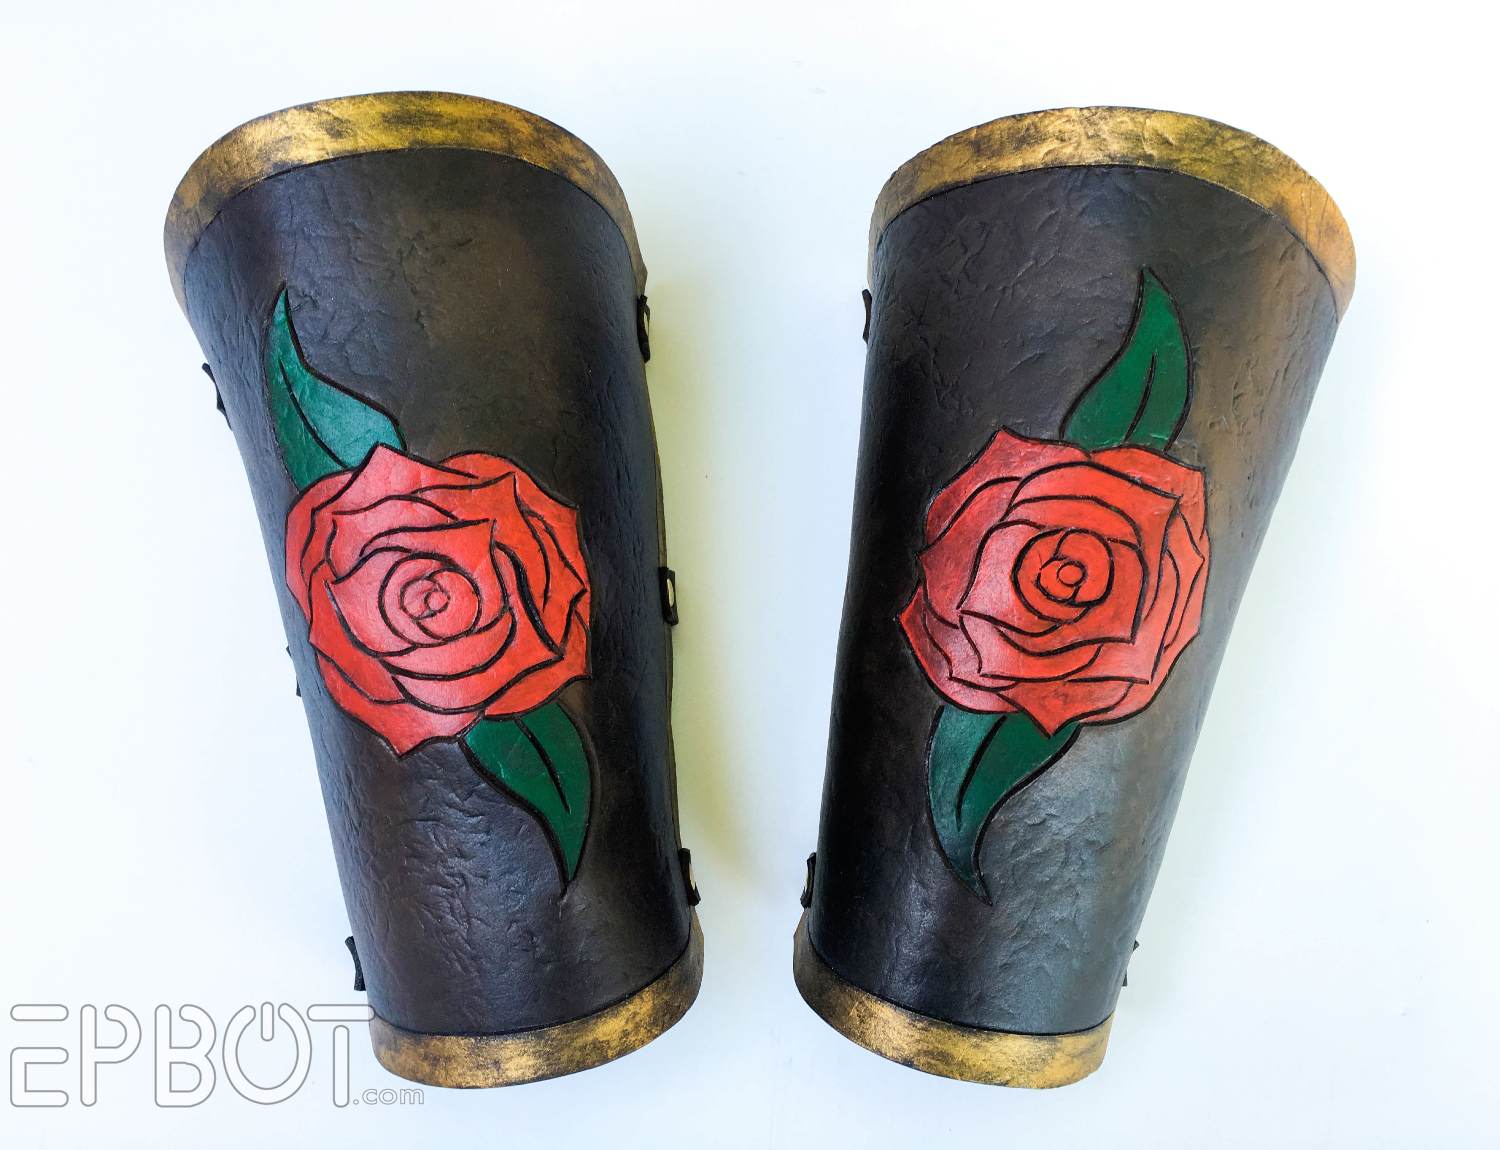
From a single 12X18 sheet of kids' Fun Foam from the craft store? And that the only special tools you need are a craft blade and a clothing iron? MUCH less intimidating, amirite?
I made this rose design with a Warrior Belle in mind, but it would also
look amazing for Poison Ivy (just add more green) or an original
steampunk cosplay. Not to mention you can carve *anything* in this stuff, so sky's the limit!
And check out how realistic this "leather" is:

I'mma teach you how to do that now.
In fact, I'mma give you templates so you can make a pair just like this.
Ready?
First, some basics:
The first thing you need to know is that Fun Foam comes in 1mm (the most common), 3mm, and even 6mm sheets at the craft store - and the 3mm thickness is perfect for arm bracers.
The second thing you need to know is that Fun Foam - as well as EVA foam - does something quite magical when you carve and heat it. Here's my test with a scrap of thick 6mm white foam:

I sketched the rose out with a pencil, then used a craft blade to cut into the foam slightly.
Now watch what happens when I hit that with a heat gun for 30 seconds:
MAGIC.
The cuts all open up and raise slightly, making the foam look almost exactly like carved leather:

There's still one more trick to making your foam look like leather, but before I get to that, let's make some bracers.
1) Print out this template, then cut and trace two bracers from your 3mm foam sheet:


Now print the rose, if you plan to use it:

2) To transfer the rose pattern to the foam, first trace over the rose lines - twice - with a pencil. Put the pencil-side down on the foam:

...and trace the lines again from the back, pressing down to transfer the marks. The foam is like a sponge, so this works pretty well:

3) Use a craft blade to lightly carve the pattern lines into the foam. Don't go all the way through, of course; try to just break the "skin" of the foam:

Carve any extra details you like now, too. I added a border around the edge:

4) Now comes that final trick for getting a leather-like texture:

TIN FOIL.
Yep, crumple a sheet of tin foil, and briefly iron it onto your foam. Repeat 'til you have as many crinkles as you like.
During this ironing your carved pattern will start to open up, but if it's not enough, hit it with a hair dryer for an extra moment or two. While the foam is still warm, you can also bend it to get a nice curve:

Ironing the foam also heat seals it - see the shine? - which means your paint won't soak in as much. VERY HANDY.
(Remember how I said these would look great on a Poison Ivy? You could almost leave this green and just paint the rose and border, since it already looks like leather!)
5) Speaking of paint, let's paint:

First a base coat of cheap acrylic craft paints in brown, red, and green.

Followed by a wash of thin black acrylic to age the brown leather areas.
Note that the black paint may grab & try to pull off your base coat when you wipe it off - which happened to me. (Blurg.) To fix this, I sprayed on a quick clear coat to seal in the base coat, then followed again with the thin black paint.
6) [Optional] Clear coat the whole thing when you're done, to give your bracers a pretty sheen. You can use a spray lacquer or brush-on Modpodge for this.

My last touch was a gold border of Rub N' Buff, applied with a very stiff paint brush.
6) To finish your bracers you'll need some lacing or straps. The easiest option is to punch 3 holes up each side and use a bit of ribbon or shoelace to tie them. If you want something a little fancier, though...

Cut out 12 foam tabs approximately 1.5 X .5 inches from the thinner 1mm Fun Foam. Paint them brown, age them to match, and use gold rivets to attach them down the sides of your bracers.
This method is a little more durable, easier to cinch, and looks cool, natch.
This method is a little more durable, easier to cinch, and looks cool, natch.

If you wear your bracers a little loose you can probably knot the lacing permanently, and slip them on over your hands. Otherwise, just try to tie a better bow than I did. (Srsly, that is TERRIBLE. Ha!)
Daytime Action Shoooot:

Can't you just see flaming arrows ricocheting off my arms? And hear dramatic music? Or is that just me?
One last look:


(I think I may add a second layer of gold, for more shine.)

This whole project only took me half a day - and that includes sketching out the rose and figuring out the template from scratch, so yours should go much faster. So hey, what are you waiting for? Go make stuff!! And then send me pics pleeeaaase.
I do hope this inspires some of you to play more with Fun Foam! Happy crafting!


So Cool! I think I might need to play around with some foam now!
ReplyDeleteNice! Hmmm. I've just moved to North America. To within 10 walking minutes of a Michaels. That means I can get my hands on a bunch of previously inaccessible cool craft stuff. This could be dangerous . . .
ReplyDeleteChiaroscuro
Welcome to North America!
DeleteMore importantly, welcome to Michael's! Basically every purchase gets you a coupon for your next purchase, so you're never free.
DeleteIf you are close to a JOANN'S Fabric store; they also carry craft supplies, I find that they are less expensive than Micheals. Good Luck.
DeleteI have a shopping center down the street that has a Michael's, Jo-Anns, a specialty fabric store, and a Home Depot ALL RIGHT NEXT TO EACH OTHER. We're new to the area, and when I discovered this awesomeness I called my mother and squealed over the phone with giddiness.
Deleteand sign up for their email newsletters. they're pretty frequent, but they ALWAYS have a discount coupon, which is often 40 or 50% off.
DeleteWait, I can comment now? I can comment now! Woohoo!
ReplyDeleteChiaroScuro
Those are amazing! I have no idea how you come up with all you do, but thank you for sharing it! :)
ReplyDeleteThe bracers are absolutely fantastic! Thank you for sharing your ideas. You are creative and wonderful! My 12 year old son would love these to go with his wizarding/warrior costume he likes to wear around the house.
ReplyDeleteDid you ever see that episode of Castle where they caught the bad guy by realizing someone had tied a crappy bow behind her back and was ergo the baddie? Your bracers are awesome btw.
ReplyDeleteSo amazing! If only I had a use for these. Going to cons always gets me super sick, so I stay away now...but they look so cool I might just make some to wear around the house and confuse my family lol
ReplyDeleteIf you got sick from catching things, you might try a cosplay that involves a medical mask. When I wear my steampunk one I'm less likely to catch con crud, so I've been tempted to go full cyber goth just for the mask, lol.
DeleteThis is amazing!!
ReplyDeleteThose are amazing! And I immediately thought of Belle! Now I'm gonna have the soundtrack from Beauty and the Beast on my mind all day :).
ReplyDeleteHow did you know that I want to make a bracer for the cosplay I'm working on right now? :)
ReplyDeleteAny suggestions for how to make them a bit more Steampunk? (I'm going for a Steampunk Seven of Nine, if that helps.)
Just glue some gears on it!
Delete*a-hem*
This comment has been removed by the author.
DeleteI am so making these for my Renaissance Garb! Thanks!
ReplyDeleteMy teenage son has pretty much taken over my dark cape that I bought for Renn Faire... and he's working on some costume ideas for this year. I was just thinking this would be great for his costume. And something he could do. :)
DeleteAngela, I'd love to see what you come up with you get yours finished. :)
*cough*WonderWomangoldcuffscrown&bootbracers*cough* You're welcome. ;)
ReplyDeleteI was just thinking how much I'd love to see Wonder Woman's bracers, lol.
DeleteMe too! Or She-Ra. :)
DeleteBeautiful and clever project! Thank you for posting, Jen.
ReplyDeleteWe've been talking about making some armor for our 2 year old, and I think this is the perfect way to do it! Thanks for coming up with this awesome idea and sharing it with us!
ReplyDeleteYou have GOT to be kidding me! How do you even think of stuff like this?! That looks amazing and SO much like leather. Now even vegetarians and vegans can wear costumes that have "leather" components!
ReplyDeleteHow strong would you say the foam is after you finish it in the way you describe here? Stronger than without the paint and heat? Weaker? Do you think a corset could be made if I had a big enough sheet of this foam? Is it even sold in sheets larger than 12" x 18"? Would a foam corset hold together well if I didn't cinch it too tightly, or would it likely split apart in places that had the most tension? Do you know if the paint will flake off if the foam is creased or stretched at all? What temperature setting did you put your iron on when you did the aluminum foil bit? I know, I know. Too many questions. This has just inspired me like crazy because your results are so stunningly beautiful.
KW
The foam is definitely not strong, and paint & heat-sealing doesn't add much either way. If you wanted to add foam components to an *existing* corset (say, made of fabric) that might work, but don't make the foam itself weight-bearing or under pressure, or it could buckle and split.
DeleteThe acrylic paint should flex with the foam, but if you flat-out fold the foam over, there could be a crease or crack in the paint. So flex with caution. :)
And temp setting on the iron was... uh... all the way hot. Ha! It doesn't take long at all to press in the foil, so just hold it for a second or two at a time.
I made full upper body armor for my Lady Sif cosplay out of this kind of foam. To add strength I used a mixture of Sobo glue, Elmer's school glue, and water (basically a bottle of each, then add a whole bunch of water - it's very runny) to coat the foam so I wouldn't suck up all my paint, and to adhere light weight linen fabric to the inside (any all natural plant based fabric would work, too: cotton, muslin, etc.). Anywhere I had a butted edge to edge seam (I was working with the 12"x18" sheets) I used brown craft paper (the kind that comes on the big rolls) with straight Sobo glue before the fabric to keep it from coming apart. Any seams that were two pieces of the foam overlapping stayed together just fine with some Sobo glue. It all ended up very durable. I had to mail it from Kansas City to Atlanta for DragonCon, wore it all day in Georgia summer heat, and brought it home in a crowded car, and it's still in one piece with no noticeable damage. I did notice that it was more flexible and a little looser on me when we were outside versus when we were inside, but it didn't get messed up from the back and forth. I'm plus-sized so there was plenty of bending and straining put on various parts of the costume. Hope my experience with that can help you decide how to move forward with your project! :)
DeleteThis is amazing... I have totally been intimidated to work on EVA foam, but this, this I can do, and I think it's going to look SO. COOL!
ReplyDeleteWhere was this tutorial a month ago when I needed bracers for my daughter's Link costume? :P I ended up just buying her brown fingerless gloves for cheapness and quickness. We'll have to make a pair of these (sans rose) to go with for the next time she wears it.
ReplyDeleteQuestion for the Master Crafter (with your host, Jen from Epbot... and we are on the air, go ahead caller). Uhm... hi. Longtime reader here... I was wondering if you wanted to do a layered gauntlet with multiple pieces, what would you use to glue them together and also, at what point in the process would you glue them (before or after painting/sealing)?
ReplyDeleteI'd glue them before paint and rivet them also for extra sturdiness and the rivets will look cool and add extra holding. Or, sew them together! More detail!
DeleteFor glue, contact cement. It comes in tubes or in bottles with the little "brush lid." Super stinky, so use in a well-ventilated area!
DeleteIt would depend on what effect you're going for, but in some cases, if I want one layer to have "cut outs" peeking to another layer below, I may paint and THEN glue, but in other cases, I'll glue, then paint, then seal (in my process, sealing always comes last).
I'm sure others do it differently. I'm just giving an (unsolicited) reply based on what I've done in foam craft projects. :)
Hi Granny K, thanks for calling.
DeleteMy first thought is also rivets, since they look cool, but since you don't need any flex on bracers I'd go with contact cement instead. Contact cement is PERFECT for foam, and you can buy small bottles at the craft or hardware store. Just make sure you coat both sides with the cement, and let it dry for a minute 'til there's not tack before sticking them together.
For extra strength I'd glue first, then paint. Technically either way could work, but if you paint first the glue may try to pull the paint off, so most prop builders prefer to get the glue on the bare base material, just to be safe.
Sobo glue is also a great adhesive for craft foam. Used the two to make entire upper body armor. I love Sobo!
DeleteWell this is just amazing. And now I can't stop thinking about the design of the warrior Belle dress that would pair with these. You've opened up a world of possibilities - thanks!
ReplyDeleteIt occurs to me that I could make a really cool cover for my Kindle using this technique. Hmmm...must experiment...
ReplyDeleteYou are SO creative! I just can't get over all the cool stuff you come up with. I don't cosplay, so I don't really need these but I want to make them, just because they're neat.
ReplyDeleteJen this is AWESOME!! I've been contemplating cosplay accessories for a Critical Role character I want to do, and this is perfect! Thank you so much for sharing, you brilliant human! <3
ReplyDeleteWhat temperature did you set the iron on?
ReplyDeleteIt was at max temp, Linen, I think? So you only need the briefest of passes over that tin foil.
DeleteYeah!!! I know which member of my family needs this ASAP. Jen - THANK YOU!
ReplyDeleteAbsolutely love fun foam. Wish I'd thought to do this for my son's bracers for Link. I'd have saved hours of sewing and waiting for puff paint to dry. I made fun foam (hobby lobby carries it in a little thicker version) Wonder Woman crowns and bracers for my mother and I to wear in a costumed race. They had to be sweat proof and hold up to crowds jostling around us. The fun foam held it's shape pretty well for the majority of the race, we did end up getting warm enough for it to start to loosen up and wrapped beads around it to keep them on. I will have to make some new bracers and try those techniques out on other pieces too ^_^
ReplyDeleteThese are amazing! Once again, Jen, I want to drop everything and do this new project. This looks like one I might actually be able to pull off, though! SO. COOL. And versatile. I will have a different pair for every day of the year. Yay!
ReplyDelete-Just Andrea
Um holy crap this is BRILLIANT! :)
ReplyDelete"Borrowing" the rose pattern for my next quilt. Thanks for the awesome idea on how to use craft foam to make all sorts of cool things!
ReplyDeleteI wish that I knew this when I was volunteering with the renaissance faire! I have 3 sets of garb, one of which is as an archer. Since I don't wear leather, my brother used the vinyl used for car interiors to create my bracers, quiver, and belt, but I wasn't entirely pleased with the look. The faire that I volunteered with for 11 years, and is also where I met my husband, no longer exists, but I still might make these for when I go to the next closest one.
ReplyDeleteYou could become a bow-tying savant if you stare at this website long enough: http://www.fieggen.com/shoelace/ianknot.htm
ReplyDeleteStart with shoelaces, end up dazzling with bracers.
Wow! Very cool!
ReplyDeleteWe are doing this next summer at Animania. Solihull cool!
ReplyDeleteThis would be perfect for a wonderful woman costume I was contemplating after seeing the new Batman vs. Superman movie! Such a neat idea. How you think of things like ironing tin foil on foam I will never know, but how cool.
ReplyDeleteAs a side note: I love your blog (and I love all the posts: sad, happy, anxiety-triggering, crafts, geek, photos, bras, etc.) I hope you never stop sharing what is uniquely you with all of us!
I don't envision ever making a pair of braces but just knowing there's an easy technique to fake leather makes me happy. You rock and your craft skill generosity is unparalleled.
ReplyDeleteOh my word, these are amazing! And now the ideas wont stop!! I actually tried to make a pair of leather bracers a few years ago and they were a horrible, throw in the trash, mess. This, now this I can do. Thanks so much!
ReplyDeleteFiling this away in my brain in case I ever need it! So very cool!
ReplyDeleteDon't know if anyone else mentioned it (didn't read all the previous comments) but you can also use elastic cord to lace them if you don't want to tie them every time. Super easy on/off but tight. =)
These look incredible! That leather technique gives it a spot on look. Love it!
ReplyDeleteThese look amazing, Jen! Thank you so much for sharing this wonderful tutorial with us! Love the leather-look! Might have to try making a travel journal cover using this method...so many possibilities!
ReplyDeleteBrilliant. Want to make gauntlets for a Lady Loki costume and came across this. Thanks.
ReplyDeletePlanning on using this process for my kids homeschool lessons on Ancient Greece, Rome and the Near east! Thanks for the instructions!
ReplyDeleteI want to do this with my girls at camp this summer, but I can't find the 3mm foam anywhere. I can find 2mm and 6mm. The 6 is too think and the 2mm just melts even though I used the low setting on my heavy-duty heat gun and also tried my low-temp embossing heat gun. So we'll just be painting ours without doing the carving step. It will still be cool :)
ReplyDelete