Happy Tuesday, clever mortals!
Quick question: where did October go?! EEP.
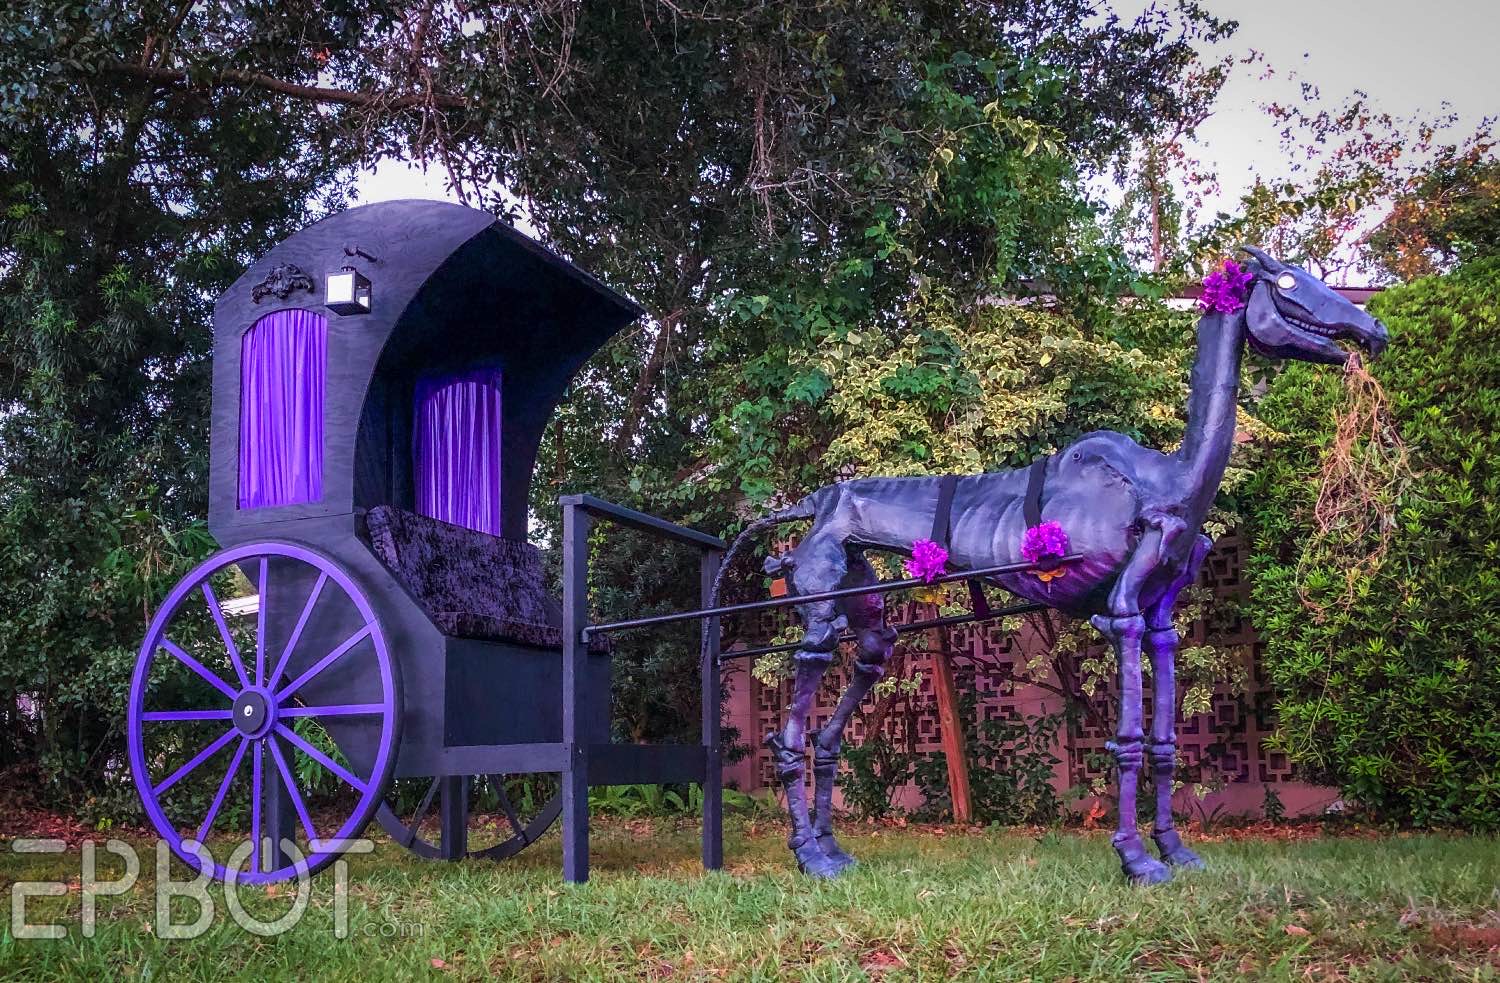
With Halloween coming at us like a dark horse (heheheh foreshadowing humor), John and I have several builds going at once. We hustled to finish our Doom Buggy for y'all yesterday, though, because this beauty needs her own debut post.
Ready?


Ta-daaa!
This is before we turned on the fog machine, so keep going for more spook-taculor glamour shots.
This is before we turned on the fog machine, so keep going for more spook-taculor glamour shots.
We modeled our Doom Buggy after a Victorian hansom cab, which looks like this:

This let us A) take some artistic license with the ride's design, and B) re-use Tiny Tim, our beloved thestral. (Tim insists on coming out each year to play.)
Plus I've wanted to make a vehicle photo op for years now, because EVERYONE likes climbing into cool vehicles and pretending to drive. That's just science.
Plus I've wanted to make a vehicle photo op for years now, because EVERYONE likes climbing into cool vehicles and pretending to drive. That's just science.
The Buggy is our most expensive Mansion build, because the cost of plywood right now is scarier than our ghost bride. (It was over $100 for the ply and 2X4s.) All told the Buggy was still less than $200 for everything, though, since we already had the horse. And happily John sold a few things to make room in the garage, so it was an even trade.
We started with a pencil sketch and lots of conversation, since my brain doesn't work in 3D. This makes it an uphill battle for John every project, but eventually we (usually) get there!

The lighter lines are my own mods after we talked through things like head space, safety, and lighting.
What I lack in spatial visualization John has in spades, because that sketch is literally all he used to build the entire Buggy. No measurements, he just... winged it. Boggles my mind, y'all.
He started with this:

Which he then doubled, and then connected the two sides together:

If you're not already impressed with John, please note the TINY SPACE he has to work in.
PHENOMENAL COSMIC POWERS
....iiiittty bitty garage space.
....iiiittty bitty garage space.
Next he clad everything in plywood:

And at this point we dragged it outside to assess.

We also checked the proportions with Tim and a volunteer driver:

I wasn't wild about the top curve of the buggy, so we cut that down:

Subtle change, but better!
Then after dark each day John worked inside (in the A/C, yesss) on the giant wheels:

He broke the wheels into quadrants and cut all 8 pieces from a single sheet of pink insulation foam. Which is friggin' genius.

Testing the fit, and deciding the spokes were too thin.


Better!
John assembled all the pieces with high-heat hot glue, then I got the tedious job of painting.
After painting we decided the wheels still needed something.

Meh.
It looked too flat, so John went back with a router and rounded the outside edge. Then I carefully hand-painted it like so:

Yep, we're liking that MUCH better.

Yep, we're liking that MUCH better.
We stapled a cheap plastic tablecloth across the roof and back to save on materials, and I gotta say, no one's gonna know.

Except you. Shhhh.
(There are 2 or 3 bracer bars underneath to hold the sides steady, so it's solid.)
Our original plan for the windows was to have frosted plexi with a Cricut decal that read "Doom Buggy" in a fancy font. Ultimately we decided it would be small to read from a distance, though, and we wanted a pop of color instead. So more plastic tablecloths to the rescue!
Our original plan for the windows was to have frosted plexi with a Cricut decal that read "Doom Buggy" in a fancy font. Ultimately we decided it would be small to read from a distance, though, and we wanted a pop of color instead. So more plastic tablecloths to the rescue!

John pleated these onto long pieces of duct tape, then taped them inside. Easy peasy.
I love the extra color, and how the plastic glows with a light inside. (Keep scrolling; you'll see!)
I love the extra color, and how the plastic glows with a light inside. (Keep scrolling; you'll see!)

With the structure done we could get to the fun part: decorating.
By a happy happenstance we found these metal carriage lanterns on clearance at Michael's for $8 each:

Then we found some old curtain brackets in the garage to hang them, plus a little decorative foam piece to glue over the window:
 That plywood texture vexes me, currently telling myself it's fine after dark and I *don't* need to coat it in textured chalk paint or something. It's fine. It's fine? I think it's fine.
We were losing light at this point, so we scrambled to made the World's Fastest Seat Cushion:

We were losing light at this point, so we scrambled to made the World's Fastest Seat Cushion:

Lest you think there are bounds to my frugality: the seat is made from an old memory foam mattress topper I made John save and store in the attic. VINDICATION!! (Also the comfiest bench cushion ever, dang.)
I safety-pinned stretch velvet over the foam, so we can re-use the fabric later. I only had time to knot in 3 tufts in the back, but I plan to add more, because I lurrrrve that tufted look.
Finally we rounded the handrail, painted the support legs, and made PVC support poles to attach the buggy to the horse. Basically all the
finishing touches, hastily crammed into the last hour before sunset.
Here's a quick look at the back of the buggy, before we get to the beauty shots:

We initially thought painting the support legs green would blend with the grass - which it kind of does? - but after dark the green is way too bright. So don't mind those green bits; they'll be flat black soon.

Finished!!
(Except the green legs. Ignore the green legs.)
(Except the green legs. Ignore the green legs.)
(You're looking at the legs now, aren't you?)
(STOP IT)
Update: John and Photoshop to the rescue:

Yay! Thx, sweetie.
Tim's harness is made of canvas belts from our stash and thin PVC pipes sprayed black. I thought Tim looked a little plain, so at the last second I tucked in those purple flowers. You like?
(STOP IT)
Update: John and Photoshop to the rescue:
Yay! Thx, sweetie.
Tim's harness is made of canvas belts from our stash and thin PVC pipes sprayed black. I thought Tim looked a little plain, so at the last second I tucked in those purple flowers. You like?
Of course the real magic happens after dark, when we turned on all the accent lights and added - oh yes - some Extreme Fog Machine Action:

Yessssss.
I love the pops of light from the lantern, windows, and Tim's eyes. We also have purple and fuchsia spotlights going.
A little fog swirling inside the Buggy turned green for some reason, very ghostly and pretty:
I love the pops of light from the lantern, windows, and Tim's eyes. We also have purple and fuchsia spotlights going.
A little fog swirling inside the Buggy turned green for some reason, very ghostly and pretty:
Oh, and John gave Tim some vines to munch as a joke, and I thought it was so funny I had him leave them. Even skeleton horses have to eat!
We plan to add a little more lighting at the handrail, aimed up and inside the Buggy, to light anyone sitting there for photos. I hope to have some fun examples for you in our Halloween wrap-up post.
We plan to add a little more lighting at the handrail, aimed up and inside the Buggy, to light anyone sitting there for photos. I hope to have some fun examples for you in our Halloween wrap-up post.


And that's it! I hope you had fun seeing our Victorian Doom Buggy come to life!
I do have one last thing I want to add: a decorative "Doom Buggy" sign on the lawn in front, closer to the sidewalk. I'm hoping that will help hide the front support legs, show people where to stand to take the best photos, and also tie in the Haunted Mansion theme, for anyone who doesn't guess what it is. (I really want people to know it's a Doom Buggy, ok? :p)
We have a few more Mansion builds we're hoping to finish before Halloween, so stay tuned! (I also have a huge list of builds we don't have time for. Will this be our first Halloween theme to repeat next year? TIME WILL TELL.) Next time I'll show you John's dynamite costume, and maaaaybe a nifty budget Leota build, if we can get it to work. ::giant nervous grin::
'Til then, stay spoopy, my friends!
*****
If you like our over-the-top DIYs and silliness and want to help us do even MORE, then you can support me and John directly through Paypal! Whether it's a one-time tip or a monthly donation, every dollar helps us buy more materials, devote more time, and even pay a few bills, so THANK YOU.
You can also support Epbot by sharing my posts, tagging your friends, buying a cute t-shirt, or shopping through the Epbot Amazon storefront, where I keeps lists of my favorite things. The best support is reading my posts, though, so thank you for being here, truly. Love y'all.


What you've made looks fantastic! I totally agree on the wheels.
ReplyDeleteI just saw The Bloggess's page where she got a 12' skeleton. Now I keep seeing your hansom cab with a driver's seat, with a skeleton driver perched there.
A dapper skeleton wearing a top hat driving the doom buggy would be awesome!
DeleteI am always impressed by y'all's Halloween builds, and this may be one of the coolest! (Also, Jen, I sympathize with the inability to visualize things in 3D. It just does not work for me either.)
ReplyDeleteIt's gorgeous as is, but did you consider adding reins?
ReplyDeleteYou can see in the example pic of a handsom she included that the reins go up over the top of the cab so that might be a bit of a safety hazard in the dark on Halloween night with people climbing in & out
DeleteWe planned to have reins from the start, and may still add them! My thinking was more black straps wouldn't show up anyway, but it *would* be a fun element for kids to hold. We'd just bolt the straps to the railing so they can't yank Tim over. ;)
DeleteThis looks great! Will you also have some sound effects like clip clop hoof sounds or whinnying or squeaky buggy wheels?
ReplyDeleteWe plan to blast the Haunted Mansion organ music and "Grim Grinning Ghosts" all night - but I do like the idea of sound effects!
DeleteI think the plywood texture looks velvety! Because it’s a *very* fancy doom buggy ;)
ReplyDeleteI know it doesn't matter 'cause Tim's not actually pulling anything, but my former-horsegirl brain can't get over the fact his current harness setup doesn't have a strap across the chest so he wouldn't actually be ABLE to pull it, he'd just walk right out of the traces & leave the buggy behind!
ReplyDelete(Seriously though, the whole thing looks amazing!)
Here's what I told John while explaining the lack of reins: Tim is a magic horse (well, thestral cosplaying as a horse) and can do what he wants. ;p
DeleteI love it and want one for my yard, I mean for the ghostly graveyard in front of our cemetery caretaker's house.
ReplyDeleteOh wow, it's amazing! Fantastic job, you guys!
ReplyDeleteAww, Tim got all prettied up with flowers.
ReplyDeleteYour neighbors must be just constantly entertained by you guys :D
ReplyDeleteThis is fantastic!
ReplyDeleteThat Doom Buggy is cool!
ReplyDelete