Hiya, bots and babes! John and I made something new during my sabbatical last month, and I'm super psyched to show you.
For a little background: one of our closest friends, Ken, recently started radiation for a spot of skin cancer on his leg. The good news is they caught it early and everyone expects a full recovery, but since Ken has SMA it's still stressful and a bit scary for him and his wife, Sue.
The day Ken started treatment I decided to make him some sort of celebration countdown, like an advent calendar, or a goal chart, to mark off each of his 32(!!) treatments. I couldn't find anything online, though, so I spent all afternoon brainstorming with John, then all evening experimenting with different materials.
In the end we had my new favorite DIY: something you can use to countdown to any celebration, whether it's the end of cancer treatments, graduation, or a family vacation.
Ready to see?
Here it is, mid-countdown:
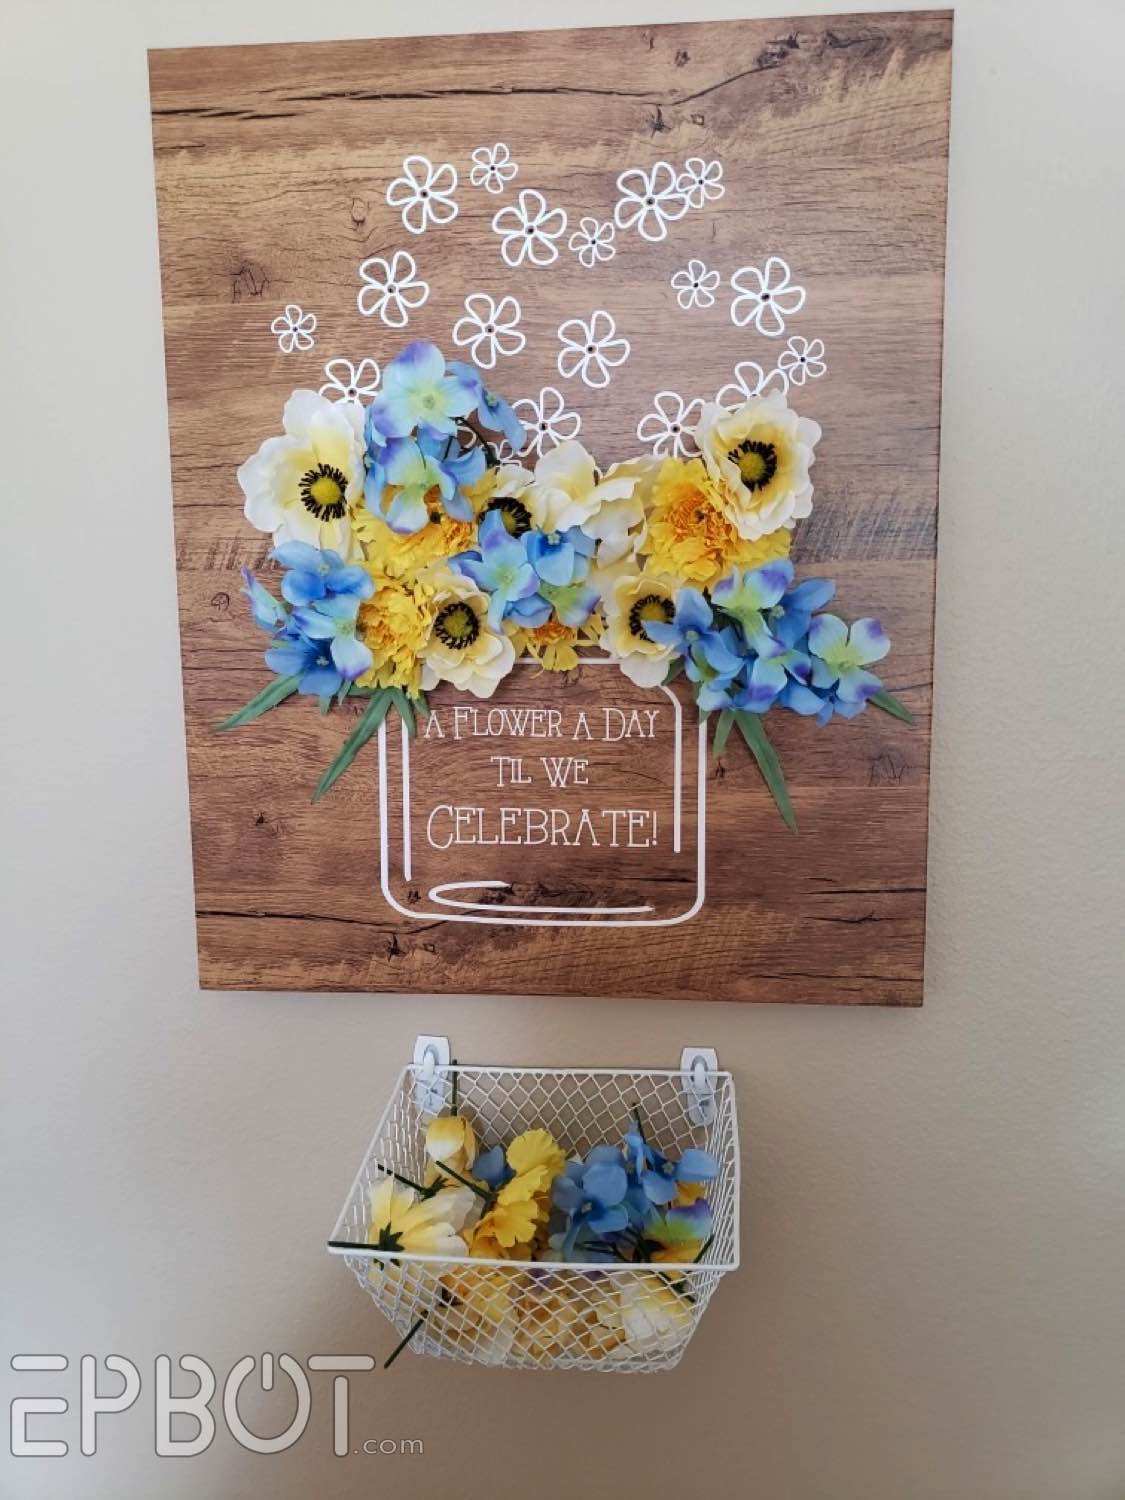
This is a photo Sue sent me a couple of weeks ago, showing their progress. See how it works?
There are 32 flowers, and 32 holes in the backer board. Every treatment day Ken and Sue add a flower, so not only can they SEE his progress, but by the end they'll also have a pretty piece of wall art!
In fact, here's what it will look like all finished:

I chose the colors and style to match Ken & Sue's kitchen, where this hangs besides the door from the garage. They tell me it's their new ritual for Sue to wait for Ken at the door every treatment day with a flower, so they can place it together. (MY HEART.) In fact there were happy tears on all sides when we first brought this over, and I think it was as much a gift to me, seeing my friends' reaction. Gah.
I promise this is easier to make than you think, and doesn't have to cost much, either. All you need is a piece of foam board, some wood-grained contact paper, faux flowers, and either vinyl or paint to add the wording and vase outline.
C'mon, I'll walk you through it:
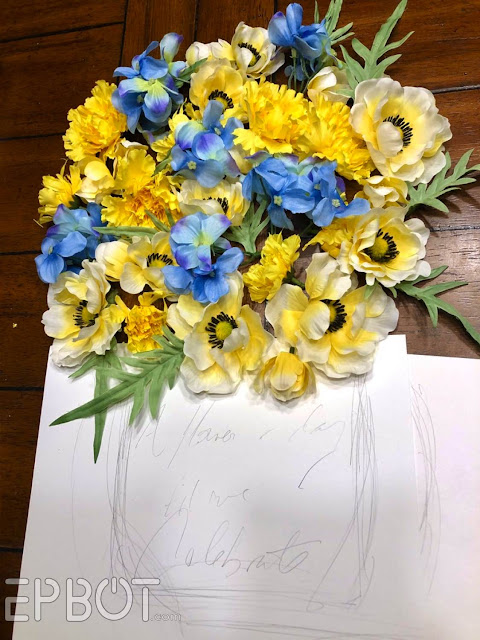
1) First gather your flowers, one per day, so you know how large of a board you'll need. If you have lots of days to count, make sure you use smaller flowers.
2) Cut your flower stems, leaving only an inch or two of length - just enough to poke through the foam.
3) Cut your foam board with a utility blade. We made ours 16X20, but you can adjust the size to fit your flowers/design.
(I recommend pink insulation foam from the hardware store, but you could also stack 3 or 4 Dollar Tree foam boards together.)
4) Cover your foam board with wood-grain contact paper. Dollar Tree sells some, but I like this rustic design on Amazon better, which costs less than $6 for a 17 foot roll:
Cut extra contact paper so you can cover the edges and overlap onto the back, for a strong hold:

5) Add your vinyl vase outline and wording.
We spent a lot of time designing these, so you don't have to! Instead you can download and use our files:

This fits a 16X20 board perfectly, or feel free to stretch or shrink as needed. If you don't have a cutting machine, you can use a white paint pen for the vase and sticker letters from the craft store for the words.

The holes can be hard to see on the woodgrain, so these outlines are helpful.
Here's John transferring the vinyl:
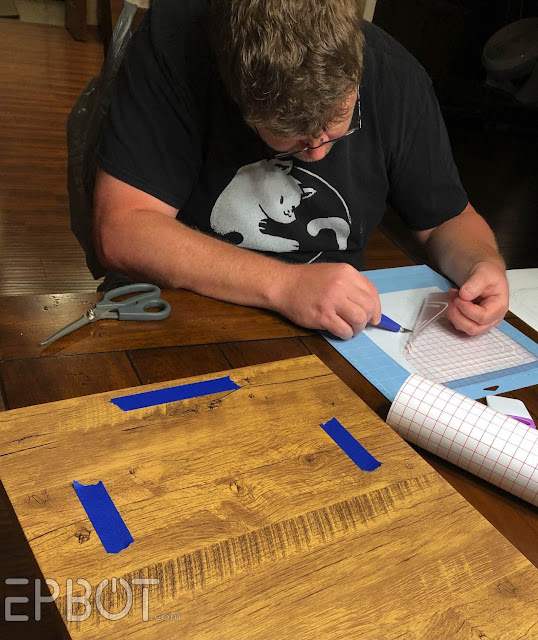
We used blue tape to help center it.


7) (Optional) Add vinyl flowers over your flower holes:


We delivered this to Ken and Sue on day 3 of his treatments, so as soon as we hung it up they got to place 3 flowers at once:


Bonus: these are re-usable! Since the flowers aren't glued in place you could easily take them out and start the countdown all over for your next celebration.
I like this idea so much John and I are thinking of making another one, so we can film the process for a quick video tutorial. So tell me: are there any changes you'd make? Or what other occasions would you use this for? Any specific themes or colors you'd like to see? Help me brainstorm!
And thanks for continuing to check in while I get back to my regular posting schedule. I'm letting myself take it slow - which my inner perfectionist hates - so I can prioritize time for doctors and friends and offline life. John and I've also been dreaming up fun new projects and parties for the coming holidays, so DO stick around; I think you're gonna like 'em. ;)
***** UPDATE *****
I have a happy to share! A few days after this Ken messaged me, all excited. Turns out his lead radiation technician, Kim, reads Epbot! She saw this post and realized *her* Ken must be *our* Ken, so they had a lovely small world moment during his next treatment. Love that so much.
I immediately asked for a photo so I could give Kim a shout-out here on the site, and Ken did one better, and got a pic with his whole team:


You know, I hear Dragon Con is coming up....
ReplyDeleteoh Jen, I step away for 6 months at a time, bounce back to check in and it NEVER fails, you two make me smile.
ReplyDeletethis is an amazing thoughtful idea. Thanks!
Might be cute for a countdown to a wedding or an adoption
ReplyDeleteBack to school countdown for the moms out there ; ^}
ReplyDeleteWeight loss! Way cuter than sticking marbles in a jar :)
ReplyDeleteI can totally see this as a reverse-christmas advent calendar.
ReplyDeleteExactly what I was thinking! Some green and red flowers and you'd be good to go.
DeleteOoh, ooh, ooh, instead of flower-outlines as place-holders, they could be outlines flower-BUDS so when you stick the flower in they bloom!
ReplyDeleteI'm not much of a floral type myself though, but could see it done with maybe balloons too. Maybe just stickers, but could also be little fluffy craft balls, and just add the strings for guidance. Could do a house up-style instead of a vase, would be perfect for countdown to a move
With fluffy craft balls you could be filling the jar with candy!
DeleteA birthday countdown calendar maybe? My little kids are totally obsessed with their birthdays and this would probably help them visualise how much more waiting there is to go, and also feel like they were getting closer every time they put a flower up. Maybe with something like butterflies mixed in with the flowers?
ReplyDeleteAlso, we got some cats recently and I know cats don't have like, you know, stems, so it's probably not workable but a cat-countdown basket of kittens would be extremely cute.
Ooo what a brilliant idea! You could create a Christmas wreath or tree for an advent calendar mixing bits of greenery and decorations to form the shape as part of the design. A sugar skull with a floral crown would make a beautiful countdown to Halloween or Día de Muertos.
ReplyDeleteI also fancy the idea of making a tulgey wood from Alice in Wonderland and using pom-pom fluffs as mome rath hair- I'm not sure what you would use this to countdown to though.
Maybe break out the amazing Amazon butterflies again along with some magnetic paint/surface to make a removable butterfly countdown too!
You could also use it as a guest book for an event- get the guests to arrange the bouquet for you as a momento.
Oh yes! I'm on board with the magnets idea! So many cool ideas popping up!
DeleteOk, this is SUPER cool, and I kinda want to make one. Maybe borrowing some previous posters' ideas of doing a Christmas version? Since I sometimes miss getting to enjoy Advent calendars like I used to. (Or I could do the version you shared and use it to count down to my book releases . . .)
ReplyDeleteThis would have been much more fun than the simple sticker calendar I did when going through radiation several years ago! And now I'm in the middle of chemo for an entirely different cancer. I think I'm a little too afraid they'll change the number of cycles I'll need to make a countdown display. It's *supposed* to be 4 cycles, but the actual protocol is "until the numbers we're tracking are good plus two more cycles so we're sure we killed all of it."
ReplyDeleteAnyway, just the idea of this is cheering. Thanks for sharing your awesomeness, Jen!
Love this! Maybe something with a flexible number of days so it could be used and re-used. I have no idea how that would work but I'm sure one of the brilliant people reading this could work it out.
ReplyDeleteOh, Jen. This project will not only change, but also metaphorically save our lives. Our son has serious memory challenges, making waiting for anything rewarding that doesn't happen immediately an endlessly long nightmare. I'm already mapping out our version of this to help him through the waiting period until his next earned reward (a train ride). But it may have to wait until after the happy tears have been wiped. Thank you 10000 times! ~~Swan
ReplyDeleteAww, this was such a wonderful comment to find tonight, Swan, thank you! I hope this helps your son and bring your family many more smiles.
DeleteClever idea. And creative comments. For those artsy types, they could create a scene on the board and have the bits and pieces to make it 3D in the basket. Could be done in some predefined order or random. Like maybe leading up to Christmas, the scene might have a snowman and a pine tree. The bits and pieces in the basket could be pompoms and hat and stick arms, etc., to build the snow man, lights and tinsel and star, etc., for the tree. For a new baby, the board could be a nursery and basket could contain various pieces of furniture and decorations to bring the nursery to life - and the last, final, showstopper piece would be a naked mohawk baby carrot jockey.
ReplyDelete:-)
Thought you were going to end with "would be a sweet little baby". Instead I'm now howling with laughter, because of course it would be a naked mohawk carrot-jockey
DeleteIt might be cool to use it to keep track of debt as you pay it off or maybe it could be used to keep track of items you are saving for (a Jew car, vacation, some other wish list.). Each flower could represent a certain amount of money ($50 or $100) or maybe there is another way to represent this (like a $ tree). Contact paper allows for dry erase markers so it could be modified for each new event/countdown).
ReplyDeleteIf you ever open a shop, please let us know! I would love to purchase your flowery countdown! (I have carpal tunnel syndrome and arthritis, so it's not easy to DIY!) :)
ReplyDeleteI wonder if you could do a longer countdown with lightweight beads attached to florist wire, and lay out a beadwork design on the foam board. You know, for that 180-day Disney count-down...
ReplyDelete"Knowledge is Blooming" for a school day countdown?
ReplyDeleteHey! That’s my mom! She was so excited about her picture being included at the bottom of the post. I honestly can’t blame her, she’s been reading epbot since forever.
ReplyDeleteI want you to know how much I like this idea and have been mulling over how to use it myself. With ADHD having both a fun and a visual reminder/way to see time is so great! I finally made myself something similar to track this huge assignment I have to do. They're just hand drawn (since I'm not crafty) flowers (circles for the petals and center) with enough sections for each requirement. I also added a couple things to color to track as the days go by until the due date - if these are outpacing my flowers, we've got a problem!
ReplyDeleteSo, thank you Jen!! :)