::runs in::
Y'ALL.
Dollar Tree just started carrying some new crafting embellishment thingies, and they are a GOLDMINE for jewelry-making:
Dollar Tree just started carrying some new crafting embellishment thingies, and they are a GOLDMINE for jewelry-making:

These are laser-cut... wood? ::squints:: Maybe "wood" is being too generous. They're a wood-like substance. Think Masonite, but weaker. You get 6 pieces per pack, so that's 6 for a dollar. SIX FOR A DOLLAR.
Now here's the cool part: you can take those lovely wood-like things and make fabulous statement necklaces like THIS:

Now here's the cool part: you can take those lovely wood-like things and make fabulous statement necklaces like THIS:

Or this!
This DIY is the perfect combination of "easy" and "infinitely customizable." Other than the wood-like designs, all you need are basic jewelry-making supplies: O-rings in various sizes, chain or cord, necklace clasps, and pliers. Also if you want to add some color, a little acrylic craft paint.
These embellishments are pretty enough to leave unpainted, though, like John did with his:
These embellishments are pretty enough to leave unpainted, though, like John did with his:
Isn't this gorgeous? As you can see there are LOTS of handy dangle-hole options here, so John added a little shell rose from my stash of broken jewelry. It feels very Boho/Shabby Chic to me.
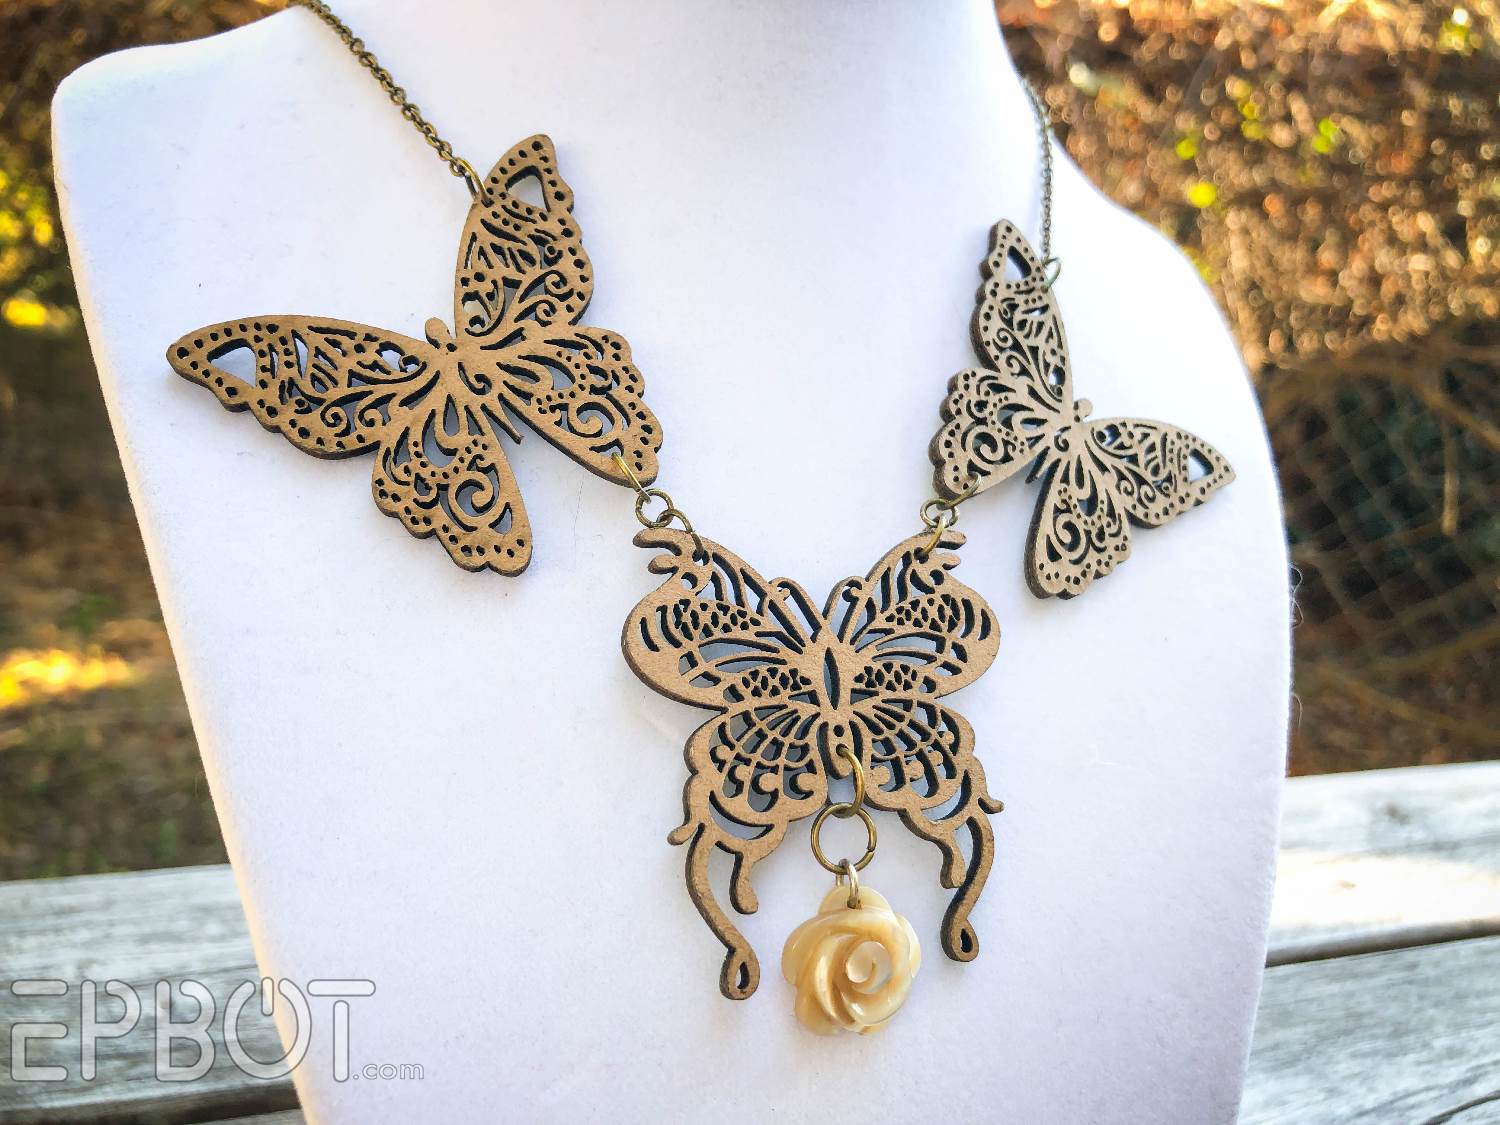
We each made a butterfly necklace, here's mine:
We each made a butterfly necklace, here's mine:

I wanted some shimmer, so I added the tiniest bit of gold Rub N' Buff here and there:

It's hard to capture on camera, but the gold catches the light at certain angles and gives it some cool dimension:

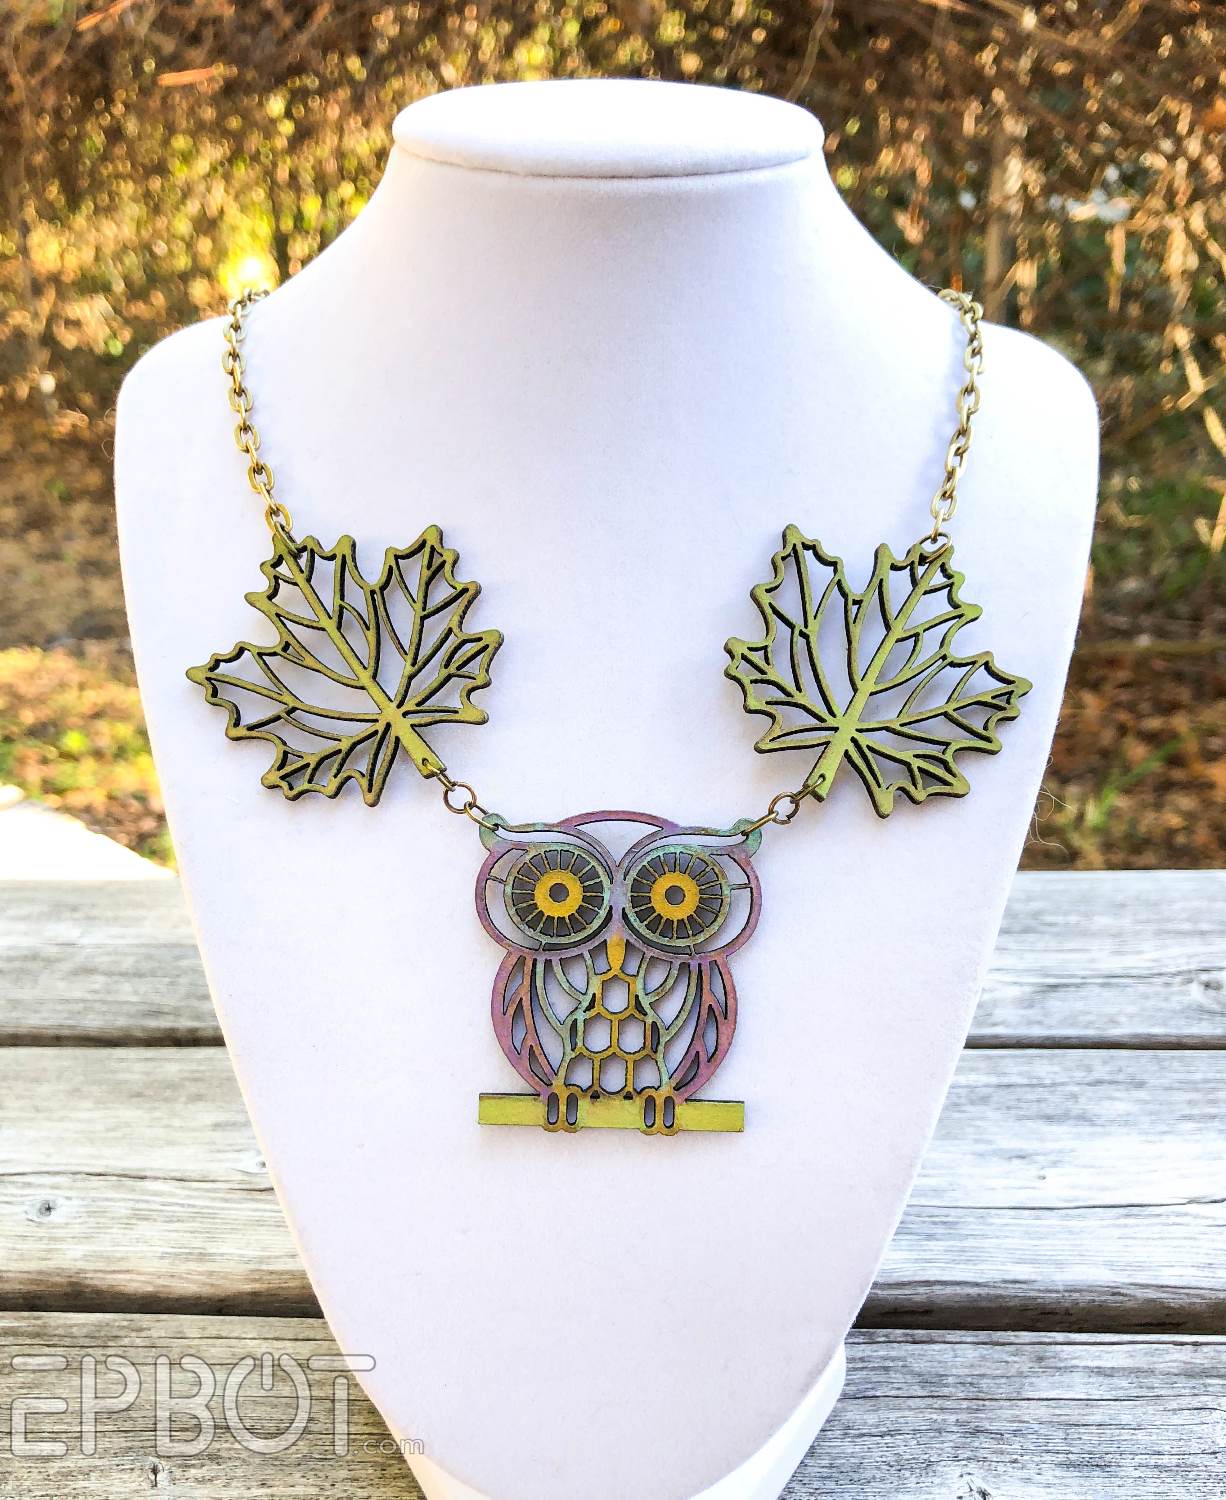
By this point I was hooked, so we went back to Dollar Tree the next day and bought more designs to play with. I like using the leaves to flank a central design:

The rose one has conveniently placed holes for O-rings, but the other two needed some extras. Don't worry, you don't need a Dremel! Just carefully twist a thumbtack through the stems, and that will leave a hole big enough for your O rings. Easy-peasy.
Now let's talk about color.

I really struggled learning how to paint these. If you add too much paint it loses the wood look, and can look flat and plasticy - or worse, fill in the laser-cut sections. The cut edges are blackened from the laser, which adds a nice outline I didn't want to lose.
Here's when I was just about to give up on the whole dang thing:
Here's when I was just about to give up on the whole dang thing:

I know. It looks like I bled all over it. This is not my proudest moment.
Anyway, see how flat the design can look when you paint it a solid color? And it's obvious how much trouble I was having blending two or more colors together. (I tried stippling, but then I over-blended and got... that.)
Eventually I figured out the trick, and it's beautifully simple: use watered down paint to stain the wood instead of painting it. Which is how I went from that rosy flesh-wound up there... to this!

OoooOOoooooh.
By letting some of the wood color come through you keep the natural look. Kinda reminds me of dyed leather.
You can make it look even more rustic if you dab the color off again with your finger, like I did on this flower:
By letting some of the wood color come through you keep the natural look. Kinda reminds me of dyed leather.
You can make it look even more rustic if you dab the color off again with your finger, like I did on this flower:

Aw yeah. EXTRA GRUNGE.
Or use a softer touch and leave the colors to dry evenly, like I did here:
Or use a softer touch and leave the colors to dry evenly, like I did here:

I love the way this purple and teal go together. So pretty!

That reminds me: since you're watering the paints down so much, you may have to experiment with brighter colors than you'd expect. This green is almost neon out of the bottle, but watered down it makes a lovely leafy color.

Remember you can always add more layers of color, so start VERY light. Here's an example where I went a little too heavy with the paint, so the flower lost the wood look and just seems off:

By contrast I love the blend on these next flowers; once I figured out to water down the colors, it was so easy to blend!

Aha, and here's a happy accident: if you dry-brush a very bright teal over the bare wood pieces, they look almost exactly like copper verdigris:

Right?
I was only experimenting here, so all three are a little different and far from perfect. I found it works best with full paint - not watered down - on an almost completely dry brush, and then press down hard as you swipe across. I think this verdigris would look amazing mixed in with some bare pieces, for a little pop of color. So just the center butterfly in verdigris, and the other two natural.
I plan to make more of these, because again, they're so easy to do, and super fun to customize. I keep thinking of new combinations I want to try! Next I'd like to make layered pins, something like this:
I plan to make more of these, because again, they're so easy to do, and super fun to customize. I keep thinking of new combinations I want to try! Next I'd like to make layered pins, something like this:


But for now I'll leave you with more of the rainbow rose necklace, because of course it's my favorite:

This was my first go at blending these colors, too! It really is that easy.

Last thing: be sure to clear coat your pieces before wearing them, since I noticed the blackened edges transferred a little ashy dust on my fingers. I plan to use a matte Mod Podge to seal them, but a spray lacquer might be even better with all those tiny gaps.
I hope this inspires you to make some pretty things! I know when I get stuck in a creative rut I need these kind of easy-win projects to get me moving again: something I don't have to think too hard about it, and that won't overwhelm me with choices.
If you do give these a try, PLEASE show me what you come up with! I wanna see!
****
Edited To Add: Several of you asked for a pic of me wearing one of these for scale, so here ya go:

They're not as big as you think; really the perfect size for a statement necklace.
*****
P.S. If you use Amazon and want to browse some of my favorite things, be sure to bookmark the Amazon Epbot shop! I have over a dozen lists of everything from the dresses I wear to the ridiculous stuff I link on Cake Wrecks, like wine condoms and toy dumpster fires, ha.

As always anything you purchase through my Amazon links - whether they're on my lists or not - gives a little back to me and John, so thanks for helping support Epbot while you shop. It's appreciated more than you know. ::MWAH::


Is it still cool to squee? Because I think I'm going to take this opportunity to squee.
ReplyDeleteHeck yes, squee away!
DeleteAbsolutely stunning! I imagine these are quite lightweight, which is rare in big bold statement pieces. I get migraines from weight on my neck, so... hello, Dollar Tree!
ReplyDeleteYes! I should have mentioned that part: they weigh practically nothing! So the only weight is from your chain, which you could easily swap for lightweight cord.
Deleteooh, that rose one! would be perfect for my Belle bounds!! 💙
ReplyDeleteI love the jewelry you all made! I am thinking about making some of these to decorate some very boring curtains in my new house. Would you mind sharing what lind of paint you used, please?
ReplyDeleteI used good ol' acrylic craft paints: the kind in small bottles you find at JoAnn's or Walmart. Those are usually matte/flat, which is nice, since I'm not sure what kind of sheen you'd get with a watered-down satin or gloss.
DeleteYou could probably get some lovely stained glass kind of vibes with these, either with resin or good old fashioned modgepodged tissue paper.
ReplyDeleteohhhh must try!
DeleteOoo...what about hairclips? Maybe glue a couple of these to a felt backing and then glue that to one of those metal hairclip blanks?
ReplyDeleteI don't wear jewelry, but I *really* want to try doing this in a frame for some 3D-ish art.
ReplyDeletegorgeous
ReplyDeleteOoh so lovely!! If you layered some iridescent or holo acetate behind these, you could make such pretty suncatchers!
ReplyDeleteThis comment has been removed by the author.
ReplyDeleteI work in polymer clay, and those are perfect for stamps and background impressions! And I'll only need one of each piece that way.
ReplyDeleteI couldn't find any in my local Dollar Tree. Really bummed because I was looking forward to crafting/beading with them.
ReplyDeleteHave you ever cut balsa wood or chipwood with the Cricut? I got some balsa wood for my birthday, but I don’t know what to make!
ReplyDeleteA-MAZ-ING *heart eyes and grabby hands*
ReplyDeleteI love the things you can make from Dollar Tree stuff. My current love is a hanging planter made from their "galvanized" flowers and garden bucket/planter and the planter hanger chain. You can punch holes in the metal with a crop-a-dile because it's so thin. I did line it with one of their clear plant saucers that come in packs of six, I just had to cut off the lip with scissors. Sooo, fancy hanging planter $2.17 (if you count the liner).
ReplyDeleteSadly (luckily?), none of my local Dollar Tree stores has a craft supply department. I saw these and immediately thought of how well they would work on wreaths! (Would the flowers combine nicely with the butterflies? Someone should experiment FOR SCIENCE!)
ReplyDeleteGood idea. How would you attach them to a wreath?
DeleteCan you tell me where you got these from I cannot find them anywhere. I own a laser engraver and would love to make my own.. maybe smaller.
ReplyDeleteThese came from Dollar Tree's craft section, but apparently they're not consistently stocked, so they can be hard to find. So much easier to buy these for a dollar than cutting your own, though!
DeleteI wonder how using something like a copic marker would work? It would do the staining effect and you'd be able to be more precise
ReplyDelete